Save/print/download your spreadsheet
-
operazioni con file
-
salvare file
-
Salvare, scaricare, stampare documento
-
Salvare, stampare, scaricare presentazione
-
Salvare, stampare, scaricare foglio di calcolo
-
Save, export, print your document
-
Save, export, print your spreadsheet
-
Save and export your presentation
-
Download and print your document
-
Download and print your spreadsheet
-
stampare file
-
Salvare, scaricare, stampare documento
-
Salvare, stampare, scaricare presentazione
-
Salvare, stampare, scaricare foglio di calcolo
-
Save, export, print your document
-
Save, export, print your spreadsheet
-
Print your presentation
-
Download and print your document
-
Download and print your spreadsheet
-
orientamento pagina
-
dimensioni pagina
-
margini pagina
Saving
By default, online Spreadsheet Editor automatically saves your file each 2 seconds when you work on it preventing your data loss in case of the unexpected program closing. If you co-edit the file in the Fast mode, the timer requests for updates 25 times a second and saves the changes if they have been made. When the file is being co-edited in the Strict mode, changes are automatically saved at 10-minute intervals. If you need, you can easily select the preferred co-editing mode or disable the Autosave feature on the Advanced Settings page.
To save your current spreadsheet manually in the current format and location,
- click the Save icon in the left part of the editor header, or
- use the Ctrl+S key combination, or
- click the File tab of the top toolbar and select the Save option.
Note: in the desktop version, to prevent data loss in case of the unexpected program closing you can turn on the Autorecover option at the Advanced Settings page.
In the desktop version, you can save the spreadsheet with another name, in a new location or format,
- click the File tab of the top toolbar,
- select the Save as... option,
- choose one of the available formats depending on your needs: XLSX, ODS, CSV, PDF, PDF/A. You can also choose the Spreadsheet template (XLTX or OTS) option.
Downloading
In the online version, you can download the resulting spreadsheet onto your computer hard disk drive,
- click the File tab of the top toolbar,
- select the Download as... option,
- choose one of the available formats depending on your needs: XLSX, PDF, ODS, CSV, XLTX, PDF/A, OTS.
Note: if you select the CSV format, all features (font formatting, formulas etc.) except the plain text will not be preserved in the CSV file. If you continue saving, the Choose CSV Options window will open. By default, Unicode (UTF-8) is used as the Encoding type. The default Delimiter is comma (,), but the following options are also available: semicolon (;), colon (:), Tab, Space and Other (this option allows you to set a custom delimiter character).
Saving a copy
In the online version, you can save a copy of the file on your portal,
- click the File tab of the top toolbar,
- select the Save Copy as... option,
- choose one of the available formats depending on your needs: XLSX, PDF, ODS, CSV, XLTX, PDF/A, OTS,
- select a location of the file on the portal and press Save.
Printing
To print out the current spreadsheet,
- click the Print icon in the left part of the editor header, or
- use the Ctrl+P key combination, or
- click the File tab of the top toolbar and select the Print option.
The Print Settings window will open, where you can change the default print settings. Click the Show Details button at the bottom of the window to display all the parameters.
Note: you can also adjust the print settings on the Advanced Settings... page: click the File tab of the top toolbar and follow Advanced Settings... >> Page Settings.
Some of these settings (page Margins, Orientation, Size, Print Area as well as Scale to Fit) are also available at the Layout tab of the top toolbar.
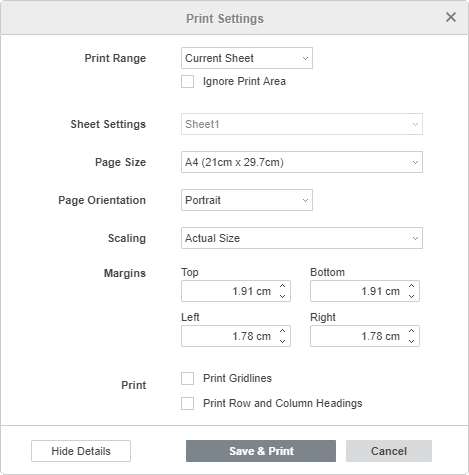
Here you can adjust the following parameters:
- Print Range - specify what to print: the whole Current Sheet, All Sheets of your spreadsheet or previously selected range of cells (Selection),
If you previously set a constant print area but want to print the entire sheet, check the Ignore Print Area box.
- Sheet Settings - specify individual print settings for each separate sheet, if you have selected the All Sheets option in the Print Range drop-down list,
- Page Size - select one of the available sizes from the drop-down list:
- US Letter (21,59cm x 27,94cm)
- US Legal (21,59cm x 35,56cm)
- A4 (21cm x 29,7cm)
- A5 (14,81cm x 20,99cm)
- B5 (17,6cm x 25,01cm)
- Envelope #10 (10,48cm x 24,13cm)
- Envelope DL (11,01cm x 22,01cm)
- Tabloid (27,94cm x 43,17cm)
- AЗ (29,7cm x 42,01cm)
- Tabloid Oversize (29,69cm x 45,72cm)
- ROC 16K (19,68cm x 27,3cm)
- Envelope Choukei 3 (12cm x 23,5cm)
- Super B/A3 (30,5cm x 48,7cm)
- Page Orientation - choose the Portrait option if you wish to print vertically on the page, or use the Landscape option to print horizontally,
- Scaling - if you do not want some columns or rows to be printed on a second page, you can shrink sheet contents to fit it on one page selecting the corresponding option: Fit Sheet on One Page, Fit All Columns on One Page or Fit All Rows on One Page. Leave the Actual Size option to print the sheet without adjusting.
If you choose the Custom Options item from the menu, the Scale Settings window opens:
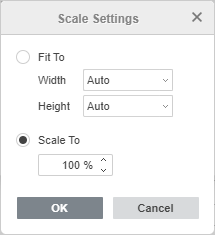
- Fit To: allows to select the necessary number of pages you want to fit the printed worksheet to. Select the necessary number of pages from the Width and Height lists.
- Scale To: allows to enlarge or reduce the scale of the worksheet to fit printed pages by manually specifying the percentage of normal size.
- Margins - specify the distance between the worksheet data and the edges of the printed page changing the default sizes in the Top, Bottom, Left and Right fields,
- Print - specify the worksheet elements to print checking the corresponding boxes: Print Gridlines and Print Row and Column Headings.
In the desktop version, the file will be printed directly. In the online version, a PDF file will be generated on the basis of the document. You can open and print it out, or save onto your computer hard disk drive or removable medium to print it out later. Some browsers (e.g. Chrome and Opera) support direct printing.
Setting up a print area
If you want to print a selected cell range only instead of an entire worksheet, you can use the Selection option from the Print Range drop-down list. When the workbook is saved, this setting is not saved, it is intended for single use.
If a cell range should be printed frequently, you can set a constant print area on the worksheet. When the workbook is saved, the print area is also saved, it can be used when you open the spreadsheet next time. It's also possible to set several constant print areas on a sheet, in this case each area will be printed on a separate page.
To set a print area:
- select the necessary cell range on the worksheet. To select multiple cell ranges, hold down the Ctrl key,
- switch to the Layout tab of the top toolbar,
- click the arrow next to the Print Area button and select the Set Print Area option.
The created print area is saved when the workbook is saved. When you open the file next time, the specified print area will be printed.
Note: when you create a print area, a Print_Area named range is also automatically created, which is displayed in the Name Manager. To highlight the borders of all the print areas on the current worksheet, you can click the arrow in the name box located to the left of the the formula bar and select the Print_Area name from the name list.
To add cells to a print area:
- open the necessary worksheet where the print area is added,
- select the necessary cell range on the worksheet,
- switch to the Layout tab of the top toolbar,
- click the arrow next to the Print Area button and select the Add to Print Area option.
A new print area will be added. Each print area will be printed on a separate page.
To remove a print area:
- open the necessary worksheet where the print area is added,
- switch to the Layout tab of the top toolbar,
- click the arrow next to the Print Area button and select the Clear Print Area option.
All the existing print areas on this sheet will be removed. Then the entire sheet will be printed.
Alla pagina precedente