Creating a Table of Contents
A table of contents contains a list of all the chapters (sections, etc.) in a document and displays the numbers of the pages where each chapter begins. In the Document Editor, it allows easily navigating through a multipage document and quickly switching to the required part of the text. The table of contents is generated automatically on the basis of the document headings, formatted using built-in styles. This makes it easy to update the created table of contents without having to edit the headings and change the page numbers manually if the text of the document has been changed.
Heading structure in the table of contents
Format headings
First, format the headings in your document using one of the predefined styles. To do that,
- Select the text you want to include into the table of contents.
- Open the style menu on the right side of the Home tab at the top toolbar.
-
Click the required style to be applied. By default, you can use the Heading 1 - Heading 9 styles.
If you want to use other styles (e.g., Title, Subtitle etc.) to format headings, you will need to adjust the table of contents settings first (see the corresponding section below). To learn more about available formatting styles, please refer to this page.
To add text as a heading quickly,
- Select the text you want to include into the table of contents.
- Go to the References tab at the top toolbar.
- Click the Add text button at the top toolbar.
- Choose the required heading level.
Manage headings
Once the headings are formatted, you can click the  Headings icon on the left sidebar to open the panel that displays the list of all headings with corresponding nesting levels. This panel allows easily navigating between headings in the document text as well as managing the heading structure.
Right-click on a heading in the list and use one of the available options from the menu:
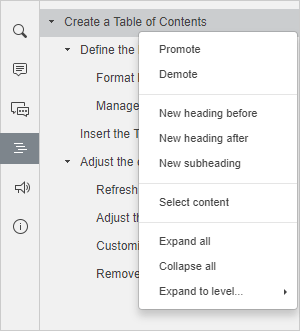
- Promote - to move the currently selected heading up to the higher level in the hierarchical structure, e.g. change it from Heading 2 to Heading 1.
- Demote - to move the currently selected heading down to the lower level in the hierarchical structure, e.g. change it from Heading 1 to Heading 2.
- New heading before - to add a new empty heading of the same level before the currently selected one.
- New heading after - to add a new empty heading of the same level after the currently selected one.
- New subheading - to add a new empty subheading (i.e., a heading with lower level) after the currently selected heading.
When the heading or subheading is added, click on the added empty heading in the list and type in your own text. This can be done both in the document text and on the Headings panel itself.
- Select content - to select the text below the current heading in the document (including the text related to all subheadings of this heading).
- Expand all - to expand all levels of headings at the Headings panel.
- Collapse all - to collapse all levels of headings, excepting level 1, at the Headings panel.
- Expand to level - to expand the heading structure to the selected level. E.g. if you select level 3, then levels 1, 2 and 3 will be expanded, while level 4 and all lower levels will be collapsed.
To manually expand or collapse separate heading levels, use the arrows to the left of the headings.
To close the Headings panel, click the Headings icon on the left sidebar once again.
Insert a Table of Contents into the document
To insert a table of contents into your document:
- Position the insertion point where the table of contents should be added.
- Switch to the References tab of the top toolbar.
-
Click the
 Table of Contents icon on the top toolbar, or
click the arrow next to this icon and select the necessary layout option from the menu. You can select the table of contents that displays headings, page numbers and leaders, or headings only.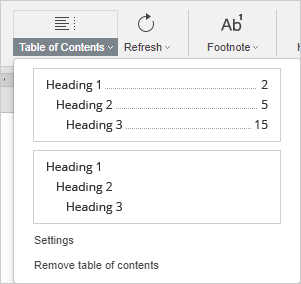
The table of contents appearance can be adjusted later in the settings.
The table of contents will be added at the current cursor position. To change its position, you can select the table of contents field (content control) and simply drag it to the desired place. To do that, click the  button in the upper left corner of the table of contents field and drag it without releasing the mouse button to another position in the document text.
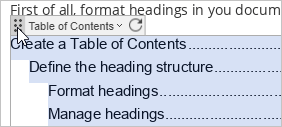
To navigate between headings, press the Ctrl key and click the necessary heading within the table of contents field. You will go to the corresponding page.
Adjust the created Table of Contents
Refresh the Table of Contents
After the table of contents is created, you can continue editing your text by adding new chapters, changing their order, removing some paragraphs, or expanding the text related to a heading so that the page numbers that correspond to the previous or the following section may change. In this case, use the Refresh option to automatically apply all changes.
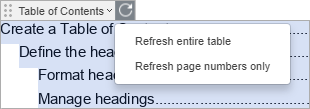
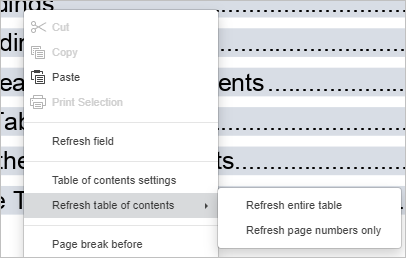
Click the arrow next to the  Refresh icon on the References tab of the top toolbar and select the necessary option from the menu:
- Refresh entire table - to add the headings that you added to the document, remove the ones you deleted from the document, update the edited (renamed) headings as well as update page numbers.
- Refresh page numbers only - to update page numbers without applying changes to the headings.
Alternatively, you can select the table of contents in the document text and click the  Refresh icon at the top of the table of contents field to display the above-mentioned options.
It's also possible to right-click anywhere within the table of contents and use the corresponding options from the contextual menu.
Adjust the Table of Contents settings
To open the table of contents settings, you can proceed in the following ways:
- Click the arrow next to the Table of Contents icon on the top toolbar and select the Settings option from the menu.
-
Select the table of contents in the document text, click the arrow next to its field title, and select the Settings option from the menu.
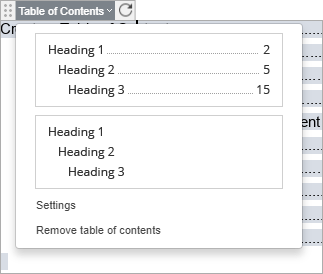
- Right-click anywhere within the table of contents and use the Table of contents settings option from the contextual menu.
A new window will open, and you will be able to adjust the following settings:
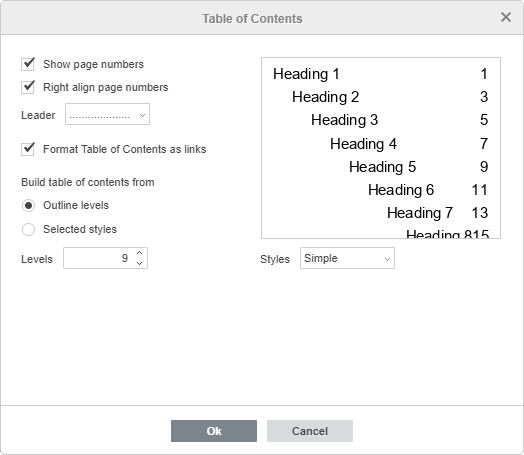
- Show page numbers - this option allows displaying the page numbers.
- Right align page numbers - this option allows aligning the page numbers on the right side of the page.
- Leader - this option allows choosing the required leader type. A leader is a line of characters (dots or hyphens) that fills the space between a heading and the corresponding page number. It's also possible to select the None option if you do not want to use leaders.
- Format Table of Contents as links - this option is checked by default. If you uncheck it, you will not be able to switch to the necessary chapter by pressing Ctrl and clicking the corresponding heading.
- Build table of contents from - this section allows specifying the necessary number of outline levels as well as the default styles that will be used to create the table of contents. Check the necessary radio button:
- Outline levels - when this option is selected, you will be able to adjust the number of hierarchical levels used. Click the arrows in the Levels field to decrease or increase the number of levels (the values from 1 to 9 are available). E.g., if you select the value of 3, headings that have levels 4 - 9 will not be included into the table of contents.
- Selected styles - when this option is selected, you can specify additional styles that can be used to build the table of contents and assign the corresponding outline level to each of them. Specify the desired level value in the field on the right of the style. Once you save the settings, you will be able to use this style when creating a table of contents.
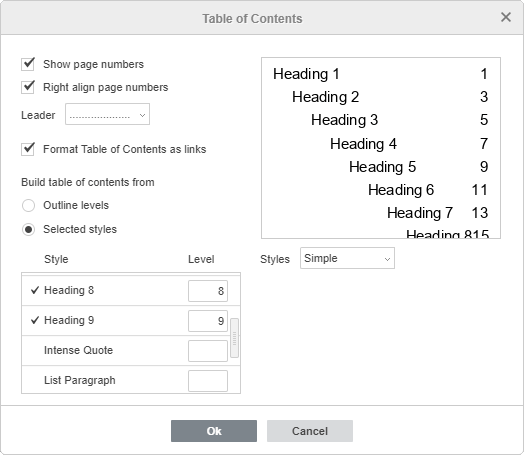
- Styles - this options allows selecting the desired appearance of the table of contents. Select the necessary style from the drop-down list. The preview field above displays how the table of contents should look like.
The following four default styles are available: Simple, Standard, Modern, Classic. The Current option is used if you customize the table of contents style.
Click the OK button within the settings window to apply the changes.
Customize the Table of Contents style
After you apply one of the default table of contents styles within the Table of Contents settings window, you can additionally modify this style so that the text within the table of contents field looks like you need.
- Select the text within the table of contents field, e.g., pressing the button in the upper left corner of the table of contents content control.
- Format table of contents items changing their font type, size, color or applying the font decoration styles.
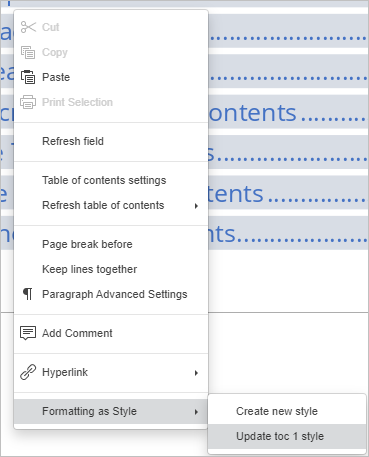
-
Consequently, update styles for items of each level. To update the style, right-click the formatted item, select the Formatting as Style option from the contextual menu and click the Update toc N style option (toc 2 style corresponds to items that have level 2, toc 3 style corresponds to items with level 3 and so on).
- Refresh the table of contents.
Remove the Table of Contents
To remove the table of contents from the document:
- click the arrow next to the Table of Contents icon on the top toolbar and use the Remove table of contents option,
- or click the arrow next to the table of contents content control title and use the Remove table of contents option.