Apply formatting styles
-
font formatting
-
Mail. Getting Started
-
Set font type, size, and color
-
Set font type, size, style, and colors
-
Set font type, size, and color
-
Apply font decoration styles
-
Add hyperlinks
-
Set font type, size, and color
-
Add hyperlinks
-
Set font type, size, and color
-
Apply font decoration styles
-
Add hyperlinks
-
Set font type, size, and color
-
Apply font decoration styles
-
Add hyperlinks
-
Set font type, size, and color
-
Add hyperlinks
-
Set font type, size, and color
-
Apply font decoration styles
-
Add hyperlinks
-
Set font type, size, and color
-
Apply font decoration styles
-
Add hyperlinks
-
Set font type, size, and color
-
Add hyperlinks
-
Set font type, size, and color
-
Apply font decoration styles
-
Set font type, size, and color
-
Apply font decoration styles
-
Add hyperlinks
-
Set font type, size, and color
-
Add hyperlinks
-
Set font type, size, and color
-
Apply font decoration styles
-
Add hyperlinks
-
predefined styles
Each formatting style is a set of predefined formatting options: (font size, color, line spacing, alignment etc.). The styles in the Document Editor allow you to quickly format different parts of the document (headings, subheadings, lists, normal text, quotes) instead of applying several formatting options individually each time. This also ensures the consistent appearance of the whole document.
You can also use styles to create a table of contents or a table of figures.
Applying a style depends on whether this style is a paragraph style (normal, no spacing, headings, list paragraph etc.), or a text style (based on the font type, size, color). It also depends on whether a text passage is selected, or the mouse cursor is placed on a word. In some cases you might need to select the required style from the style library twice, so that it can be applied correctly: when you click the style in the style panel for the first time, the paragraph style properties are applied. When you click it for the second time, the text properties are applied.
Use default styles
To apply one of the available text formatting styles,
- place the cursor within the required paragraph, or select several paragraphs,
- select the required style from the style gallery on the right on the Home tab of the top toolbar.
The following formatting styles are available: normal, no spacing, heading 1-9, title, subtitle, quote, intense quote, list paragraph, footer, header, footnote text.

Edit existing styles and create new ones
To change an existing style:
- Apply the necessary style to a paragraph.
- Select the paragraph text and change all the formatting parameters you need.
- Save the changes made:
- right-click the edited text, select the Formatting as Style option and then choose the Update 'StyleName' Style option ('StyleName' corresponds to the style you've applied at the step 1),
- or select the edited text passage with the mouse, drop-down the style gallery, right-click the style you want to change and select the Update from selection option.
Once the style is modified, all the paragraphs in the document formatted with this style will change their appearance correspondingly.
To create a completely new style:
- Format a text passage as you need.
- Select an appropriate way to save the style:
- right-click the edited text, select the Formatting as Style option and then choose the Create new Style option,
- or select the edited text passage with the mouse, drop-down the style gallery and click the New style from selection option.
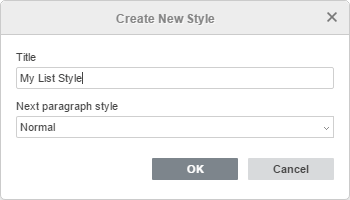
- Set the new style parameters in the opened Create New Style window:

- Specify the new style name in the text entry field.
- Select the desired style for the subsequent paragraph from the Next paragraph style list. It's also possible to choose the Same as created new style option.
- Click the OK button.
The created style will be added to the style gallery.
Manage your custom styles:
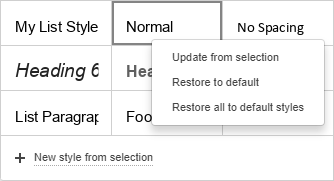
- To restore the default settings of a certain style you've changed, right-click the style you want to restore and select the Restore to default option.
- To restore the default settings of all the styles you've changed, right-click any default style in the style gallery and select the Restore all to default styles option.

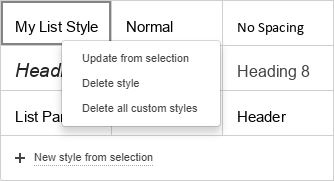
- To delete one of the new styles you've created, right-click the style you want to delete and select the Delete style option.
- To delete all the new styles you've created, right-click any new style you've created and select the Delete all custom styles option.

Return to previous page