To control each step of collaboration, admins in ONLYOFFICE DocSpace can perform various operations with the existing rooms: sort and filter the room list to easily find the necessary room, pin some important rooms to the top of the list, move old rooms to the archive, edit the room info, add new members, resend invitations, change the active user permission levels or remove users from the room.
As for managing rooms in DocSpace, the available actions differ depending on the user type:
| Section\User type |
Owner |
DocSpace admin |
Room admin |
User |
Guest |
| Documents |
|
|
|
|
|
| Creating, uploading, moving, copying, renaming, downloading, deleting files and folders |
|
|
|
|
|
| Rooms |
|
|
|
|
|
| Viewing all rooms |
|
|
|
|
|
| Viewing own rooms |
|
|
|
|
|
| Viewing rooms the user is invited to |
|
|
|
|
|
| Creating and editing rooms |
|
|
|
|
|
| Pinning rooms to top |
|
|
|
|
|
| Viewing room info (contacts, history, details) |
|
|
|
|
|
| Inviting external users (guests) to a room |
|
|
|
|
|
| Inviting internal users to a room |
|
|
|
|
|
| Assigning permission levels of own room members |
|
|
|
|
|
| Changing permission levels of own room members |
|
|
|
|
|
| Removing users from own room |
|
|
|
|
|
| Archiving own rooms |
|
|
|
|
|
| Creating a copy of own room |
|
|
|
|
|
| Creating a copy of someone else's room |
|
|
|
|
|
| Editing someone else's rooms: inviting users, assigning and changing permission levels of the room members, removing users from the room |
|
|
|
|
|
| Viewing links of someone else's public room |
|
|
|
|
|
| Changing the owner of someone else's room |
|
|
|
|
|
| Archiving someone else's room |
|
|
|
|
|
| Archive |
|
|
|
|
|
| Viewing all archived rooms |
|
|
|
|
|
| Viewing own archived rooms |
|
|
|
|
|
| Viewing archived rooms the user is invited to |
|
|
|
|
|
| Editing archived rooms |
|
|
|
|
|
| Pinning archived rooms to top |
|
|
|
|
|
| Viewing archived room info (contacts, history, details) |
|
|
|
|
|
| Inviting users to an archived room, assigning and changing permission levels of members |
|
|
|
|
|
| Restoring, copying, or removing someone else's archived rooms |
|
|
|
|
|
| Restoring, copying, or removing own archived rooms |
|
|
|
|
|
Operations in the room list
Using tools on the top toolbar, you can perform the following operations:
- Search for a room name using the search bar at the top of the room list.
- Filter rooms by member or owner, type (Public room, Form room, Collaboration, Virtual Data Room, Custom), the existing tags, third-party resources using the
 button. Select the necessary filter parameters and click Apply. To clear the filter, use the
  icon in the upper right corner.
- Sort rooms by parameters (Name, Type, Tags, Owner, Last activity date, Storage) using the
 button. Click the arrow next to the selected parameter to change the sort order.
- Switch between the available display modes (Thumbnails or Compact) using the
 or
or  button.
- Use the
 icon to display or hide the Type, Tags, Owner, Last activity, Storage / Quota columns in the room list (Compact view).
Using the top panel that appears when one or several rooms are selected in the list, you can perform the following operations:
- Select rooms by type (All, Public, Form room, Virtual Data Room, Custom, Collaboration) using the
 icon.
icon.
- Pin/unpin the selected room(s) to top.
- Move the selected room(s) to the archive.
- Change a quota per room.
- Set a custom quota to the default value.
- Disable the quota.
- View info about the single selected room using the
 icon.
icon.
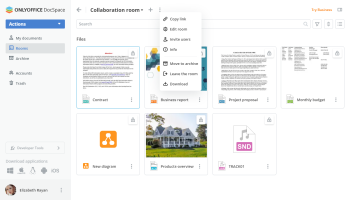
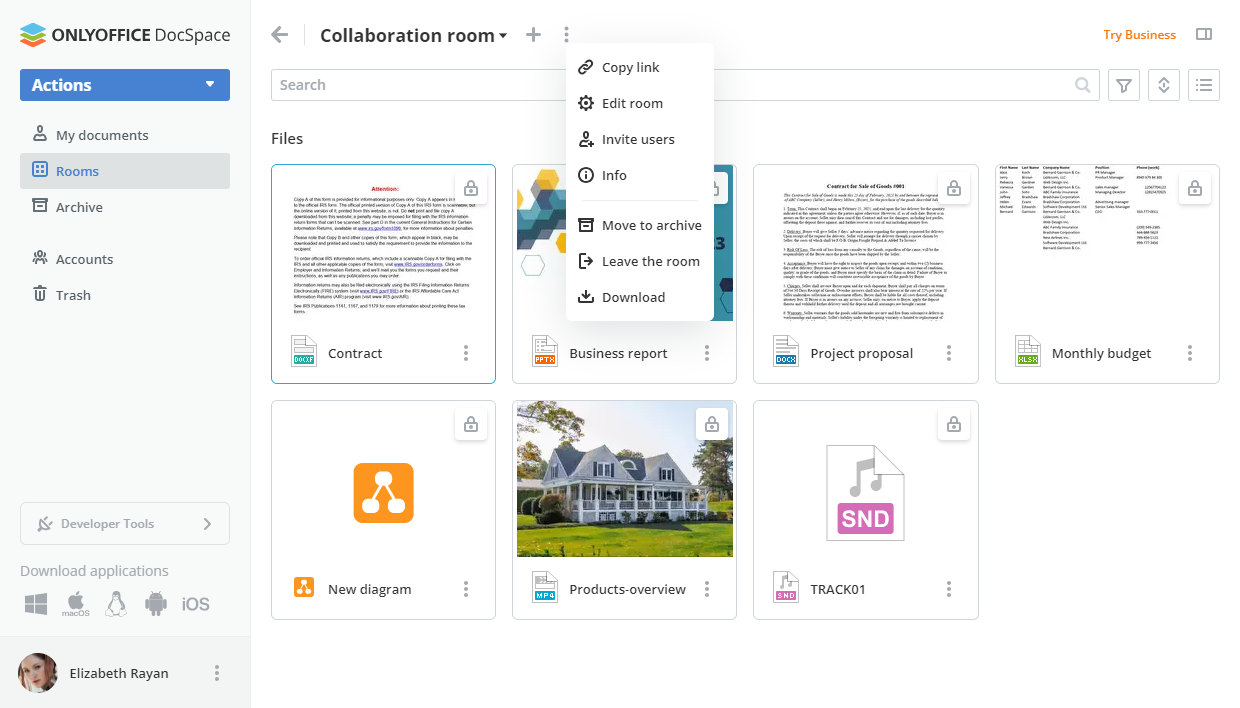
Using the right-click menu or the  icon next to the room name, you can perform the following actions:
 Select – to select the room in the list. When the room is selected, you can Pin/Unpin it or move to archive using the top toolbar options or view info using the icon.
 Open – to open the room.
 Edit room – to rename the room, add tags or an image, change the room owner.
 Invite contacts – to send invitations to users or guests.
 Copy shared link – to copy a link to the public or custom room. The contents of the room accessed via this link will be available for viewing without authorization.
- Copy link – to copy a link to the collaboration room for room members.
 Info – to view the following information: Contacts (Administration, Users, Expected users), History (Recent activities), Details (Owner, Type, Content, Date modified, Last modified by, Creation date).
The
Contacts screen also allows you to add new members, resend invitations, change the active user permission levels or remove a user from the room.
For a Public room, you can also copy or edit the shared link which is available by default, revoke the shared link (the current link will be deactivated and a new shared link will be created), create additional links with different parameters. For a Custom room, you can create shared and additional links, if necessary.
 Pin to top – to display the room on the top of the list. You can unpin the pinned room clicking the
  icon or using the Unpin option in the menu.
 Disable notifications – to disable notifications for this room. You can re-enable notifications using the
  Enable notifications option in the menu.
 Embed – to embed the room available via a public link.
 Export room index – to export the index for the Virtual Data Room. The
 xlsx file with a summary report on the file structure of the room will be exported to the 'Documents' section. Duplicate – to duplicate the room. When duplicating rooms, the icon and tags are copied, users are deleted. Duplicated rooms have an index at the end of the name.
 Download – to download the room.
 Change the Room Owner – to change the room owner.
 Move to archive – to archive the room. Archived rooms can be restored or deleted.
 Leave the room – to leave the room. If you are the room owner, you will need to assign another owner first.
 Restore – to restore the archived room.
 Delete – to permanently delete the archived room.
Using the right-click menu in the Storage / Quota column next to the room name, you can perform the following actions:
- Change quota (if the default quota is enabled) – to set a custom quota per room.
- Set to default (if the default quota is enabled and changed) – to set a custom quota to the default value.
- Disable quota (if the default quota is enabled) – to disable the quota.
Operations within the room
When you open a room by clicking its name in the list, you can use the top toolbar to perform the following actions:
- Return to the room list using the
 arrow.
- Create new documents, spreadsheets, presentations, PDF forms, folders using the
 Plus icon. In a form filling room, you can upload PDF form from DocSpace, from device, choose from templates.
- Manage the room using the icon:
- Edit room – to rename the room, add tags or an image, change the room owner.
- Invite contacts – to send invitations to users or guests.
 Copy shared link – to copy a link to the public or custom room. The contents of the room accessed via this link will be available for viewing without authorization.
- Copy link – to copy a link to the collaboration room for room members.
- Info – to view the following information: Contacts (Administration, Users, Expected users), History (Recent activities), Details (Owner, Type, Content, Date modified, Last modified by, Creation date).
The
Contacts screen also allows you to add new members, resend invitations, change the active user permission levels or remove a user from the room.
For a Public room, you can also copy or edit the shared link which is available by default, revoke the shared link (the current link will be deactivated and a new shared link will be created), create additional links with different parameters. For a Custom room, you can create shared and additional links, if necessary.
- Embed – to embed the room available via a public link.
- Export room index – to export the index for the Virtual Data Room. The
xlsx file with a summary report on the file structure of the room will be exported to the 'Documents' section.
- Duplicate – to duplicate the room. When duplicating rooms, the icon and tags are copied, users are deleted. Duplicated rooms have an index at the end of the name.
- Download – to download the room.
 Edit index – to re-order files and remove spaces in the index of the Virtual Data Room. You will be able to use arrows to change the file order manually one by one or use the Reorder option on the top.
- Change the Room Owner – to change the room owner.
- Move to archive – to archive the room. Archived rooms can be restored or deleted.
- Leave the room – to leave the room. If you are the room owner, you will need to assign another owner first.
- Restore – to restore the archived room.
- Delete – to permanently delete the archived room.
- Share the public room or form filling room using the Share room button.
- View info about the room using the icon.
Creating external links for rooms
In a public or custom room, you can create several links with different parameters. The contents of the room accessed via these links will be available for viewing without authorization. For public rooms, the shared link is enabled by default. If you want to get a link for a custom room, you should create a shared link first.
For a form filling room, the link to fill out is enabled by default. This room is available to anyone with the link. External users will have Form Filler permission for all the files.
To create or edit external links:
- In the room menu, use the Info item.
- Switch to the Contacts screen.
- For a public room, proceed to the next step. For a custom room, use the Create and copy option in the Shared links section.
- Click the icon next to the Shared link.
- Choose the Edit link option.
- Change the link name to distinguish various links.
- Set a password to protect the link.
- Turn on the Password access switcher.
- Click the
 icon to generate a password or enter it manually into the corresponding field.
The password must be at least 8 characters long. The following characters are allowed: a-z, A-Z, 0-9, !"#%&'()*+,-./:;<=>?@[]^_`{|}
- To clean the password field, click the Clean button.
- To copy the password to your clipboard for future sharing, click the Copy password button.
- Enable the Restrict file content copy, file download and printing switcher to disable downloads of files and folders from the public or custom room shared via a link.
- To save the changes made to the shared link parameters, click the Save button.
If you need more than one link for a public or custom room, use the Create new link option in the Additional link section. When creating an additional link, you can:
- Set the link name.
- Set a password protection as described above.
- Restrict file content copy, file download and printing.
- Limit availability period for this link by setting an expiration date. Choose the date and time using the date picker.
- Save the link by clicking Create.
The room will be available to anyone with the link. External users will have View Only permission for all the files in a public or custom room and Form Filler permission in a form filling room.
In a public or custom room, you can change the default Viewer link by selecting a different permission level: Editor, Reviewer, or Commentator. To do that:
- In the room menu, use the Info item.
- Switch to the Contacts screen.
- Click the
 icon next to the Shared link.
- Choose the necessary option: Editor, Reviewer, Commentator, Viewer.
The link for the selected permission level will be copied to the clipboard.
Embedding public rooms
You can embed a public room to your website so that the room will be available for viewing without authorization.
- In the public room menu, use the Info item.
- Switch to the Contacts screen.
- Click the icon next to the Shared link.
- Choose the Embedding section option.
- Add the website URL for embedding to the allow list: click the allow list link to switch to the DocSpace Settings -> Developer Tools -> JavaScript SDK -> Enter the address of DocSpace to embed section, paste the link to your website and press the + icon.
- Adjust Display settings: customize the size in the Width and Height fields by entering the required values.
- Select Interface elements: uncheck Title and/or Search, filter and sort if you want to disable these elements.
- Copy the embedded code by clicking the Copy button.
- Insert the copied code into your website's index.html file.
You can upload PDF forms into the form filling room, invite users to fill out a PDF form, review completed forms and analyze data automatically collected in a spreadsheet.
To upload a PDF form to a form filling room:
- click the Actions button in the left upper corner, or the Plus icon.
- select the necessary option:
- select the Upload PDF form -> From DocSpace option, choose the form in the room and click the Select button.
- select the Upload PDF form -> From device option, choose the form in the file manager window and click the Open button.
- select the Choose from Templates option, choose the template and click the Create button.
To copy a link to a form filling room for external users:
- Click the Share room button next to the room name.
- Click the icon next to the room name and use the Copy shared link option.
- Use the Info item, switch to the Contacts screen and click the Copy icon next to the Link to fill out.
Send the copied link for external users. They will have the Form Filler permission.
To review completed forms, use the Complete and In process folders which appear in the room when users start the form filling process.
- The In process folder contains forms which users have started to fill out but haven't yet completed.
- The Complete folder contains forms which users have completed by clicking the Complete and Submit button. The automatically generated spreadsheet with the forms data is also available in this folder.
If the room contains several PDF forms, the Complete and In process folders will include separate subfolders for each form.
Working with Virtual Data rooms
You can use new capabilities for working with data in a Virtual Data room: indexing of data with the ability to change the index and generate a summary report on the file structure of the room, setting the lifetime of files, prohibition on copying and downloading files, setting watermarks.
When creating a new Virtual Data room or editing an existing one, enable the necessary switchers in the room settings panel:
- Automatic indexing - Enable automatic indexing to index files and folders by serial number. Sorting by number will be set as default for all users.
- File lifetime - Set file lifetime to automatically delete the files in this room after a defined period. Lifetime begins on the date of upload/creation of the file.
Set a number of days, months, or years and select the necessary action: Move to trash or Delete permanently.
- Restrict copy and download - Enable this setting to disable downloads and content copying for users with the "Viewer" role.
- Add watermarks to documents - Protect all documents in this room with watermarks. If a document already contains one, it will not be replaced.
You can select the Viewer info option and adjust the following settings for a text watermark:
- Add watermark elements: User Name, User Email, User IP Address, Current date, Room Name.
- Add static text
- Position: Diagonal or Horizontal.
You can select the Image option, upload an image file and adjust the following settings for an image watermark:
- Scale - select the necessary scale value from the available ones: 100%, 200%, 300%, 400%, 500%.
- Rotate - select the necessary value: 0°, 30°, 45°, 60°, 90°.