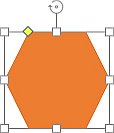
Resize objects
To change the autoshape/image/chart/table size, touch and drag one of the resize handles
 situated on the object edges.
Move objects
To alter the autoshape/image position, touch and drag the object to the necessary position.
When you move an object, guide lines are displayed to help you position the object on the slide precisely.
To move a table, touch and hold the table border and drag the table to a different place on the slide.
Rotate objects
To rotate the autoshape/image, touch the rotation handle
 and drag it clockwise or counterclockwise.
Reshape autoshapes
When modifying some shapes, for example Figured arrows or Callouts, the yellow reshaping handle
 is also available. It allows to adjust some aspects of the shape, for example, the length of the head of an arrow.
Arrange several objects
If you have several objects overlapped you can arrange their order:
- tap the necessary object to select it,
- tap the
 icon at the top toolbar,
- tap the Reorder menu item,
- select the desired arrangement option:
 Bring to Foreground - to move the selected object in front of all other objects,
 Send to Background - to move the selected object behind all other objects,
 Move Forward - to move the selected object by one level forward as related to other objects,
 Move Backward - to move the selected object by one level backward as related to other objects.
Align objects
To align objects on a slide:
- tap the necessary object to select it,
- tap the
icon at the top toolbar,
- tap the Align menu item,
- select the desired alignment option:
 Align Left - to line up the object horizontally by the left side of the slide,
 Align Center - to line up the object horizontally by the center of the slide,
 Align Right - to line up the object horizontally by the right side of the slide,
 Align Top - to line up the object vertically by the top side of the slide,
 Align Middle - to line up the object vertically by the middle of the slide,
 Align Bottom - to line up the object vertically by the bottom side of the slide,
- select the desired distribution type:
 Distribute Horizontally - to align the selected object by its center (from right to left edges) to the horizontal center of the slide,
 Distribute Vertically - to align the selected object by its center (from top to bottom edges) to the vertical center of the slide.