Mattermost

About the ONLYOFFICE and Mattermost integration

ONLYOFFICE offers an official connector to integrate ONLYOFFICE Docs with Mattermost to collaborate on office documents sent in private or group chats. You can download it from the official website or from GitHub. The application is distributed under the Apache license.

To learn more about how it works and how to compile the ONLYOFFICE connector for Mattermost, please visit our API documentation.
Main features
  • View and edit text documents, spreadsheets, and presentations using the Open file in ONLYOFFICE option.
  • Manage access rights (Edit or Read) from the context menu with the Change access rights option.
  • Co-editing documents in real-time: two co-editing modes (Fast and Strict).
  • Live Viewer: users with read-only access can watch real-time document changes made by other editors, including their cursors. Available for server installations only, enabled by default.
  • View the file changes history.
  • Modern Light and Dark interface themes for the editors.
  • Admin notifications when the ONLYOFFICE editor becomes unavailable (Enable health notifications in System Console).
  • Automatic editor reload when the connection is restored.
  • JWT support to secure your traffic so no one besides the users with proper rights has access to your documents.
Supported formats
  • For editing:
    • WORD: DOCM, DOCX, DOTM, DOTX
    • CELL: XLSB, XLSM, XLSX, XLTM, XLTX
    • SLIDE: POTM, POTX, PPSM, PPSX, PPTM, PPTX
    • PDF: PDF
  • For viewing:
    • WORD: DOC, DOCM, DOCX, DOT, DOTM, DOTX, EPUB, FB2, FODT, HML, HTM, HTML, HWP, HWPX, MD, MHT, MHTML, ODT, OTT, PAGES, RTF, STW, SXW, TXT, WPS, WPT, XML
    • CELL: CSV, ET, ETT, FODS, NUMBERS, ODS, OTS, SXC, TSV, XLS, XLSB, XLSM, XLSX, XLT, XLTM, XLTX
    • SLIDE: DPS, DPT, FODP, KEY, ODG, ODP, OTP, POT, POTM, POTX, PPS, PPSM, PPSX, PPT, PPTM, PPTX, SXI
    • PDF: DJVU, OXPS, PDF, XPS
    • DIAGRAM: VSDM, VSDX, VSSM, VSSX, VSTM, VSTX
What's new in version 2.3.0

Added

  • Live Viewer: users with read-only access can now see real-time changes from other editors, including their cursors. Available for server installations only, no additional configuration required.
  • Support for Modern Light and Modern Dark interface themes (View tab → Interface theme → Modern Light / Modern Dark).
  • Admin notifications for editor disconnection via the Enable health notifications option in System Console.
  • Automatic editor reload when the connection is restored.

The full change log is available here.

Connecting ONLYOFFICE Docs to Mattermost

Requirements
  • ONLYOFFICE Document Server v6.4.0 (server or cloud version) or later

    You need an instance of ONLYOFFICE Docs that is resolvable and connectable both from Mattermost and any end clients. It must be able to POST to Mattermost directly.

    Please refer to the official documentation page to learn more about installing ONLYOFFICE Docs.

    ONLYOFFICE Docs and Mattermost can be installed either on different computers, or on the same machine. If you use one machine, set up a custom port for Document Server.

  • Mattermost v. 10.11.0 or later
  • ONLYOFFICE Connector v2.3.0 for Mattermost
Installing the ONLYOFFICE connector for Mattermost

To connect Mattermost, follow these steps:

  1. Install Node.js. Please refer to the installation documentation for further details.
  2. Install Go. Please refer to the installation documentation for further details. The installation steps vary depending on your OS.
  3. Install make:
    sudo apt install make
  4. Clone the plugin branch:
    git clone https://github.com/ONLYOFFICE/onlyoffice-mattermost.git
  5. Go to the project root and fetch git submodules:
    cd onlyoffice-mattermost/
    git submodule update --init --recursive
  6. Start the build:
    make
Configuring the ONLYOFFICE Connector for Mattermost

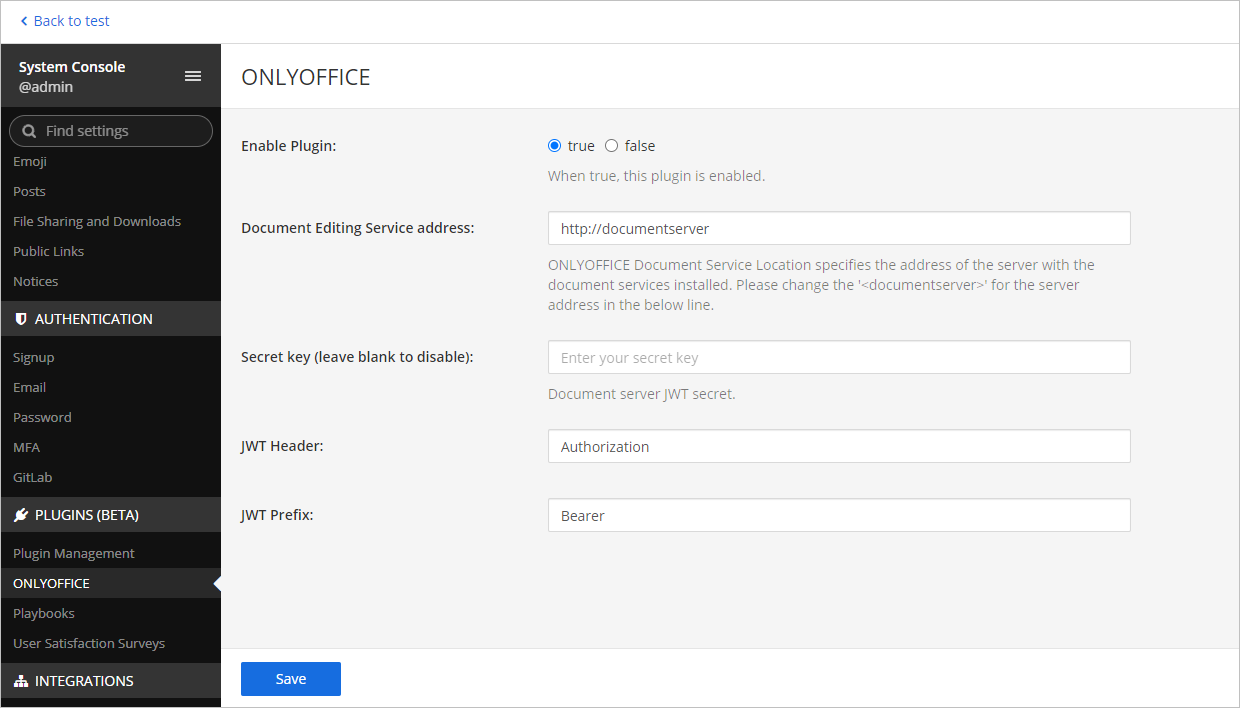
Go to System Console → find the ONLYOFFICE plugin via search → Configure. Enable the plugin in the corresponding field and specify the following parameters:

  1. ONLYOFFICE Docs address — enter the URL address where ONLYOFFICE Docs is installed (e.g., https://documentserver).
    The address of ONLYOFFICE Docs must be accessible from Mattermost, as well as the address of Mattermost must be accessible from ONLYOFFICE Docs.
  2. Document Server JWT Secret — the document server JWT secret used to sign the data.
    Starting from ONLYOFFICE Docs v7.2, JWT is enabled by default and the secret key is generated automatically. You need to enable it on the Mattermost side as well: find your secret key in the ONLYOFFICE Docs configuration file, then specify the same secret key in the connector settings. For more details, see the Enabling JWT for the ONLYOFFICE and Mattermost integration section of this article.
  3. JWT Header — specify the JWT header.
    If JWT protection is enabled, it is necessary to specify a custom header name, since the Mattermost security policy blocks external 'Authorization' Headers. This header should be specified in the ONLYOFFICE Docs signature settings as well (further information can be found here).
  4. JWT Prefix — specify the JWT prefix.
  5. You can also connect to the public test server of ONLYOFFICE Docs for one month by checking the Connection to demo ONLYOFFICE Docs server enabled box.
  6. Formats — select file formats that should be opened in ONLYOFFICE Docs. All formats are enabled by default. Uncheck formats to disable them.
  7. File protection only by owner — when enabled, only file owners can protect/unprotect files via the Protection tab. When disabled, file protection is available to everyone.
  8. Enable ONLYOFFICE plugins — when enabled, users can access the plugins in the editors. When disabled, the plugins are hidden.
  9. Enable macros — when enabled, users can create and run macros in the editors. When disabled, all macro functionality is hidden.
  10. Enable health notifications — enable this option to receive admin notifications when the ONLYOFFICE editor becomes unavailable.
ONLYOFFICE_configuration ONLYOFFICE_configuration
How it works

The user-document interaction is done both at the client side and at the server side.

The main notions used throughout the current documentation are explained below.

The client side includes:

  • Document manager — the list of the documents displayed in the user browser where the user can select the necessary document and perform some actions with it (depending on the provided rights, the user can open the document to view it or edit, share the document with other users).
  • Document editor — the document viewing and editing interface with all the most known document editing features available, used as a medium between the user and the document editing service.

The server side includes:

  • Document storage service — the server service which stores all the documents available to the users with the appropriate access rights. It provides the document IDs and links to these documents to the document manager which the user sees in the browser.
  • Document editing service — the server service which allows performing the document viewing and editing (in case the user has the appropriate rights to do that). The document editor interface is used to access all the document editing service features.
  • Document command service — the server service which allows performing additional commands with document editing service.
  • Document conversion service — the server service which allows converting the document file into the appropriate Office Open XML format (docx for text documents, xlsx for spreadsheets and pptx for presentations) for their editing or downloading.
  • Document builder service — the server service which allows building a document easily without the need to actually run a document processing editor.

Please note, that ONLYOFFICE Document Server includes the document editor, document editing service, document command service, document conversion service and document builder service. The document manager and document storage service are either included in the Community Server or must be implemented by the software integrators which use ONLYOFFICE Document Server on their own server.

Enabling JWT for the ONLYOFFICE and Mattermost integration

To protect documents from unauthorized access, ONLYOFFICE editors use the JSON Web Token (JWT). The token is added in the configuration when the Document Editor is initialized and during the exchange of commands between inner ONLYOFFICE Docs services. The secret key is used to sign the JSON web token and validate the token upon the request to ONLYOFFICE Docs.

Starting from ONLYOFFICE Docs v7.2, JWT is enabled by default and the secret key is generated automatically. You need to find your secret key in the ONLYOFFICE Docs configuration file, then specify the same secret key in the connector settings.

Step 1: Find your secret key in the ONLYOFFICE Docs configuration file

  1. Open the local.json file with any available text editor.
    • For Linux — /etc/onlyoffice/documentserver/local.json
    • For Windows — %ProgramFiles%\ONLYOFFICE\DocumentServer\config\local.json
    • For Docker — enter the ONLYOFFICE Docs container using the docker exec -it <containerID> bash command and open /etc/onlyoffice/documentserver/local.json

      Alternatively, you can use the following command to find the default secret key without opening local.json:

      sudo docker exec <containerID> /var/www/onlyoffice/documentserver/npm/json -f /etc/onlyoffice/documentserver/local.json 'services.CoAuthoring.secret.session.string'

    The local.json file should look like this:

    {
      "services": {
        "CoAuthoring": {
          "token": {
            "enable": {
              "request": {
                "inbox": true,
                "outbox": true
              },
              "browser": true
            }
          },
          "secret": {
            "inbox": {
              "string": "yoursecret"
            },
            "outbox": {
              "string": "yoursecret"
            },
            "session": {
              "string": "yoursecret"
            }
          }
        }
      }
    }
  2. The true value is specified in three sections. It means that token validation is enabled.
    • services.CoAuthoring.token.enable.browser
    • services.CoAuthoring.token.enable.request.inbox
    • services.CoAuthoring.token.enable.request.outbox
  3. The automatically generated secret key is specified in three sections. You can replace the default secret value with your own secret key. The secret key must be the same in three sections.
    • services.CoAuthoring.secret.inbox.string
    • services.CoAuthoring.secret.outbox.string
    • services.CoAuthoring.secret.session.string
  4. If you make changes, save them and restart the services for the config changes to take effect.
    supervisorctl restart all

Step 2: Specify the same secret key in the connector settings

In the connector settings, specify the same secret in the Secret key field and save the settings.

Start using ONLYOFFICE Docs within Mattermost

Viewing and editing files
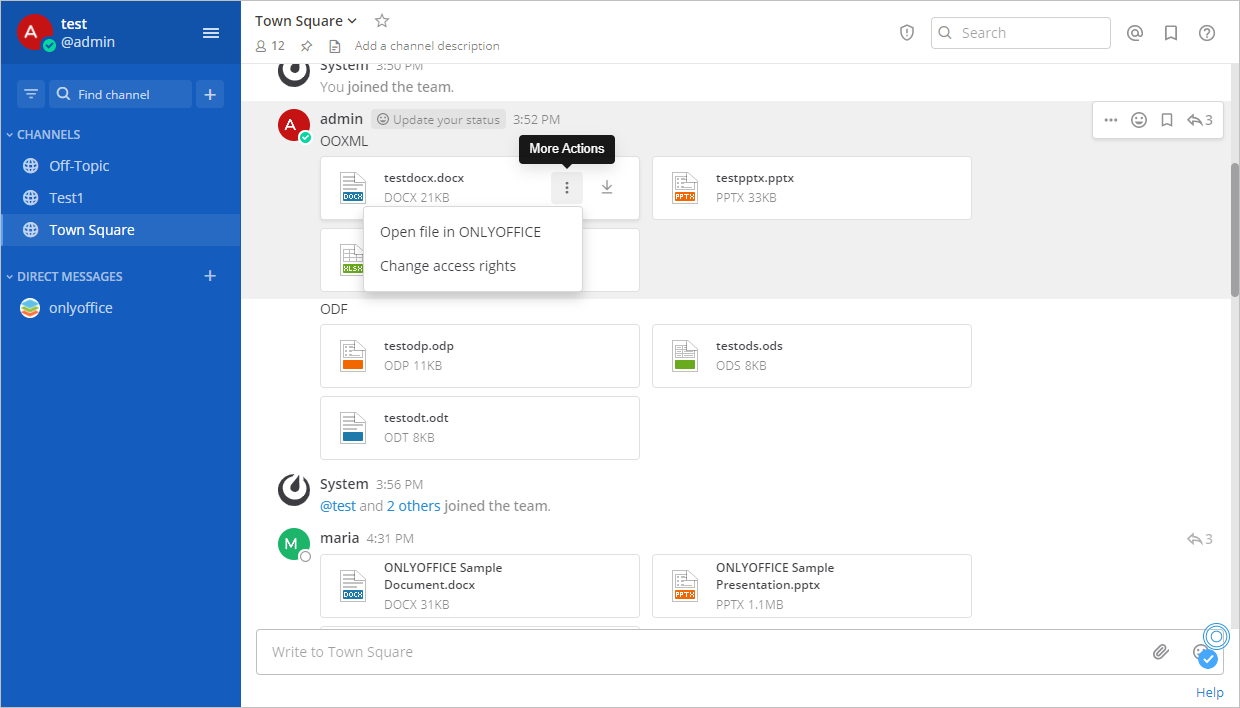
  • Click the More Actions button More Actions button next to a file sent in a Mattermost chat.
  • Choose the Open file in ONLYOFFICE option from the context menu.
    ONLYOFFICE_filemenu ONLYOFFICE_filemenu

or

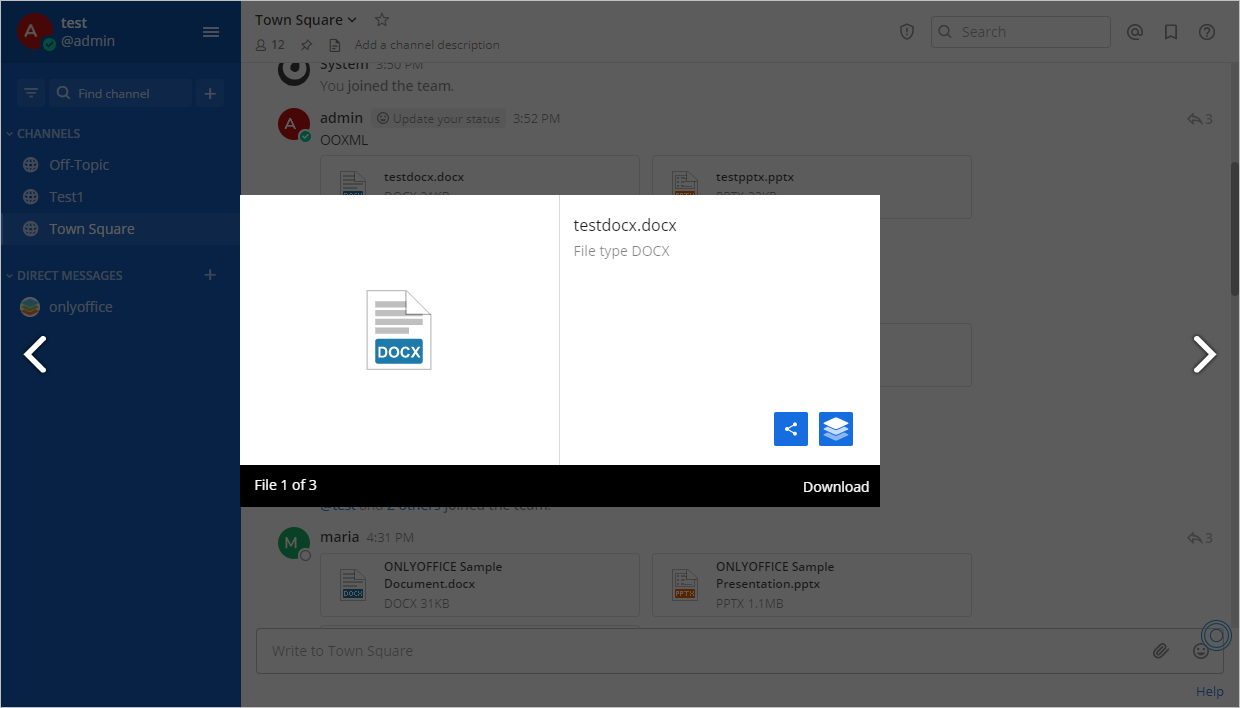
  • Click the file name.
  • The file preview window will appear. To share the file with other users, click the Share button. To proceed with the editing, click the Edit in ONLYOFFICE button.
    ONLYOFFICE_previewfile ONLYOFFICE_previewfile

The file will be opened in the corresponding ONLYOFFICE editor.

Users with read-only access can use the Live Viewer to watch real-time changes made by other editors, including their cursors, without switching to editing mode. The Live Viewer is available for server installations only and is enabled by default — no additional configuration is required. To learn more about the Live Viewer, please refer to the API documentation.

Changing access rights

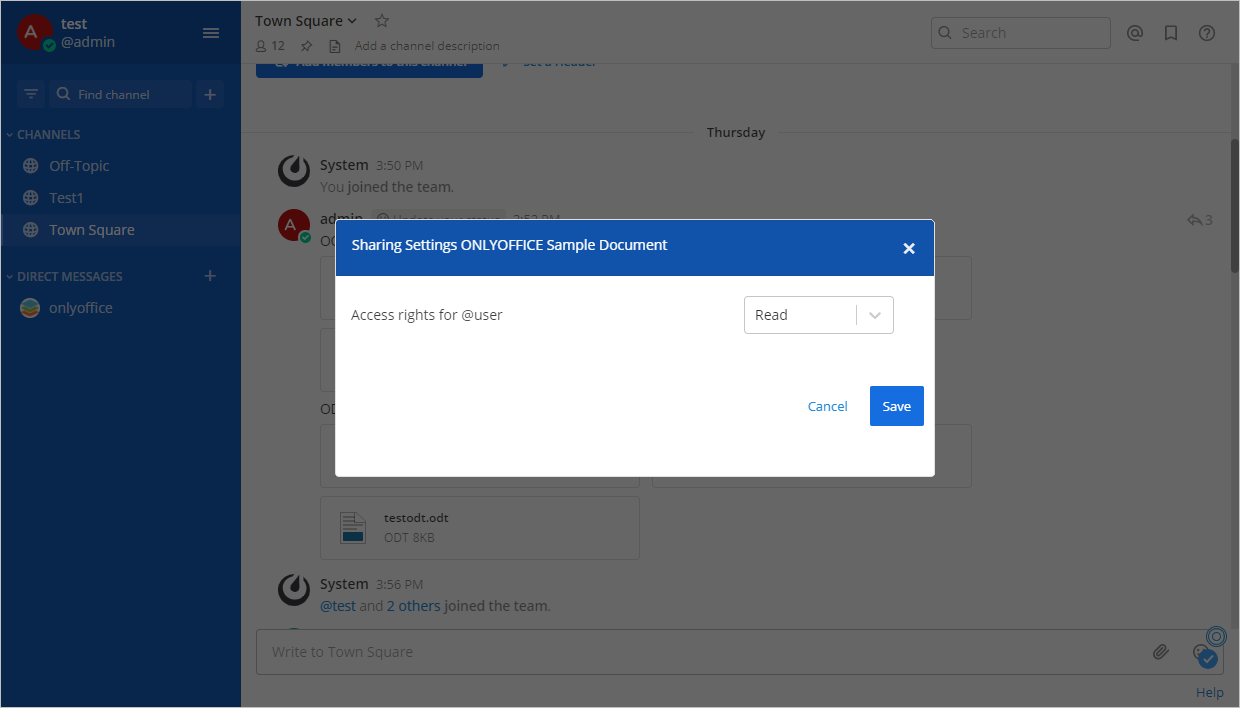
The sender has editing access rights and the recipient has reading access rights by default. To change them, use the Change access rights option available in the file context menu. This option is available only for the sender.

To co-edit a document, the authorized users should open the same file together.

In a private chat:

  • Use the drop-down menu in the Access rights for @user field.
    ONLYOFFICE_privatechat ONLYOFFICE_privatechat

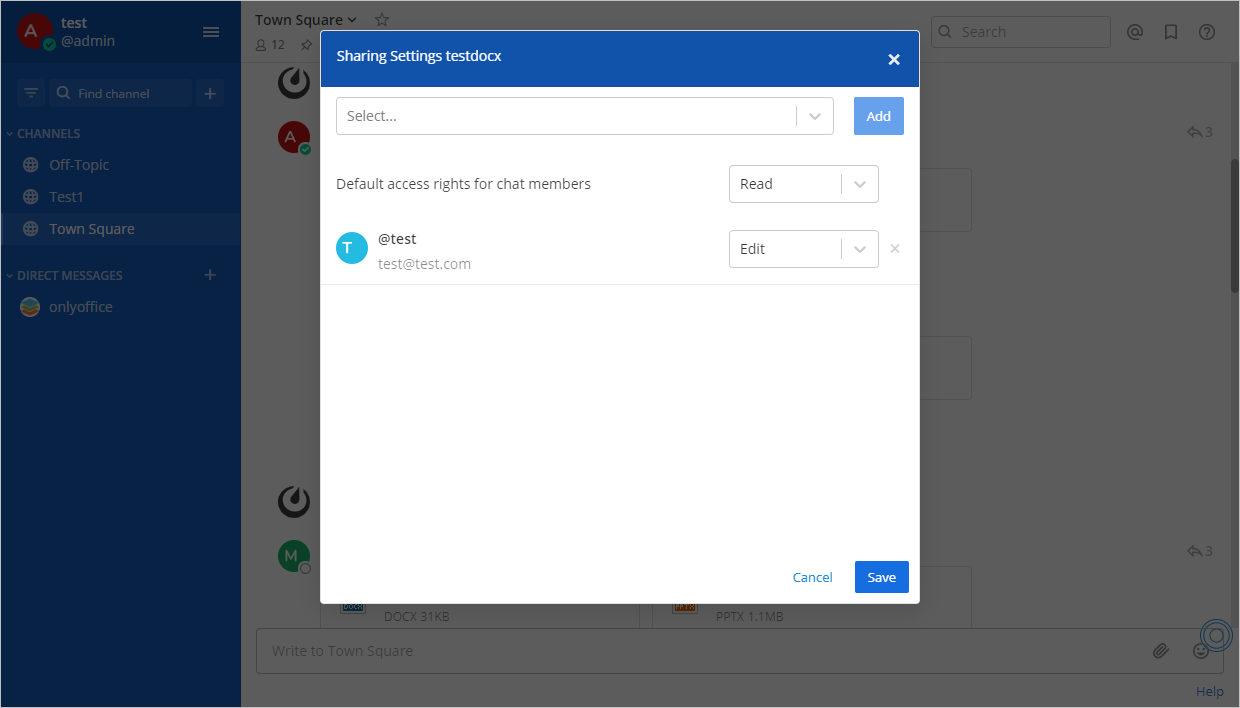
In a group chat for all members:

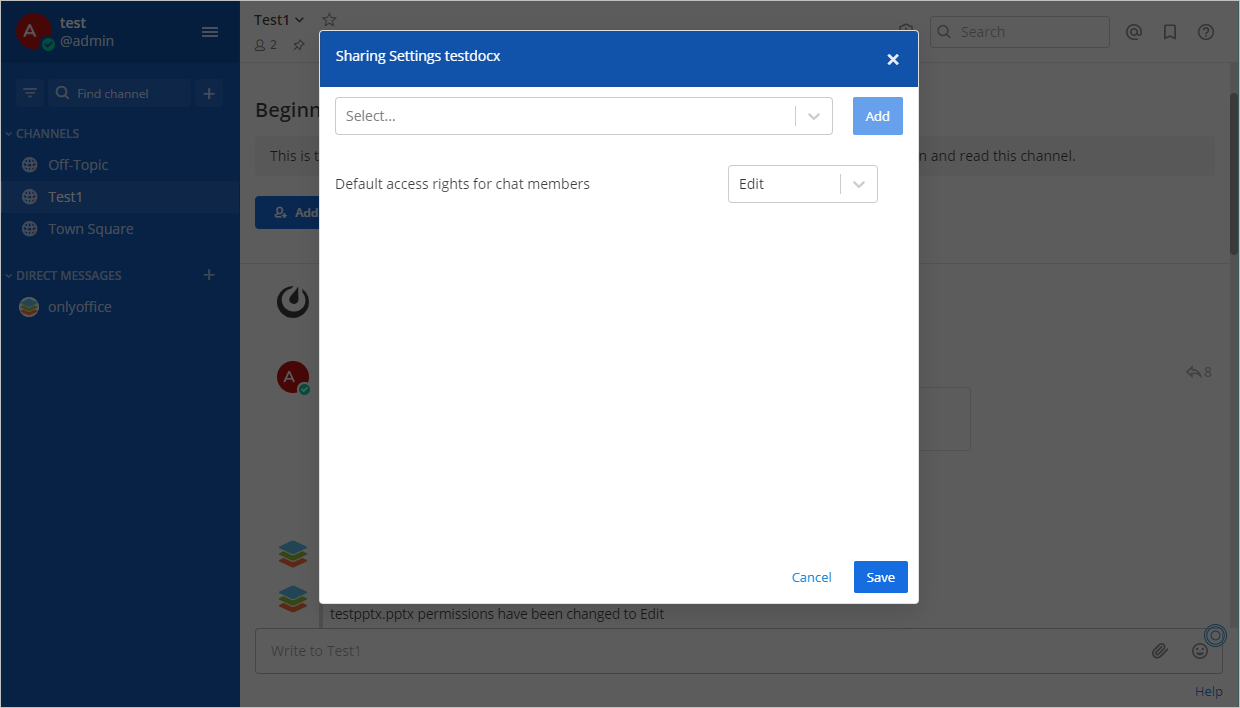
  • Use the drop-down menu in the Default access rights for chat members field.
    ONLYOFFICE_groupchatall ONLYOFFICE_groupchatall

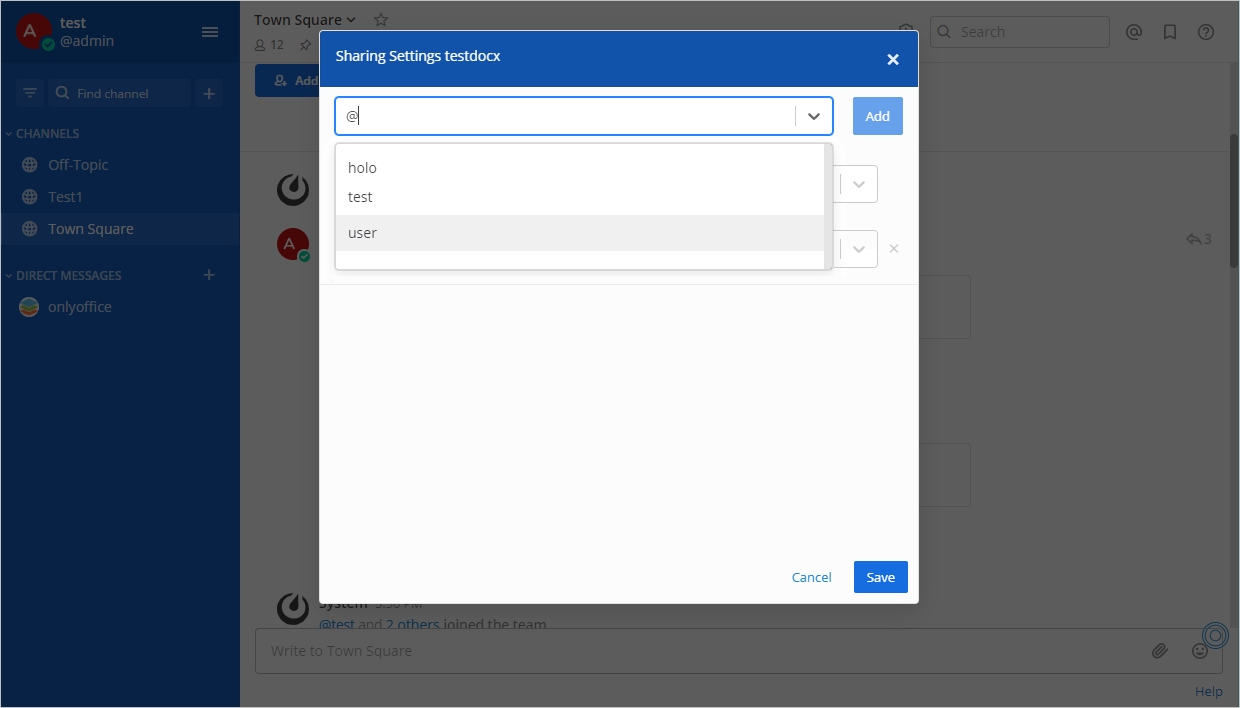
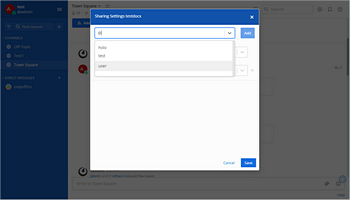
In a group chat for a certain user:

  • Use the drop-down menu at the top, choose the required user, and click the Add button to the right.
    ONLYOFFICE_groupchatcertain ONLYOFFICE_groupchatcertain
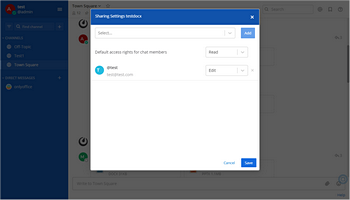
  • The user will appear in the list below. Change their access rights via a drop-down menu on the right.
    ONLYOFFICE_groupchatcertain ONLYOFFICE_groupchatcertain
Managing access rights will send a bot notification to the corresponding party.
Viewing changes history

All changes to the file will be sent as notifications containing the username.
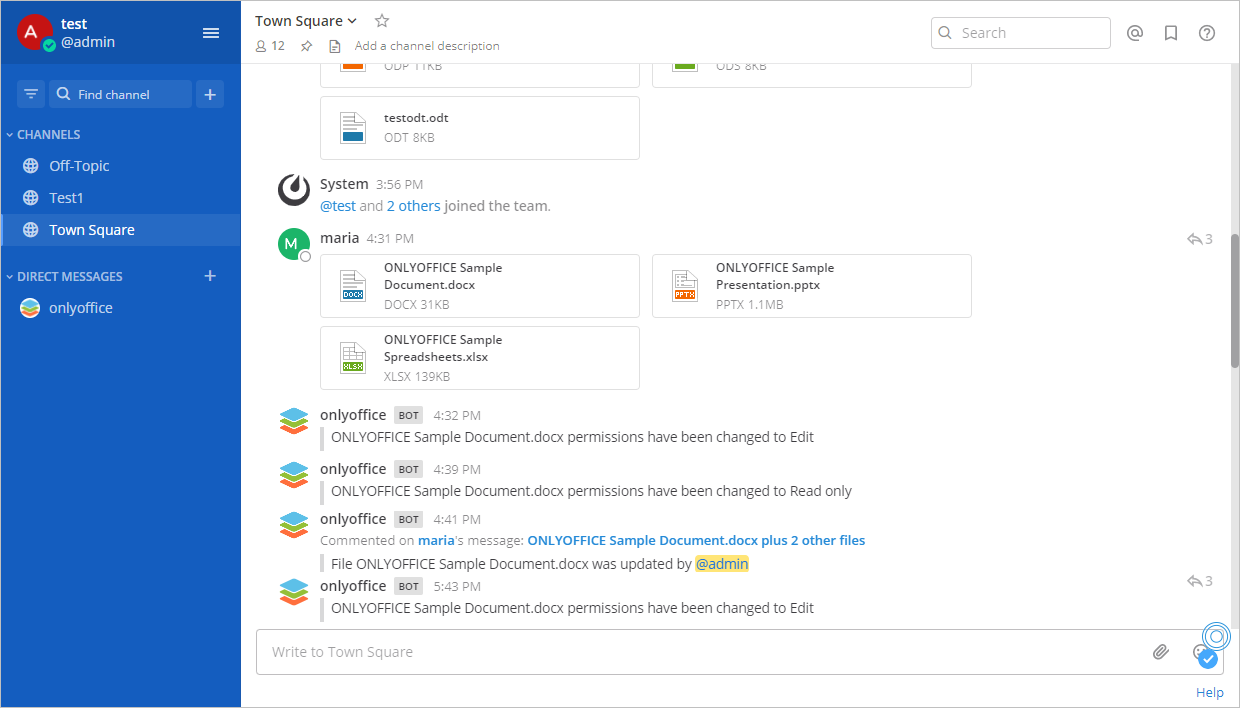
ONLYOFFICE_versionhistory ONLYOFFICE_versionhistory

The notifications are available in a dedicated thread. To open the thread, click the arrow to the right of the file.
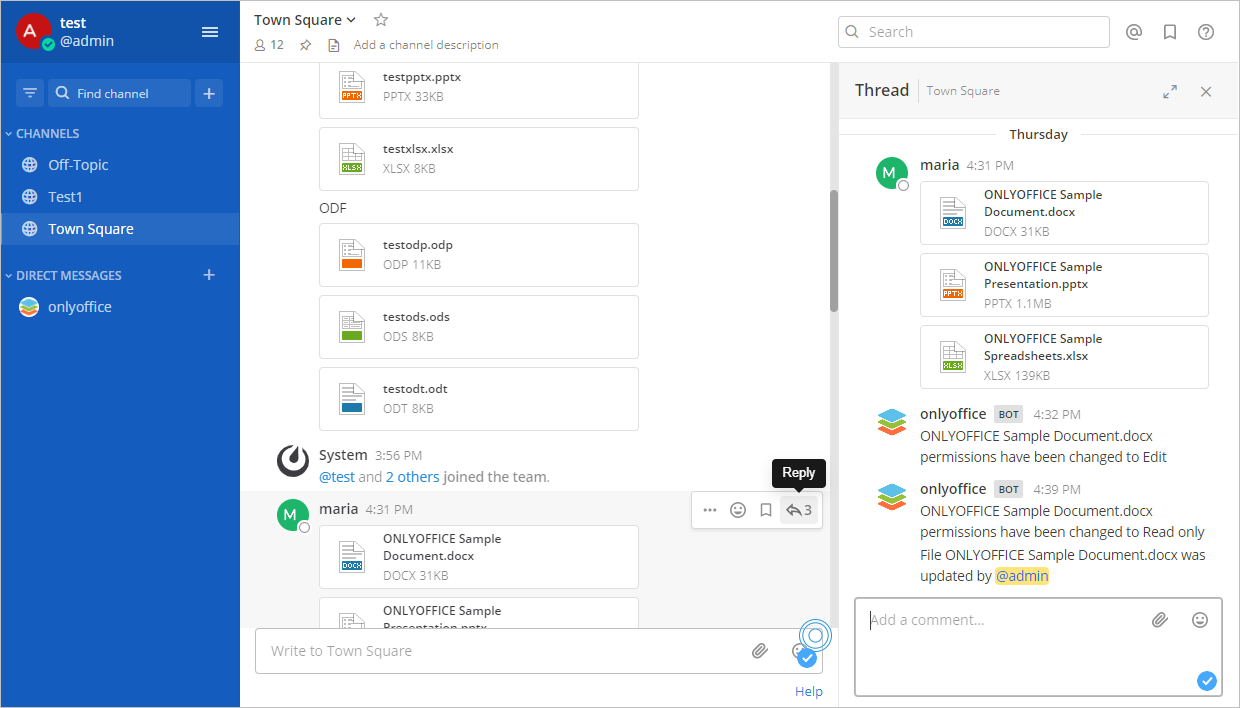
ONLYOFFICE_versionhistory ONLYOFFICE_versionhistory
To learn more about the most common problems and the ways to solve them, please visit our troubleshooting guide.
Article with the tag:
Browse all tags