SharePoint

About the ONLYOFFICE and SharePoint integration

To edit your documents within the SharePoint collaborative platform, you can integrate ONLYOFFICE Docs with your document library using either the official ONLYOFFICE connector or WOPI. For more information, please visit the ONLYOFFICE to SharePoint connector GitHub page. The connector is distributed under the AGPL-3.0 license.

To learn more about how the ONLYOFFICE connector for SharePoint works, please visit our API documentation page.

Connection methods

ONLYOFFICE Docs can be connected to SharePoint using two methods: the official connector or WOPI. Both methods allow editing documents directly in SharePoint, but differ in supported features and formats.

Warning We strongly recommend choosing only one method of installation. If the installation is performed using both methods, collaborative features and document saving may not work as expected.
Feature comparison
FeatureOfficial connectorWOPI
Editing documents from context menu / ribbon✓ (Open in ONLYOFFICE)✓ (Click the file / Context menu → OpenOpen in office online)
Fast co-editing mode
Strict co-editing mode1
Track changes
Comments, built-in chat
Version History
Mail Merge
Insert image from storage
Compare documents

1 Strict co-editing mode may negatively affect the access token parameter when using WOPI.

Important When using WOPI, access tokens expire after a certain period of time. Set the access_token_ttl property to 10 hours for the Fast co-editing mode.
Supported formats

Official connector:

  • For viewing and editing: DOCM, DOCX, DOTM, DOTX, PDF, POTM, POTX, PPSM, PPSX, PPTM, PPTX, XLSB, XLSM, XLSX, XLTM, XLTX
  • For viewing only: CSV, DJVU, DOC, DOT, DPS, DPT, EPUB, ET, ETT, FB2, FODP, FODS, FODT, HML, HTM, HTML, HWP, HWPX, KEY, MD, MHT, MHTML, NUMBERS, ODG, ODT, ODP, ODS, OTT, OTP, OXPS, PAGES, POT, PPS, PPT, RTF, STW, SXC, SXI, SXW, TXT, VSDM, VSDX, VSSM, VSSX, VSTM, VSTX, WPS, WPT, XLS, XLT, XML, XPS

WOPI:

  • For viewing and editing: DOCX, XLSX, PPTX, DOCM, XLSM, PPTM, ODT, ODS, ODP, CSV, PDF
  • For viewing only: DJVU, XPS
The available formats depend on your ONLYOFFICE Docs version and the selected connection method.
What's new in version 3.1.0

Changed

  • Added new supported formats

The full change log is available here.

Using the official connector

Requirements
  • ONLYOFFICE Document Server v7.1 (server or cloud version) or later. The instance must be resolvable and connectable from both SharePoint and any end clients, and must be able to POST directly to SharePoint. Please refer to the official documentation page to learn more about installing ONLYOFFICE Docs.
  • SharePoint 2019
  • ONLYOFFICE Connector 3.1.0 for SharePoint
Installing and configuring

The ONLYOFFICE SharePoint integration solution is an official ONLYOFFICE connector available on the GitHub page under the GNU AGPL v.3 licence.

To learn more about how it works and how to compile the solution, please visit our API documentation.

  1. Click Start, point to All Programs, point to Administrative Tools, then click Services, and make sure that the SharePoint Administration service is started.
  2. Click Start, open the SharePoint Management Shell, and navigate to the directory containing the .wsp file.
  3. Run the Install.ps1 script:
    PS> .\Install.ps1
  4. Enter your SharePoint site address:
    https://<yoursharepointsite>
    Instead of steps 3 and 4 you can type the following command:
    Add-SPSolution -LiteralPath<solutionpath>/onlyoffice.wsp
    On the SharePoint Central Administration home page, click System Settings → Farm Management → Manage farm solutions. On the Solution Management page, click onlyoffice.wsp, then click Deploy Solution.
  5. On the SharePoint Central Administration home page, under Application Management, click Manage web applications.
  6. Make sure you select your site and click the Authentication Providers icon.
  7. In the Authentication Providers pop-up window, click Default zone.
  8. Under Edit Authentication, check Enable anonymous access and click Save.
  9. Going back to Web Application Management, click on the Anonymous Policy icon.
  10. Under Anonymous Access Restrictions, select your Zone and set the Permissions to None – No policy and click Save.
  11. In SharePoint, open the /\_layouts/15/Onlyoffice/Settings.aspx page with administrative settings. Enter the following address:
    https://<documentserver>/
    Where documentserver is the name of the server with ONLYOFFICE Docs installed. The address must be accessible for the user browser and from the SharePoint server. The SharePoint server address must also be accessible from ONLYOFFICE Docs for correct work.

If you have subsites set up with SharePoint, you will need to additionally configure ONLYOFFICE Docs connection with each of them. Go to each subsite settings and enter the Docs address in the proper field.

Starting from ONLYOFFICE Docs v7.2, JWT is enabled by default and the secret key is generated automatically. You need to enable it on the SharePoint side as well: find your secret key in the ONLYOFFICE Docs configuration file, then specify the same secret key in the SharePoint administrative settings. For more details, see the Enabling JWT section below.

If JWT protection is enabled, it is necessary to specify a custom header name, since the SharePoint security policy blocks external 'Authorization' headers. This header should be specified in the ONLYOFFICE Docs signature settings as well (further information can be found here).

Compiling the solution

There are two ways to compile the ONLYOFFICE SharePoint integration solution:

  • Using MS Visual Studio:
    1. Enter the SharePoint server and open this project in Visual Studio.
    2. In Solution Explorer, open the shortcut menu for the project and choose Publish.
    3. In the Publish dialog box, choose the Publish to File System option button.
    4. Click the Publish button. When the publishing process is finished, the solution .wsp file will be created.
    5. Copy the resulting file to the folder with the Install.ps1 file (BuildAndInstall folder by default).
  • Using the build.bat file:
    1. Go to the BuildAndInstall folder.
    2. Run the build.bat file.
    3. The resulting solution .wsp file will be created and placed in the BuildAndInstall folder.
How it works

The ONLYOFFICE integration follows the API documented here.

  1. The user navigates to a document within SharePoint and selects the Edit in ONLYOFFICE action in the context menu or on the ribbon.
  2. SharePoint makes a request to the editor page (URL of the form: /\_layouts/15/Onlyoffice/editorPage.aspx?SPListItemId={ItemId}&SPListURLDir={ListUrlDir}&action=track).
  3. SharePoint prepares a JSON object with the following properties:
    • url — the URL that ONLYOFFICE Docs uses to download the document;
    • callbackUrl — the URL that ONLYOFFICE Docs informs about the status of the document editing;
    • DocumentSeverHost — the URL that the client needs to reply to ONLYOFFICE Document Server (can be set at the settings page);
    • Key — the file identifier from SharePoint;
    • FileName — the document title (name);
    • CurrentUserId — the user identifier;
    • CurrentUserName — the username.
  4. SharePoint constructs a page, filling in all of those values so that the client browser can load up the editor.
  5. The client browser makes a request to the JavaScript library from ONLYOFFICE Docs and sends ONLYOFFICE Docs the DocEditor configuration with the above properties.
  6. Then ONLYOFFICE Docs downloads the document from SharePoint and the user begins editing.
  7. When all users and client browsers are done with editing, they close the editing window.
  8. After 10 seconds of inactivity, ONLYOFFICE Docs sends a POST to callbackUrl letting SharePoint ONLYOFFICE solution know that the clients have finished editing the document and closed it.
  9. SharePoint downloads a new version of the document, replacing the old one.

To learn more about the most common problems and the ways to solve them, please visit our troubleshooting guide.

Enabling JWT

To protect documents from unauthorized access, ONLYOFFICE editors use the JSON Web Token (JWT). The token is added in the configuration when the Document Editor is initialized and during the exchange of commands between inner ONLYOFFICE Docs services. The secret key is used to sign the JSON web token and validate the token upon the request to ONLYOFFICE Docs.

Starting from ONLYOFFICE Docs v7.2, JWT is enabled by default and the secret key is generated automatically. You need to find your secret key in the ONLYOFFICE Docs configuration file, then specify the same secret key in the connector settings.

Step 1: Find your secret key in the ONLYOFFICE Docs configuration file

  1. Open the local.json file with any available text editor:
    • For Linux: /etc/onlyoffice/documentserver/local.json
    • For Windows: %ProgramFiles%\ONLYOFFICE\DocumentServer\config\local.json
    • For Docker: enter the ONLYOFFICE Docs container using docker exec -it <containerID> bash and open /etc/onlyoffice/documentserver/local.json. Alternatively, run:
      sudo docker exec <containerID> /var/www/onlyoffice/documentserver/npm/json -f /etc/onlyoffice/documentserver/local.json 'services.CoAuthoring.secret.session.string'
    The local.json file should look like this:
    {"services": {"CoAuthoring": {"token": {"enable": {"request": {"inbox": true,"outbox": true},"browser": true}},"secret": {"inbox": {"string": "yoursecret"},"outbox": {"string": "yoursecret"},"session": {"string": "yoursecret"}}}}}
  2. The true value is specified in three sections, meaning token validation is enabled:
    • services.CoAuthoring.token.enable.browser
    • services.CoAuthoring.token.enable.request.inbox
    • services.CoAuthoring.token.enable.request.outbox
  3. The automatically generated secret key is specified in three sections. You can replace the default value with your own key — it must be the same in all three sections:
    • services.CoAuthoring.secret.inbox.string
    • services.CoAuthoring.secret.outbox.string
    • services.CoAuthoring.secret.session.string
  4. If you make changes, save them and restart the services:
    supervisorctl restart all

Step 2: Specify the same secret key in the connector settings

In the connector settings, specify the same secret in the Secret key field and save the settings.

Using WOPI

You can also connect ONLYOFFICE Docs with SharePoint over WOPI, a REST-based protocol that issues HTTP requests to a set of REST endpoints when a client establishes a connection to the server with your data.

Limitations

Connecting ONLYOFFICE Docs over WOPI lacks some features due to the WOPI architecture:

  • No support for the Version History feature.
  • Inserting an image from storage is not supported.
  • Comparing documents is not supported.
  • No support for the following formats: DOC, XLS, PPT.
Requirements
  • ONLYOFFICE Document Server v7.1 or later with WOPI enabled. Follow this instruction to enable WOPI.
  • SharePoint 2019
Connecting over WOPI
  1. Open your SharePoint server. Run the SharePoint Management Shell console and set the needed WOPI zone:
    Set-SPWOPIZone -Zone "external-http"
    The documentserver uses the external-http parameter by default.
  2. Check whether there are WOPI bindings to other document types on the current farm:
    Get-SPWOPIBinding
    Delete these bindings, if any:
    Remove-SPWOPIBinding -All:$true
  3. Create new bindings for default actions as per file types.

    To create bindings for all file types at once:

    New-SPWOPIBinding -ServerName ip_or_domain.com:port

    To create bindings for particular file types only:

    New-SPWOPIBinding -ServerName ip_or_domain.com:port -Extension DOCX

    If SSL is not used, add -AllowHTTP at the end of the command.

Creating new documents
Important The following instructions are valid for the WOPI connection method only.

To be able to create new documents, set up the parameters described below. This example is provided for DOCX files only, but you can add XLSX, PPTX, and other files similarly.

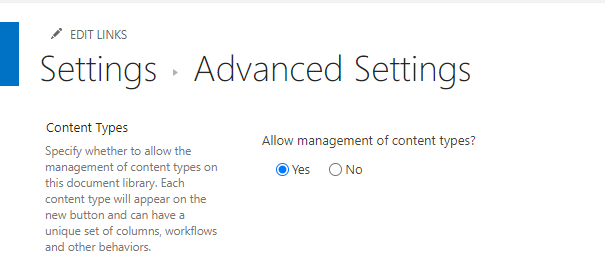
  1. Enable the Allow management of content types setting: go to Documents → Library settings → Advanced settings. In the Allow management of content types section, select Yes and click OK.
    Creating new documents Creating new documents
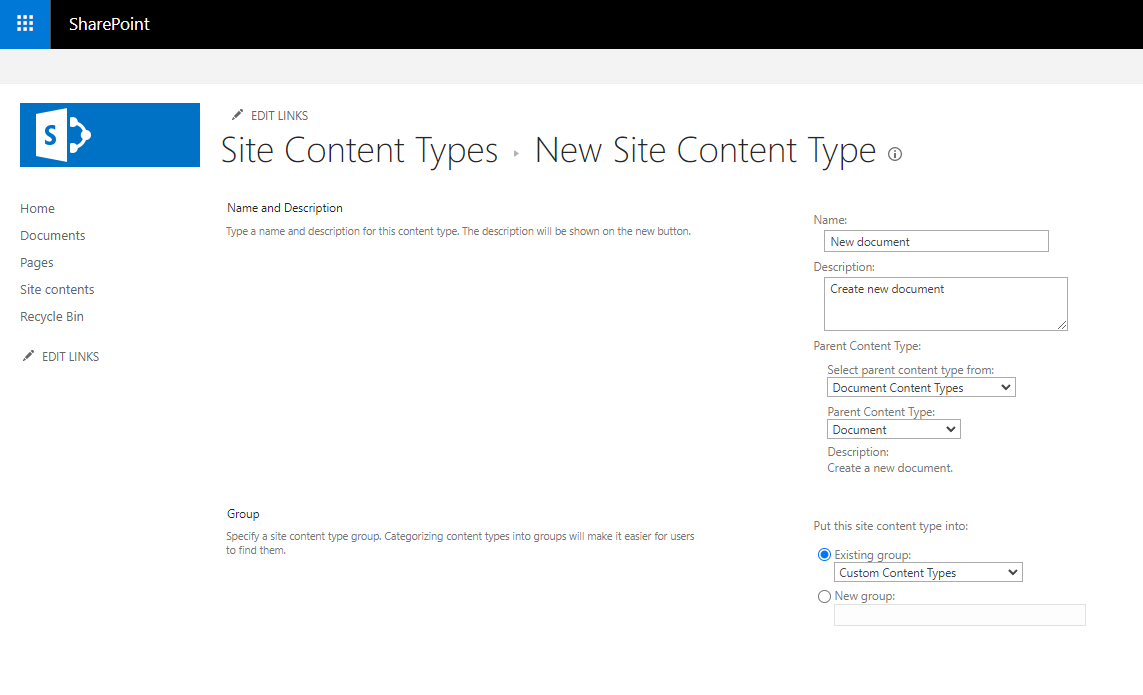
  2. In the Documents library, go to Site contents → Site Settings → Site content types. Click Create. Fill in the form: Name (New document), Description. In the Parent Content type, choose Document content types, Document. In the Existing group, choose Custom Content Types and click OK.
    Creating new documents Creating new documents
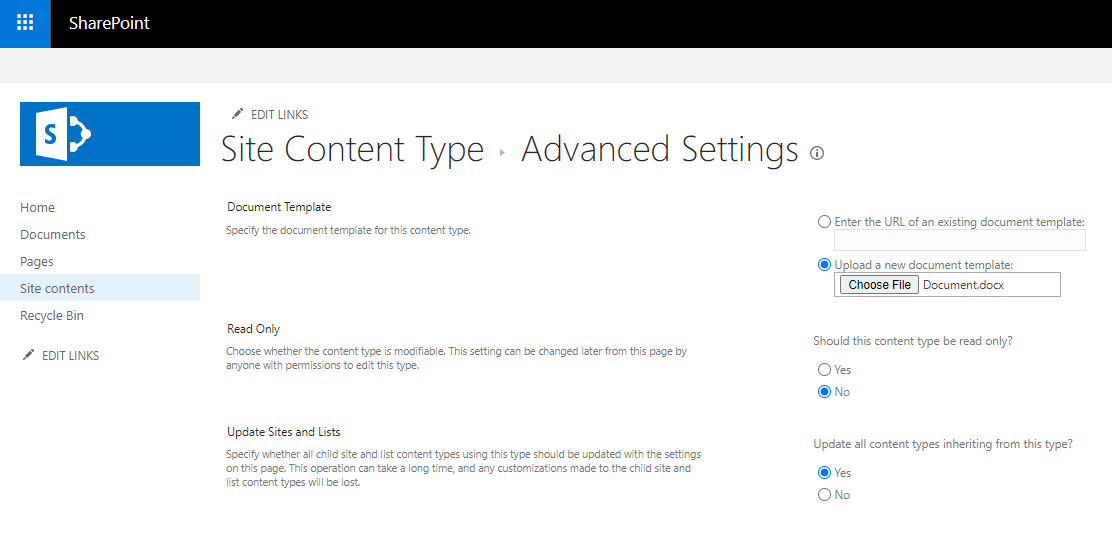
  3. In the Documents library, go to Site contents → Site Settings → Site content types. Select the recently added New document. Go to Advanced settings → Document Template → Upload a new document template. Click the Choose File button, upload the necessary document, and click OK.
    Creating new documents Creating new documents
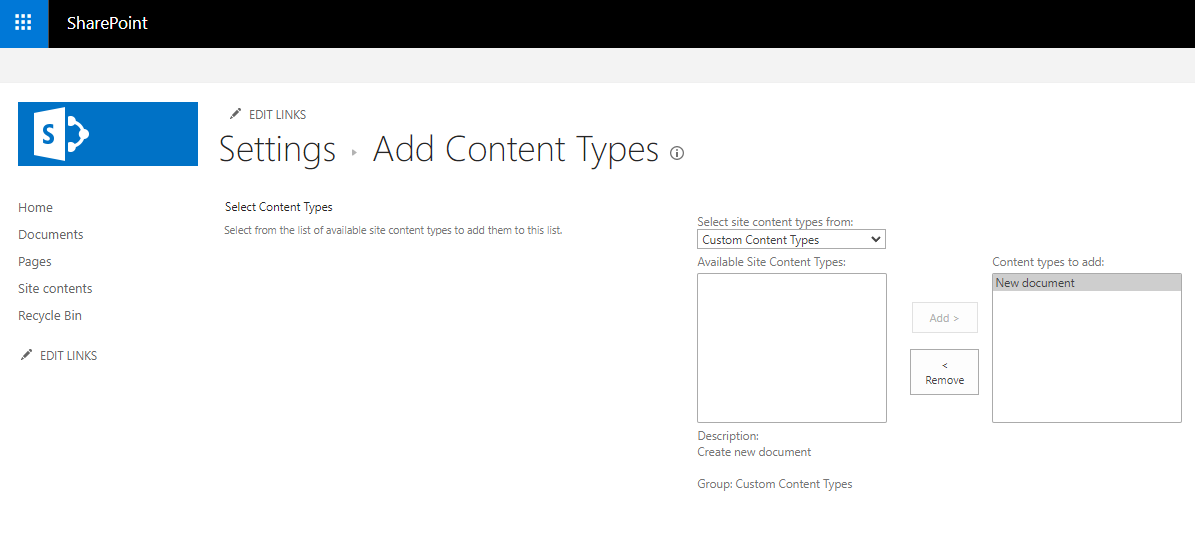
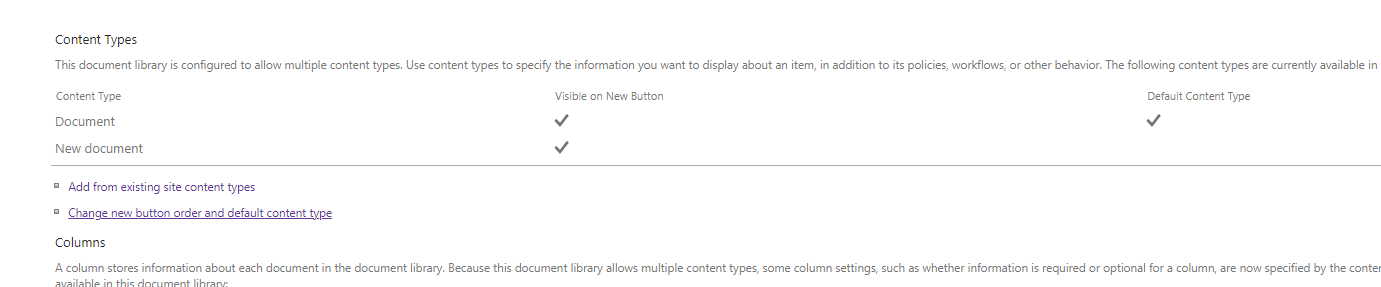
  4. Go to Documents library → Library settings. In the Content Types section, select Add from existing site content types. In the Select site content types from list, select Custom content types. In the Available Site Content Types field, choose New document. Click the Add > button, then click OK.
    Creating new documents Creating new documents
  5. In the Documents library, refresh the page and press the New button.
    Creating new documents Creating new documents
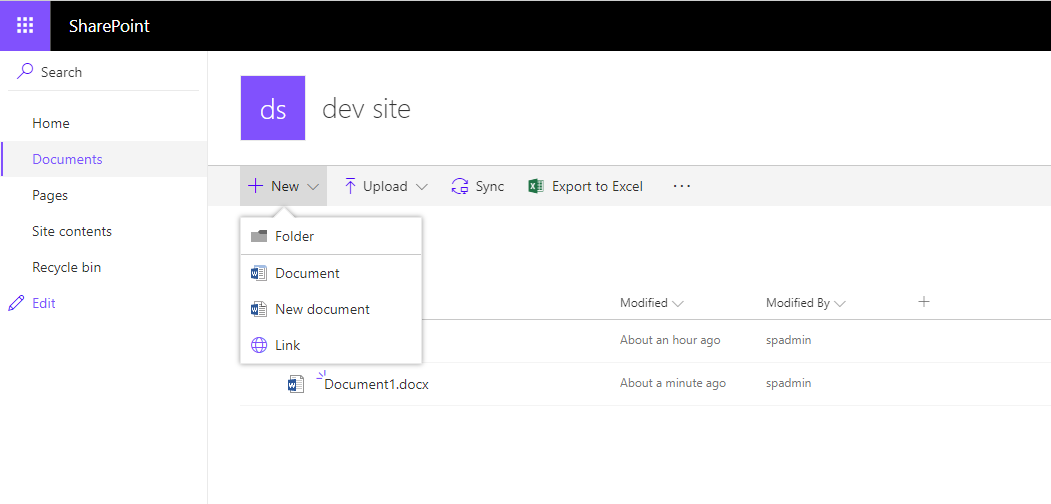
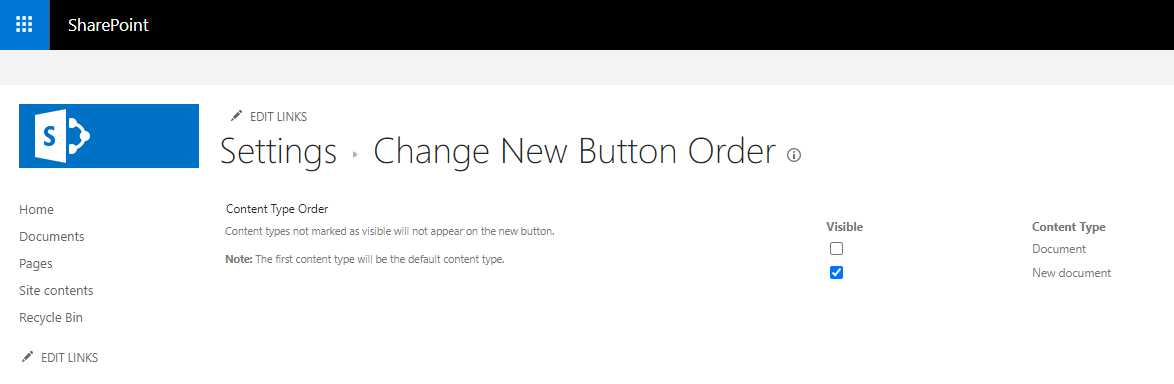
  6. The Document content type will be automatically added as the parent type. It must be hidden: go to Documents library → Library settings. In the Content Types section, select Change new button order and default content type.
    Creating new documents Creating new documents
    In the Visible column, deselect the checkbox for the Document content type and click OK.
    Creating new documents Creating new documents
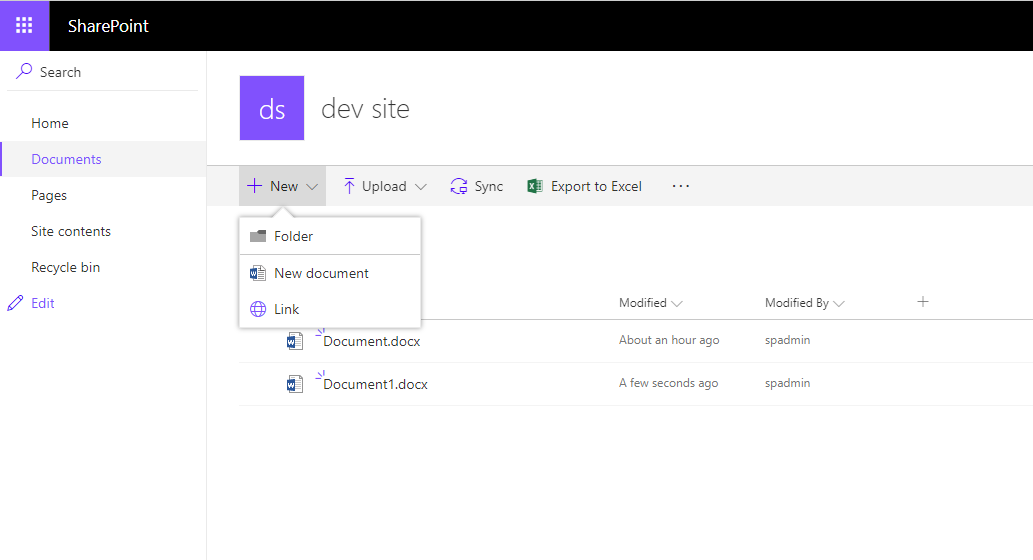
  7. In the Documents library, refresh the page and press the New button — only the New document menu item will be available.
    Creating new documents Creating new documents

Watch video

How to integrate ONLYOFFICE Docs with SharePoint
Article with the tag:
Browse all tags