Workspace Enterprise
Introducción
Después de haber instalado ONLYOFFICE Desktop Editors en tu computadora, puedes conectar fácilmente la aplicación a tu servidor ONLYOFFICE Workspace Enterprise para que puedas utilizar todas las capacidades del producto:
- funciones colaborativas, como edición colaborativa, revisión, comentarios y comunicación a través del chat integrado,
- funciones en línea, como combinación de correspondencia en el Editor de Documentos,
- Sala privada (solo para la versión del servidor).
Paso 1. Instalar ONLYOFFICE Workspace Enterprise
Si aún no has instalado ONLYOFFICE Workspace Enterprise, la forma más sencilla de iniciar una instancia de ONLYOFFICE Workspace Enterprise es usar Docker. Alternativamente, puedes instalar ONLYOFFICE Workspace Enterprise desde paquetes RPM/DEB. Si estás utilizando Windows, consulta las instrucciones de instalación correspondientes.
Las instrucciones sobre cómo configurar ONLYOFFICE Workspace Enterprise están disponibles aquí.
Paso 2. Conectar a tu servidor
Para conectar Desktop Editors a tu servidor, realiza las siguientes acciones:
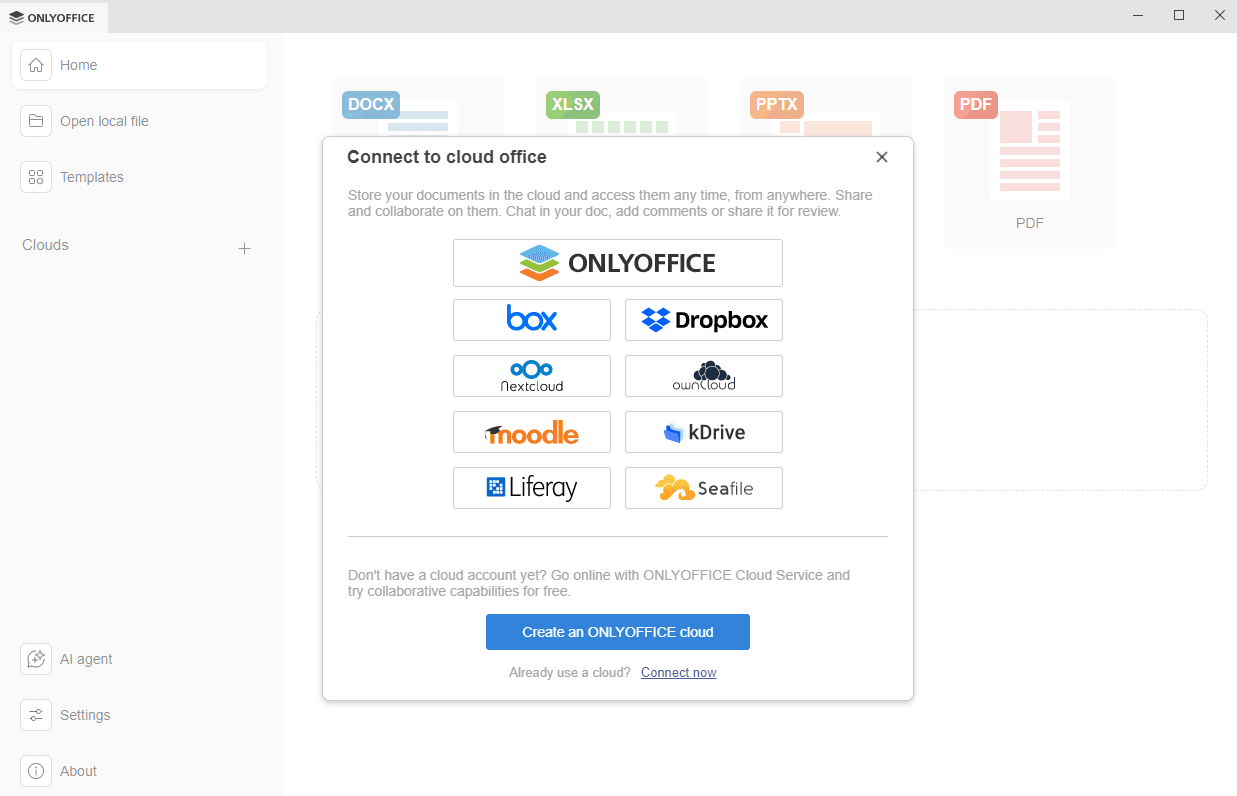
- Haz clic en el botón Más
 junto a la sección Nubes en el panel lateral izquierdo.
 -
Haz clic en el botón ONLYOFFICE. Alternativamente, puedes usar el enlace Conectar ahora en la parte inferior.
-
Se abrirá la ventana Conectar a la oficina en la nube con la opción ONLYOFFICE seleccionada.
-
en el campo URL de la oficina en la nube, ingresa la dirección de tu portal en la forma tudominio.com o https://tudominio.com. También es posible especificar la dirección IP de la máquina donde está instalado ONLYOFFICE Workspace Enterprise. Cuando estés listo, haz clic en el botón Conectar ahora.

-
La página de inicio de sesión del servidor ONLYOFFICE se abrirá en una nueva pestaña de la interfaz de Desktop Editors.
- Especifica tu correo electrónico y la contraseña que utilizas para acceder a tu cuenta,
- Haz clic en el botón Iniciar sesión.
Si deseas usar SSO al conectar ONLYOFFICE Desktop Editors a tu ONLYOFFICE Workspace Enterprise, desactiva Salas privadas en el Panel de control.

-
en el campo URL de la oficina en la nube, ingresa la dirección de tu portal en la forma tudominio.com o https://tudominio.com. También es posible especificar la dirección IP de la máquina donde está instalado ONLYOFFICE Workspace Enterprise. Cuando estés listo, haz clic en el botón Conectar ahora.
Se abrirá el módulo Documentos de tu portal.
Paso 3. Gestionar documentos en tu servidor
Una vez que conectes Desktop Editors a tu servidor, puedes alternar entre las secciones disponibles (Mis documentos, Compartido conmigo, Favoritos, Recientes, Sala privada (solo para la versión de servidor de pago), Común, En proyectos, Papelera) gestionar tus archivos almacenados en el portal, crear o subir nuevos, ver, compartir y editarlos junto con otros usuarios del portal o usuarios externos.


Para poder editar un archivo de manera colaborativa, compártelo con otros usuarios del portal o proporciona acceso al archivo a través de un enlace externo. Si deseas editar archivos con usuarios externos fuera de tu red local, el portal debe ser accesible a través de Internet.
- haz clic en el botón Compartir a la derecha del documento necesario - se abrirá la ventana de Configuración de compartición,
- haz clic en el botón Agregar usuarios o Agregar grupos para abrir la lista de usuarios/grupos, luego marca los usuarios/grupos con los que deseas compartir el documento y haz clic en Guardar,
-
cambia los detalles de permisos para cada usuario/grupo en particular seleccionando una de las opciones disponibles del menú desplegable junto al nombre de la persona/grupo:
- Acceso completo - para permitir que un usuario edite el documento,
- Revisión (esta opción está disponible solo para archivos .docx) - para permitir que un usuario sugiera cambios que pueden ser aceptados o rechazados,
- Relleno de formularios (esta opción está disponible solo para archivos .oform) - para permitir que un usuario solo rellene formularios,
- Filtro personalizado (esta opción está disponible solo para archivos .xlsx) - para permitir que un usuario aplique cambios a los filtros solo localmente,
- Comentario - para permitir que un usuario trabaje solo con comentarios,
- Solo lectura - para permitir que un usuario solo vea el documento,
- Denegar acceso - para bloquear el acceso previamente concedido.
Cuando estés listo, haz clic en Guardar en la parte inferior de la ventana de Configuración de compartición.
- para proporcionar acceso al archivo a través de un enlace externo, activa el conmutador Acceso por enlace externo, haz clic en el enlace Solo lectura y selecciona los permisos necesarios descritos anteriormente. Cuando estés listo, copia el enlace y cierra la ventana de Configuración de compartición.
Para más detalles sobre cómo compartir archivos, consulta estas instrucciones.


Paso 4. Gestionar tus cuentas conectadas
Haz clic en el logo en la esquina superior izquierda de la interfaz de Desktop Editors para regresar a la ventana principal del programa. Todas las cuentas en la nube conectadas aparecen en el panel lateral izquierdo debajo de la sección Nubes. Haz clic en los tres puntos  que aparecen al pasar el ratón sobre la nube conectada para acceder a las opciones del menú contextual de la nube:
 ``````html
- Abrir - para cambiar a la pestaña de almacenamiento en la nube correspondiente si ya has iniciado sesión en esta cuenta, o para abrir la ventana Conectar a la oficina en la nube si no has iniciado sesión actualmente (en tal caso, deberás ingresar tus credenciales),
- Cerrar sesión - para salir de tu cuenta. La cuenta conectada aún aparece en el panel lateral izquierdo, pero deberás iniciar sesión nuevamente la próxima vez para acceder a tus archivos de Dropbox.
- Eliminar de la lista - para desconectar la cuenta seleccionada y eliminarla de la lista.
Para añadir varias cuentas o nubes, haz clic en el botón Más junto a la sección Nubes en el panel lateral izquierdo.