Sharing files and folders
Available access types
Using the Documents app, you can share a file/folder with your portal users/groups or provide access to a file for anyone else by sharing a link to a document. The following access types can be selected:
 Full Access — the user or group will be able to view and edit the document/folder contents.
 Fill forms — the user or group will be able only to view the form and fill in the form fields inserted into it.
 Commentator — the user or group will be able only to view the document and add comments, as well as manage them.
 Reviewer — the user or group will be able to suggest corrections without actually editing the document (this option is only available for the .docx files).
 Viewer — the user or group will be able only to view the document/folder contents.
 Deny Access — permissions previously granted to the user or group will be revoked.
Share files and folders with portal users
To share your file/folder with other users on your portal:
- Open the Share dialog window:
In the file list:
- Tap and hold the necessary document/folder in the file list.
- Select the Sharing Settings option from the menu.
In the editors:
- Tap the
 Tools icon in the right corner of the top toolbar.
 - Select the Share option from the menu.
The Sharing settings window displays the list of users who have previously been granted access to this file/folder.
- Select users/groups you want to share the file/folder with:
- Tap the Add users icon in the top right corner of the screen.
- Select one of the three available tabs: Employees, Groups, and Guests.
- Set a default access type for all the persons/groups you want to share the document with by opening the access types list in the bottom left corner of the screen. The Viewer access type is set by default.
- Tap the empty circles
 on the left side of the necessary names one at a time. To quickly find the necessary persons, you can also use the Search field above the user list. When users/groups are selected, tap Next in the bottom right corner of the screen.

The selected users/groups will be displayed in the Share list.
- By default, all the selected users will receive a standard email notification. To send a message with your own text, tap the notification icon and enter your text in the field that appears.
- If necessary, change the access type for each user/group separately. To do that, tap the user/group name or the icon to the right of the name, select the necessary access type, and tap Share.
To remove a person/group from the list, tap the icon to the right of the user name and select the Deny Access option.
- All the settings are saved automatically. Tap Close in the upper left corner of the Sharing settings window to exit.
Share files using the external link
You can generate separate dedicated sharing links for internal portal users and external users. This is available for any file or folder, whether stored inside a room or in your personal My Documents.
To share a file or folder via a link:
- Tap and hold the necessary document/folder in the file list and select Sharing settings, or open the file in the editor, tap the Tools icon and select Share.
- Tap Copy shared link to instantly copy a link with the default settings to the clipboard, or tap Sharing settings to configure the link before sharing.
In the Sharing settings window, the following link options are available:
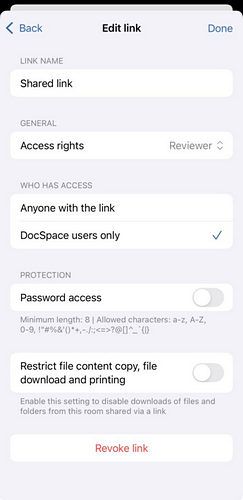
- Access rights — select the access level from the dropdown menu.
-
Who has access — specify who can use the link:
- Anyone with the link — the link is accessible to external users.
- DocSpace users only — the link is accessible to internal portal users only.
- Password access — enable this switcher to protect the link with a password.
- Restrict file content copy, file download and printing — enable this switcher to prevent users from copying content, downloading, or printing the file.
- Revoke link — tap to invalidate the current link. The file will no longer be accessible via the previously shared link.
Once configured, use the Copy link button to copy the link to the clipboard and share it via a messenger or any other app installed on your device.