Setting tab stops
In the Document Editor, you can change tab stops. A tab stop is a term used to describe the location where the cursor stops after the Tab key is pressed.
To set tab stops, you can use the horizontal ruler:
-
Select the necessary tab stop type by clicking the
 button in the upper left corner of the working area. The following three tab types are available:
- Left Tab Stop lines up the text to the left side at the tab stop position; the text moves to the right from the tab stop while you type. Such a tab stop will be indicated on the horizontal ruler with the
 Left Tab Stop marker.
 - Center Tab Stop
 centers the text at the tab stop position. Such a tab stop will be indicated on the horizontal ruler with the
  Center Tab Stop marker.
 - Right Tab Stop
 lines up the text to the right side at the tab stop position; the text moves to the left from the tab stop while you type. Such a tab stop will be indicated on the horizontal ruler with the
  Right Tab Stop marker.
- Left Tab Stop
-
Click on the bottom edge of the ruler where you want to place the tab stop. Drag it along the ruler to change its position. To remove the added tab stop, drag it out of the ruler.

You can also use the paragraph properties window to adjust tab stops. Click the right mouse button, select the Paragraph Advanced Settings option in the menu or use the Show advanced settings link on the right sidebar, and switch to the Tabs tab in the opened Paragraph - Advanced Settings window.
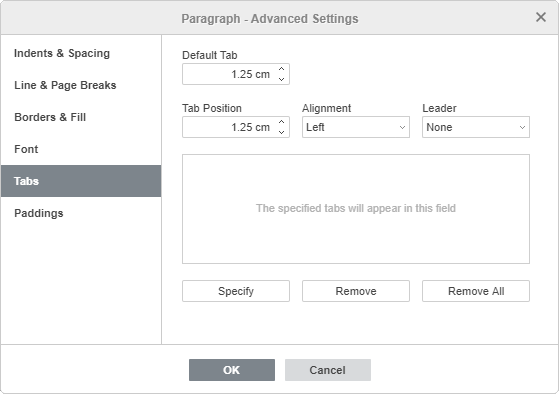
You can set the following parameters:
- Default Tab is set at 1.25 cm. You can decrease or increase this value by using the arrow buttons or entering the required value in the box.
- Tab Position is used to set custom tab stops. Enter the required value in this box, adjust it more precisely by using the arrow buttons, and press the Specify button. Your custom tab position will be added to the list in the field below. If you've previously added some tab stops using the ruler, all these tab positions will also be displayed in the list.
- Alignment - is used to set the necessary alignment type for each of the tab positions in the list above. Select the necessary tab position in the list, choose the Left, Center or Right option from the drop-down list, and press the Specify button.
-
Leader - allows choosing a character to create a leader for each tab positions. A leader is a line of characters (dots or hyphens) that fills the space between tabs. Select the necessary tab position in the list, choose the leader type from the drop-down list and press the Specify button.
To delete tab stops from the list, select a tab stop and press the Remove or Remove All button.
Article with the tag:
Browse all tags