Setting page parameters
To change page layout in the Document Editor, i.e., set page orientation and size, adjust margins and insert columns, use the corresponding icons on the Layout tab of the top toolbar.
Note: all these parameters are applied to the entire document. If you need to set different page margins, orientation, size, or column number for the separate parts of your document, please refer to this page.
Page orientation
Change the current orientation by type clicking the  Orientation icon. The default orientation type is Portrait that can be switched to Album.
Page size
Change the default A4 format by clicking the  Size icon and selecting the required format from the list. The following preset sizes are available:
- US Letter (21,59cm x 27,94cm)
- US Legal (21,59cm x 35,56cm)
- A4 (21cm x 29,7cm)
- A5 (14,81cm x 20,99cm)
- B5 (17,6cm x 25,01cm)
- Envelope #10 (10,48cm x 24,13cm)
- Envelope DL (11,01cm x 22,01cm)
- Tabloid (27,94cm x 43,17cm)
- AЗ (29,7cm x 42,01cm)
- Tabloid Oversize (29,69cm x 45,72cm)
- ROC 16K (19,68cm x 27,3cm)
- Envelope Choukei 3 (12cm x 23,5cm)
- Super B/A3 (30,5cm x 48,7cm)
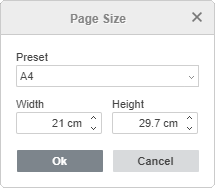
You can also set a special page size by selecting the Custom Page Size option from the list. The Page Size window will open where you'll be able to select the required Preset (US Letter, US Legal, A4, A5, B5, Envelope #10, Envelope DL, Tabloid, AЗ, Tabloid Oversize, ROC 16K, Envelope Choukei 3, Super B/A3, A0, A1, A2, A6) or set custom Width and Height values. Enter new values into the entry fields or adjust the existing values using the arrow buttons. When you finish, click OK to apply the changes.
Page margins
Change the default margins, i.e., the blank space between the left, right, top and bottom page edges and the paragraph text, by clicking the  Margins icon and selecting one of the available presets: Normal, US Normal, Narrow, Moderate, Wide. You can also use the Custom Margins option to set your own values in the Margins window. Enter the required Top, Bottom, Left and Right page margin values into the entry fields or adjust the existing values using arrow buttons.
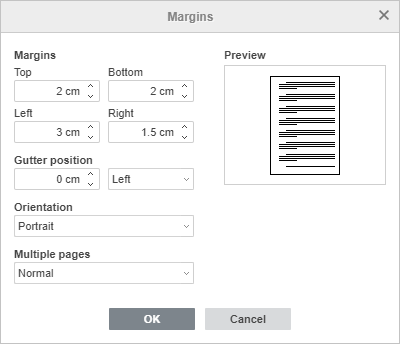
Gutter position is used to set up additional space on the left side of the document or at its top. The Gutter option is helpful to make sure that bookbinding does not cover the text. In the Margins, enter the required gutter position into the entry fields and choose where it should be placed in.
Note: the Gutter position cannot be used when the Mirror margins option is checked.
In the Multiple pages drop-down menu, choose the Mirror margins option to set up facing pages for double-sided documents. With this option checked, Left and Right margins turn into Inside and Outside margins, respectively.
In Orientation drop-down menu, choose from Portrait and Landscape options.
All applied changes to the document will be displayed in the Preview window.
When you finish, click OK. The custom margins will be applied to the current document and the Last Custom option with the specified parameters will appear in the Margins list so that you will be able to apply them to other documents.
You can also change the margins manually by dragging the border between the grey and white areas on the rulers (the grey areas of the rulers indicate page margins):

Page color
Change the page color on the Layout tab using the Page Color button. Choose one of the Theme or Standard colors, or click the More colors menu item to create a custom color.
Columns
Apply a multi-column layout by clicking the  Columns icon and selecting the necessary column type from the drop-down list. The following options are available:
- Two
 - to add two columns of the same width,
 - Three
 - to add three columns of the same width,
 - Left
 - to add two columns: a narrow column on the left and a wide column on the right,
 - Right
 - to add two columns: a narrow column on the right and a wide column on the left.
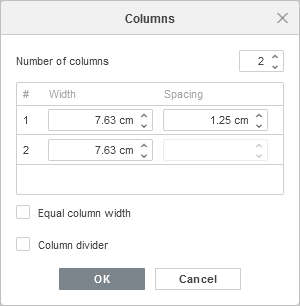
If you want to adjust column settings, select the Custom Columns option from the list. The Columns window will appear, and you'll be able to set the required Number of columns, column Width and Spacing. Enter your new values into the entry fields or adjust the existing values using arrow buttons. Check the Equal column width checkbox to make all column width the same. Check the Column divider box to add a vertical line between the columns. When you finish, click OK to apply the changes.
To exactly specify where a new column should start, place the cursor before the text that you want to move to the new column, click the  Breaks icon on the top toolbar and then select the Insert Column Break option. The text will be moved to the next column.
The inserted column breaks are indicated in your document with a dotted line:  . If you do not see the inserted column breaks, click the
  icon at the Home tab on the top toolbar to make them visible. To remove a column break, select it with the mouse and press the Delete key.
To manually change the column width and spacing, you can use the horizontal ruler.

To cancel columns and return to a regular single-column layout, click the Columns icon on the top toolbar and select the One  option from the list.