Draw freehand
Add a drawing
Use the Draw feature to draw freehand, add custom graphic objects, and handwritten notes.
- tap the
 icon at the top toolbar to open the new object insertion panel,
 - switch to the
 Other tab,
 - select the
 Draw option,
 - customize the drawing tool in the Draw settings:
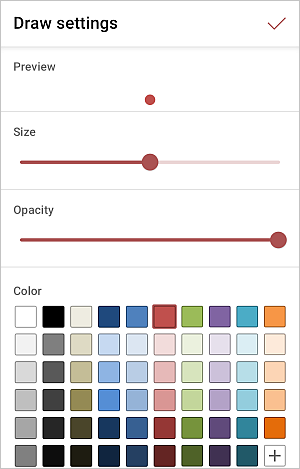
- Preview - displays how the stroke appears on the document.
- Size - set the size of the stroke by dragging the slider.
- Opacity - set the opacity level of the stroke by dragging the slider.
- Color - select one of the available colors for the stroke or choose your own Custom color.
To add a new Custom Color, follow these steps:
- tap the
 icon in the Custom colors section.
 - using the color palette, choose the necessary color and select its hue level,
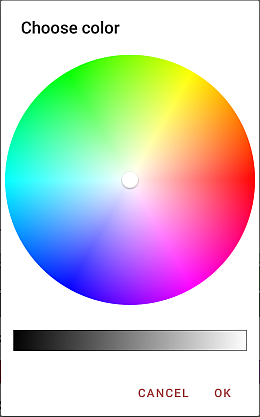
- tap the OK button to apply the color.
- tap the
- save the changes by tapping the
 button in the top right corner.
Now you can start drawing. Each drawn figure represents a shape that can be edited later. Tap the icon ![]() (the icon's color matches the current brush color) to open the Draw settings.
(the icon's color matches the current brush color) to open the Draw settings.
To exit drawing mode, tap the  icon in the upper left corner.
Adjust drawing settings
When the drawing is selected, you can open the shape/image settings panel to change the shape of the drawing, adjust its border size and color, or change the drawing position as related to other objects.
- select the drawing by tapping it,
- open the settings panel by
- tapping the
 icon at the top or bottom toolbar, or
 - tapping the
option in the pop-up menu,
- tapping the
- switch to the Shape and tap the necessary menu item: Style, Change shape, or Advanced settings. Use the
 icon on the left to return to the previous settings section.
The Style section allows you to enable the following options:
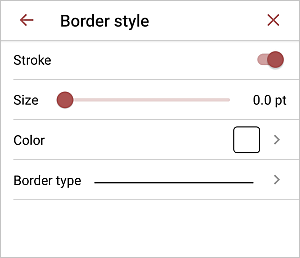
- Border style - set the border:
- Stroke - switch the toggle to enable or disable border display.
- Size - set the border size by dragging the slider.
- Color - select the border color on the palette.
- Border type - select one of the available border types.
Use the
 shortcut icon on the bottom toolbar to quickly access shape type settings.
The Change shape section allows you to change the shape of the image replacing the rectangular shape with another one selected from the menu. The shape of the image will change correspondingly.
The Advanced settings section allows you to enable the following options:
- Size - set the drawing's size:
- Width and Height - define image's dimentions in a specifit measurement.
- Lock aspect ratio - switch the toggle to preserve the original drawing aspect ratio.
- Units of measurement - selecet one of the available option: cm, pt, inch.
- Border style - set the border:
switch to the Image and tap the necessary menu item:
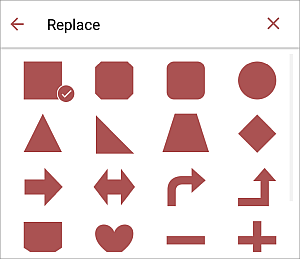
- The Replace image allows you to replace the current drawing with another one.
Use the
 shortcut icon on the bottom toolbar to quickly access replace drawing settings.
- The Arrange section allows you to change the selected drawing position as related to other objects when several objects overlap each other. To learn more, please refer to the Manipulate objects section of this guide.
- The Replace image allows you to replace the current drawing with another one.
- close the shape/image settings panel by tapping the
 cross on the left.
Remove the drawing
Select the drawing by tapping on it and proceed in one of the following ways:
- tap the
 option in the pop-up menu, or
 - open the Image settings panel by tapping the
icon at the top toolbar, swipe up and tap the Delete image button.