ONLYOFFICE Documents for iOS — Overview
ONLYOFFICE Documents for iOS — Overview
The Documents app for iOS allows you to access files stored in your ONLYOFFICE account on your mobile device, view and edit text documents, spreadsheets, presentations, and PDF files, open and fill out PDF fillable forms, create new files, and organize them. You can connect third-party cloud storages, provide different access types to your files, and edit documents collaboratively with other portal users or work on your files offline.
Supported devices
The application requires iOS 14.0 or higher.
First launch
The Documents app is available on the App Store. After you have downloaded and installed the application on your mobile device, tap the
 icon to launch it.
Application sections
The Documents app contains four main sections available at the bottom panel.

 On Device — contains your local documents that can be viewed and edited without an internet connection.
 ONLYOFFICE — allows you to connect your ONLYOFFICE DocSpace or Workspace account and work on files stored in the cloud.
 Clouds — allows you to connect third-party cloud storages such as Dropbox, Nextcloud, OneDrive, ownCloud, kDrive, iCloud, and other WebDAV-compatible services.
 Settings — allows you to adjust application settings, manage storage, and view app information.
You can easily switch between sections and move files between storages using file and folder menu options or a drag-and-drop gesture. To drag files between sections, touch and hold the file you want to move, open a different section without releasing the file, and drag it to the destination folder.
On Device section
The On Device section opens by default when you launch the application. It allows you to create and edit documents, spreadsheets, presentations, and PDF files in offline mode without an internet connection. You can create folders to organize your local files, move files between folders, duplicate, rename, or delete them.
It is also possible to edit files previously downloaded from your portal. If necessary, you can upload any local file to your portal later when an internet connection is established.
To create new files or import content, tap the + icon in the top right corner and select one of the following options:
- New Document, New Spreadsheet, or New Presentation — create a new file of the selected type.
 New Folder — create a new folder to organize your files.
 Import File — browse and import a file from your device storage.
- Open File — browse your device storage and open a file directly.
 Import Image — select an image from your photo library.
 Take Picture — capture a photo using your device camera.
 Scan Document — scan a printed document and convert it to an editable file.
ONLYOFFICE section
The ONLYOFFICE section allows you to connect your ONLYOFFICE DocSpace or Workspace account and work on files stored in the cloud, share documents with other users, and collaborate in real time.
Connecting to DocSpace or Workspace
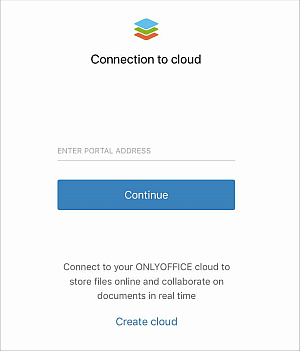
Switch to the ONLYOFFICE section at the bottom panel. The Connection to cloud screen will open where you will be prompted to connect to your existing account.
- Enter your portal address (e.g. portalname.onlyoffice.com) and tap Continue.
- Enter the email address and password you use to access your portal, then tap Login.
Alternatively, you can sign in using your Google, LinkedIn, Apple ID, or Zoom account if you have previously connected it to your profile.
Creating a new portal
If you do not have an ONLYOFFICE account, you can create a new portal directly from the app:
- Tap the Create cloud link at the bottom of the screen.
- Fill in the registration form: create your Account Name, enter your First Name, Last Name, Email Address, and tap Continue.
- Enter and confirm a password, then tap Create portal.
By default, the password must be at least 8 and no more than 120 characters long.
Recovering a password
- Enter your portal address on the start screen.
- Tap the Forgot? link on the sign-in screen and enter the email address to which your portal was registered.
- Follow the recovery link sent to your email to restore your password.
To sign out from your account, tap your profile photo in the upper left corner and select the Logout option.
DocSpace sections
When connected to DocSpace, tap the icons at the left panel to navigate between the following sections:
 My Documents — your personal documents.
 Shared with Me — documents shared with you by other users.
 Favorites — files and folders you have marked as favorites for quick access.
 Recent — files you have recently opened on the portal and on the device.
 Common Documents — files and folders available to all portal users.
 Project Documents — folders corresponding to existing projects from the portal Projects module.
 Trash — deleted files that can be restored or permanently deleted.
Clouds section
The Clouds section allows you to connect third-party cloud storages and edit your documents directly without downloading and re-uploading them.
Connecting iCloud
Tap the  iCloud Drive service in the MY CLOUDS section. The connection will be established automatically. Tap Create to start working.
Connecting third-party services
Tap the necessary service in the CONNECT CLOUDS section: Nextcloud, ownCloud (including oCIS), Dropbox, OneDrive, kDrive, or other WebDAV service. To connect a WebDAV service, specify the following:
- Server — your WebDAV server address.
- Login and Password — your account credentials.
Tap Next to complete the connection. You can also use an EMM service or MDM server to connect your WebDAV storage.
Connected clouds appear in the MY CLOUDS section at the left navigation panel.
Settings section
Settings and security
- To enable push notifications, tap Notifications and select Turn ON in Settings. You will be redirected to your device settings where you can enable notifications from ONLYOFFICE.
- To customize the app theme, tap Theme and select one of the options: Same as system, Light, or Dark.
-
To enable passcode protection, tap Passcode Lock, then Turn Passcode On, and set a 4-digit passcode.
If you forget the passcode, you'll need to delete and reinstall the app. All local documents will be lost.
Storage
- To clear the application cache, tap Cache and then Clear Cache.
- To preview files, enable the Files Preview switcher. To save storage space, enable the Compress Images switcher.
Information
- The About section contains information about the application version, Terms of Service, and Privacy Policy.
-
The Help & Feedback section contains the following menu items:
- Suggest a Feature — you are redirected to the corresponding form to fill out.
- Contact Support — go to forum to browse for solutions or describe the issue you have.
- Help Center — you are redirected to the ONLYOFFICE Help Center that is opened in your default browser.
- What's New — view the changelog for the current version.
Quick actions
Touch and hold the app icon on your home screen to access quick actions:
- New Document — create a new text document.
- New Spreadsheet — create a new spreadsheet.
- New Presentation — create a new presentation.
When you select any of these options, you will be prompted to enter a file name. The file will be created locally in the On Device section.
Touch ID protection
The quick actions menu also provides security options:
- Require Touch ID — enable biometric authentication to access the app.
- Hide and Require Touch ID — enable biometric authentication and hide app content from notification previews and Spotlight search results.
AI assistant
The app includes a built-in AI assistant available in the Document and Spreadsheet editors. You can give commands in plain language to check spelling and grammar, rewrite or summarize text, translate, apply formatting, and automate routine tasks. To set up the AI assistant, please refer to the Enable AI assistant article.