Manipulating objects
In the Spreadsheet Editor, you can resize, move, rotate and arrange autoshapes, images and charts inserted into your worksheet.
Note: the list of keyboard shortcuts that can be used when working with objects is available here.
Resize objects
To change the size of an autoshape/image/chart, drag small squares  situated on the edges of the object. To maintain the original proportions of the selected object while resizing, hold down the Shift key and drag one of the corner icons.
Note: to resize the inserted chart or image, you can also use the right sidebar that will be activated once you select the necessary object. To open it, click the Chart settings  or the Image settings
 ![]() icon to the right.
icon to the right.

Move objects
To change the position of an autoshape/image/chart, use the Arrow ![]() icon that appears after hovering the mouse cursor over the object. Drag the object to the necessary position without releasing the mouse button.
To move the object by one-pixel increments, hold down the Ctrl key and use the keyboard arrows.
To move the object strictly horizontally/vertically and prevent it from moving in a perpendicular direction, hold down the Shift key when dragging.
icon that appears after hovering the mouse cursor over the object. Drag the object to the necessary position without releasing the mouse button.
To move the object by one-pixel increments, hold down the Ctrl key and use the keyboard arrows.
To move the object strictly horizontally/vertically and prevent it from moving in a perpendicular direction, hold down the Shift key when dragging.
Rotate objects
To manually rotate the autoshape/image, hover the mouse cursor over the rotation handle  and drag it clockwise or counterclockwise. To constrain the rotation angle to 15 degree increments, hold down the Shift key while rotating.
To rotate a shape or image by 90 degrees counterclockwise/clockwise or flip the object horizontally/vertically, you can use the Rotation section of the right sidebar that will be activated once you select the necessary object. To open it, click the Shape settings ![]() icon or the Image settings
icon or the Image settings ![]() icon to the right. Click one of the buttons:
icon to the right. Click one of the buttons:
 to rotate the object by 90 degrees counterclockwise
 to rotate the object by 90 degrees clockwise
 to flip the object horizontally (left to right)
 to flip the object vertically (upside down)
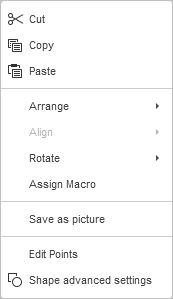
It's also possible to right-click the image or shape, choose the Rotate option from the contextual menu, and then use one of the available rotation options.
To rotate a shape or image by an exactly specified angle, click the Show advanced settings link on the right sidebar and use the Rotation tab of the Advanced Settings window. Specify the necessary value measured in degrees in the Angle field and click OK.
Reshape autoshapes
When modifying some shapes, for example Figured arrows or Callouts, the yellow diamond-shaped  icon is also available. It allows you to adjust some aspects of the shape, for example, the length of the head of an arrow.

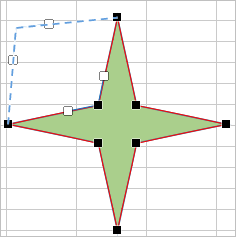
To reshape an autoshape, you can also use the Edit Points option from the context menu.
The Edit Points option is used to customize or to change the curvature of your shape.
-
To activate a shape’s editable anchor points, right-click the shape and choose Edit Points from the menu. The black squares that become active are the points where two lines meet, and the red line outlines the shape. Click and drag it to reposition the point, and to change the shape outline.
-
Once you click the anchor point, two blue lines with white squares at the ends will appear. These are Bezier handles that allow you to create and a curve and to change a curve’s smoothness.
-
As long as the anchor points are active, you can add and delete them:
- To add a point to a shape, hold Ctrl and click the position where you want to add an anchor point.
- To delete a point, hold Ctrl and click the unnecessary point.
Align objects
To align two or more selected objects in relation to each other, hold down the Ctrl key while selecting the objects with the mouse, then click the  Align icon on the Layout tab of the top toolbar and select the necessary alignment type from the list:
- Align Left
 - to align objects relative to each other to the left edge of the leftmost object,
 - Align Center
 - to align objects relative to each other in the center,
 - Align Right
 - to align objects relative to each other to the right edge of the rightmost object,
 - Align Top
 - to align objects relative to each other to the top edge of the topmost object,
 - Align Middle
 - to align objects relative to each other in the middle,
 - Align Bottom
 - to align objects relative to each other to the bottom edge of the bottommost object.
Alternatively, you can right-click the selected objects, choose the Align option from the contextual menu and then use one of the available alignment options.
Note: the alignment options are disabled if you select less than two objects.
Distribute objects
To distribute three or more selected objects horizontally or vertically between two outermost selected objects so that there is equal distance between them, click the Align icon on the Layout tab of the top toolbar and select the necessary distribution type from the list:
- Distribute Horizontally
 - to distribute objects evenly between the leftmost and rightmost selected objects.
 - Distribute Vertically
 - to distribute objects evenly between the topmost and bottommost selected objects.
Alternatively, you can right-click the selected objects, choose the Align option from the contextual menu and then use one of the available distribution options.
Note: the distribution options are disabled if you select less than three objects.
Group several objects
To manipulate several objects at once, you can group them. Hold down the Ctrl key while selecting the objects with the mouse, then click the arrow next to the  Group icon on the Layout tab of the top toolbar and select the necessary option from the list:
- Group
 - to combine several objects into a group so that they can be simultaneously rotated, moved, resized, aligned, arranged, copied, pasted, formatted like a single object.
 - Ungroup
 - to ungroup the selected group of the previously combined objects.
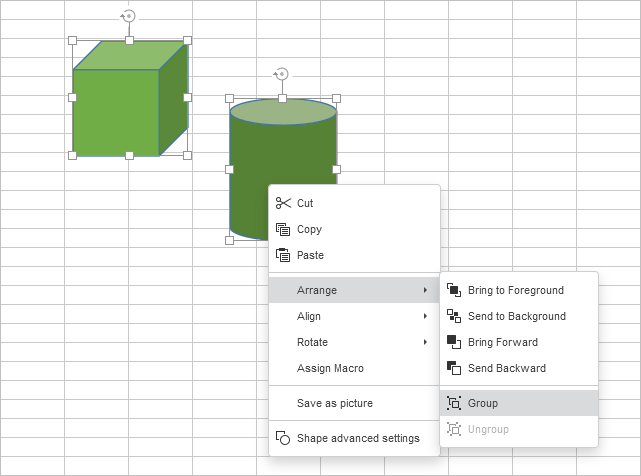
Alternatively, you can right-click the selected objects, choose the Arrange option from the contextual menu and then use the Group or Ungroup option.
Note: the Group option is disabled if you select less than two objects. The Ungroup option is available only when a group of the previously combined objects is selected.
Arrange several objects
To arrange the selected object or several objects (e.g., to change their order when several objects overlap each other), you can use the  Bring Forward and
  Send Backward icons on the Layout tab of the top toolbar and select the necessary arrangement type from the list.
To move the selected object(s) forward, click the arrow next to the Bring Forward icon on the Layout tab of the top toolbar and select the necessary arrangement type from the list:
- Bring To Foreground
 - to move the object(s) in front of all other objects,
 - Bring Forward
 - to move the selected object(s) by one level forward as related to other objects.
To move the selected object(s) backward, click the arrow next to the Send Backward icon on the Layout tab of the top toolbar and select the necessary arrangement type from the list:
- Send To Background
 - to move the object(s) behind all other objects,
 - Send Backward
 - to move the selected object(s) by one level backward as related to other objects.
Alternatively, you can right-click the selected object(s), choose the Arrange option from the contextual menu and then use one of the available arrangement options.
Boolean operations on shapes
To access the logical operations on shapes, select the Merge shapes menu item in the context menu. The Boolean operations include the following:
- Union - the shapes will be united into one group and share one area.
- Combine - the shapes will be united into one group, but the shared area will be highlighted.
- Fragment - the shapes will be united into one group, but the shared area will be outlined.
- Intersect - creates a new shape from the areas where the selected shapes overlap.
- Subtract - removes the area of a shape from the one underneath it.