Protecting your documents with a digital signature
Introduction
ONLYOFFICE Desktop Editors allow you to protect your documents, spreadsheets, or presentations using digital signatures that provide a high level of safety and security when exchanging data.
Digital signatures are commonly used to verify the authenticity and integrity of official documents, e.g., contracts, invoices, orders, reports, etc.
- Authenticity of documents means that the document was created by a known sender. Authenticity validation is implemented using the private and public key pairs.
- Data integrity means that the document has not been changed in transit. Once a digital signature is added, the document cannot be edited. If the document has been changed, the signature becomes invalid.
- A private key is used to create a digital signature. It is available only for the owner of the certificate issued by a certificate authority. When the owner sends the signed document to recipients, he/she also sends his/her digital certificate and a public key.
- A public key is used by a recipient of the document to validate the authenticity of the signature added by the certificate owner who signed the document.
Adding an invisible digital signature
To add a digital signature that is not visible in the document text,
- Create a new file or open an existing one using ONLYOFFICE Desktop Editors.
- Switch to the Protection tab on the top toolbar.
- Click the arrow next to the
 Signature button.
 - Choose the Add digital signature option.
If the document contains some unsaved changes, you'll be asked to save the document.
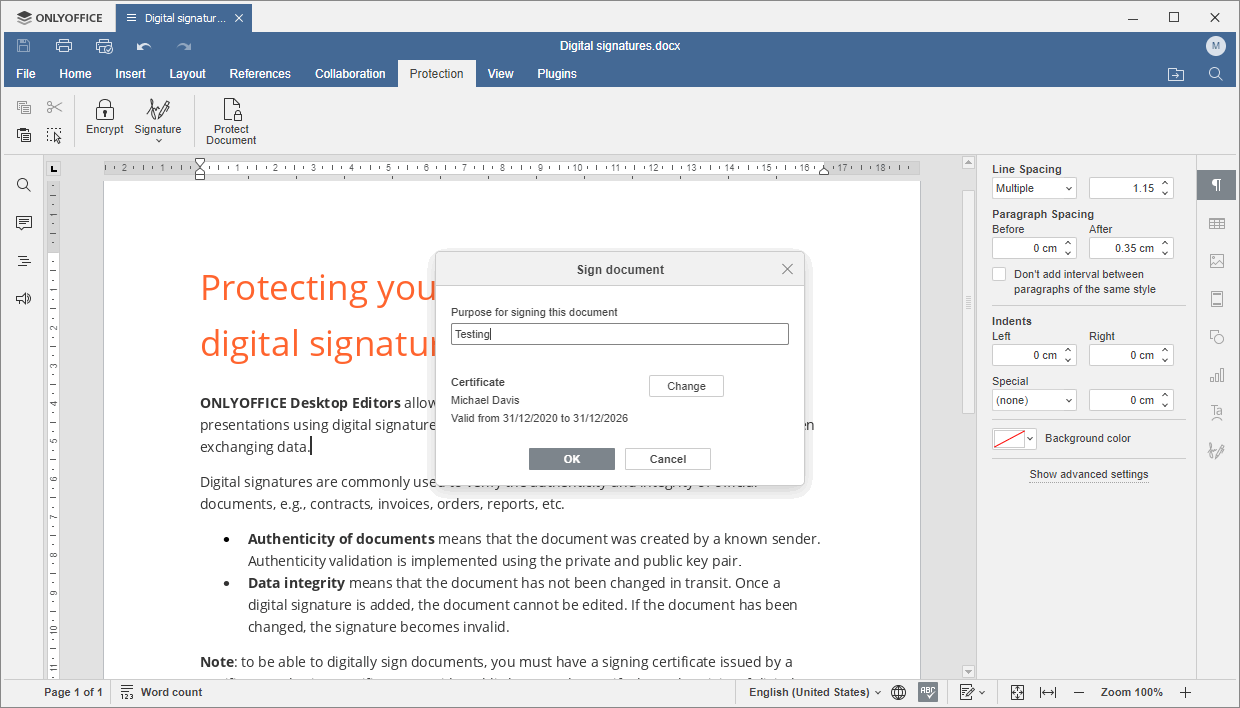
- In the Sign document window, fill in the Purpose for signing this document field (this step is optional).

-
Select a digital certificate. This process differs depending on the operating system - Windows, Linux, or Mac OS. Please choose the corresponding tab to read detailed instructions for your OS:
On Windows, certificates installed in the system are used. Verify the certificate information displayed in the Sign document window. It includes the certificate owner's name and the validity period of the certificate.If you have several digital certificates, you can choose a different certificate by clicking the Change button. In the Select a Certificate window that opens, click the More choices link, choose another certificate, and confirm it by clicking OK.


-
Click the Select button in the Sign document window.


-
Click the
 button next to the select certificate file... field.


-
Select the .crt file and click Open.


-
Click OK in the information window.

 If your certificate is protected with a password, enter the password in the Certificate password field.
 -
Click the button next to the select key file... field.


- Select the .key file and click Open.

 If your key is protected with a password, enter the password in the Key password field.
 - Click OK in the Select certificate window.


-
Click the Select button in the Sign document window.


-
Click the Load Signature button.


-
Select the .crt file and click Open.


-
Click the Load a Private Key button.


- Select the .key file and click Open.


-
Click the Select button in the Sign document window.
- When ready, click the OK button in the Sign document window.
The signature will be added, and the document will become protected from being edited. A pop-up window will appear on the right sidebar informing you that the document contains a valid signature and cannot be edited. The corresponding information will also be displayed in the Protect section of the File tab.


The signature is not visible in the document text. You can view the information about the added signature in the Valid signatures field on the right sidebar. This information includes the certificate owner's name as well as the date and time when the signature was added to the document.
You can move the mouse cursor over the added signature and click the arrow next to it to access the context menu. It includes the following options:
- Signature Details - allows you to open the corresponding certificate and view the certificate information.
- Remove Signature - allows you to remove the signature and proceed to editing the document.
Other ways to add a digital signature
- You can switch to the File tab on the top toolbar, open the Protect section on the left sidebar, and click the Add digital signature button.
- If a document already contains some valid signatures, you can use the Add digital signature button on the right sidebar.
- It’s also possible to add a visible digital signature using a signature line (see the ‘Adding a signature line’ and ‘Adding a visible digital signature using the signature line‘ sections below).
Adding a signature line
A signature line allows to request signatures from other participants. You can also add a signature line and then sign the document yourself via the added signature line. In this case, the visual representation of the digital signature is also added to the document text.
If you wish to request signatures from other signers and to sign the document yourself, first, you need to add all signature lines and then sign the document.
- Create a new file or open an existing one using ONLYOFFICE Desktop Editors.
- Put the mouse cursor where you want to add a signature line.
- Switch to the Protection tab on the top toolbar.
- Click the arrow next to the Signature button.
- Choose the Add signature line option.
- The Signature setup window will open:


- Fill in the fields: Suggested signer, Suggested signer's title, Suggested signer's e-mail, Instructions for signer.
- The Show sign date in signature line option is enabled by default.
- When ready, click the OK button to add a signature line to the document.


The signature line will be added to the document. It displays all the specified data for the signer.
- Save the document.
You can add multiple signature lines according to the number of signers.
To edit the added signature line,
- Click the
 Signature settings icon on the right sidebar.
 - Move the mouse cursor over the signer name in the Requested signatures section and click the arrow next to it to access the context menu.


- Choose the Signature Setup option from the menu.
- The Signature setup window will open. Modify the necessary information as described above, click OK, and save the document.
To remove the added signature line, select it in the document text and press Delete.
Once all the necessary signature lines are added, you can send the document to signers in any convenient way.
Adding a visible digital signature using the signature line
When you sign a document in this way, you add both the digital signature and its visual representation in the document text.
If you receive a document that requires your signature, you’ll see a pop-up window on the right sidebar informing you that the document needs to be signed.


- Double-click the signature line in the document, or proceed in the following way:
- Click the Signature settings icon on the right sidebar.
- Move the mouse cursor over the signer name in the Requested signatures section and click the arrow next to it to access the context menu.
- Choose the Sign option from the menu.

 If the document contains some unsaved changes, you'll be asked to save the document.
 - Click the
- The Sign document window will open. You can either type in your name or load your signature image:
- Enter your name in the Input signer name field and format the text, choosing the necessary font type and size.
- You can also click the Select image button and upload an image you want to use as a signature (for example, a scanned image of your handwritten signature).


Preview your signature in the Signature looks as field.
-
Select a digital certificate. This process differs depending on the operating system - Windows, Linux, or Mac OS. Please choose the corresponding tab to read detailed instructions for your OS:
On Windows, certificates installed in the system are used. Verify the certificate information displayed in the Sign document window. It includes the certificate owner's name and the validity period of the certificate.If you have several digital certificates, you can choose a different certificate by clicking the Change button. In the Select a Certificate window that opens, click the More choices link, choose another certificate, and confirm it by clicking OK.
-
Click the Select button in the Sign document window.


-
Click the
 button next to the select certificate file... field.


-
Select the .crt file and click Open.


-
Click OK in the information window.

 If your certificate is protected with a password, enter the password in the Certificate password field.
 -
Click the button next to the select key file... field.


- Select the .key file and click Open.

 If your key is protected with a password, enter the password in the Key password field.
 - Click OK in the Select certificate window.


-
Click the Select button in the Sign document window.


-
Click the Load Signature button.


-
Select the .crt file and click Open.


-
Click the Load a Private Key button.


- Select the .key file and click Open.


-
Click the Select button in the Sign document window.
- When ready, click the OK button in the Sign document window to add your signature to the document.
The signature will be added, and the document will become protected from being edited. A visual representation of the signature will also be displayed in the document.


The information about the added signature can be found in the Valid signatures section on the right sidebar.
Removing digital signatures
Once a digital signature is added to the document, it is protected from being edited. If you want to edit such a document, click the Edit anyway option in the pop-up window on the right. All the added digital signatures will be removed from the document.


Alternatively, you can remove all signatures via the File tab. Open the Protect section on the left sidebar and click the Edit document button.


If the document contains several digital signatures, and you want to remove a certain signature only,
- Click the Signature settings icon on the right sidebar.
- Click the arrow next to a valid signature.
- Choose the Remove Signature option from the menu.
Watch video
Add digital signature in ONLYOFFICE Desktop Editors
Digital signature in ONLYOFFICE Desktop Editors protects a document from forgery and verifies the sender.