Creating slicers for tables
Create a new slicer
Once you create a new formatted table or a pivot table in the Spreadsheet Editor, you can create slicers to quickly filter the data. To do that,
- select at least one cell within the table with the mouse and click the Table settings
 icon on the right.
 -
click the
 Insert slicer option on the Table settings tab of the right sidebar. Alternatively, you can switch to the Insert tab of the top toolbar and click the
  Slicer button. The Insert Slicers window will be opened:
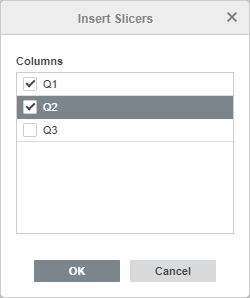
- check the required columns in the Insert Slicers window.
- click the OK button.
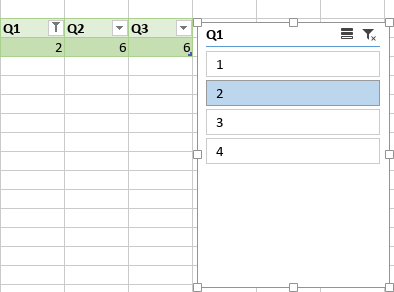
A slicer will be added for each of the selected columns. If you add several slicers, they will overlap each other. Once the slicer is added, you can change its size and position, as well as its settings.

A slicer contains buttons that you can click to filter the table. The buttons corresponding to empty cells are marked with the (blank) label. When you click a slicer button, other buttons will be unselected, and the corresponding column in the source table will be filtered to only display the selected item:
If you have added several slicers, the changes made in one slicer can affect the items from another slicer. When one or more filters are applied to a slicer, items with no data can appear in a different slicer (with a lighter color):
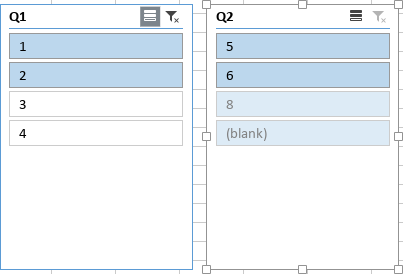
You can adjust the way to display items with no data in the slicer settings.
To select multiple slicer buttons, use the  Multi-Select icon in the upper right corner of the slicer or press Alt+S. Select necessary slicer buttons, clicking them one by one.
To clear the slicer filter, use the  Clear Filter icon in the upper right corner of the slicer or press Alt+C.
Edit slicers
Some of the slicer settings can be changed using the Slicer settings tab of the right sidebar that will open if you select the slicer with the mouse.
You can hide or display this tab by clicking the  icon on the right.
Change the slicer size and position
The Width and Height options allow you to change the width and/or height of the slicer. If the Constant proportions  button is clicked (in this case it looks like this
  ), the width and height will be changed together, preserving the original slicer aspect ratio.
The Position section allows you to change the Horizontal and/or Vertical slicer position.
The Disable resizing or moving option allows you to prevent the slicer from being moved or resized. When this option is checked, the Width, Height, Position, and Buttons options are disabled.
Change the slicer layout and style
The Buttons section allows you to specify the necessary number of Columns and set the Width and Height of the buttons. By default, a slicer contains one column. If your items contain short text, you can change the column number to 2 or more:
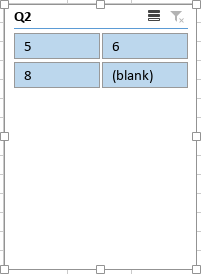
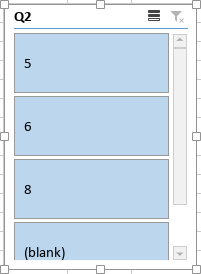
If you increase the button width, the slicer width will change correspondingly. If you increase the button height, the scroll bar will be added to the slicer:
The Style section allows you to choose one of the predefined slicer styles.
Apply sorting and filtering parameters
- Ascending (A to Z) is used to sort the data in ascending order - from A to Z alphabetically, or from the smallest to the largest number for numerical data.
- Descending (Z to A) is used to sort the data in descending order - from Z to A alphabetically, or from the largest to the smallest for numerical data.
The Hide items with no data option allows you to hide items with no data from the slicer. When this option is checked, the Visually indicate items with no data and Show items with no data last options are disabled.
When the Hide items with no data option is unchecked, you can use the following options:
- The Visually indicate items with no data option allows you to display items with no data with different formatting (with a lighter color). If you uncheck this option, all items will be displayed with the same formatting.
- The Show items with no data last option allows you to display items with no data at the end of the list. If you uncheck this option, all items will be displayed in the same order as in the source table.
Adjust advanced slicer settings
To change the advanced slicer properties, use the Show advanced settings link on the right sidebar. The 'Slicer - Advanced Settings' window will open:
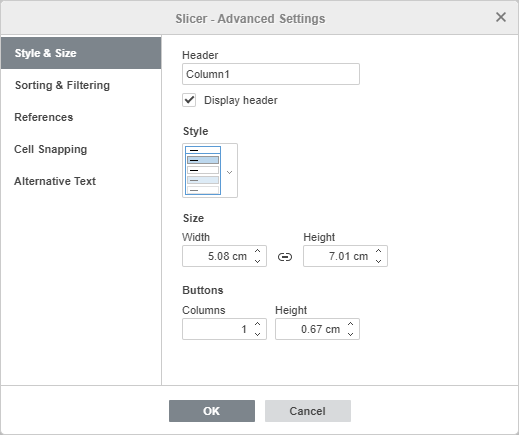
The Style & Size tab contains the following parameters:
- The Header option allows you to change the slicer header. Uncheck the Display header option if you do not want to display the slicer header.
- The Style section allows you to choose one of the predefined slicer styles.
- The Width and Height options allow you to change the width and/or height of the slicer. If the Constant proportions button is clicked (in this case it looks like this ), the width and height will be changed together, preserving the original slicer aspect ratio.
- The Buttons section allows you to specify the necessary number of Columns and set the Height of the buttons.
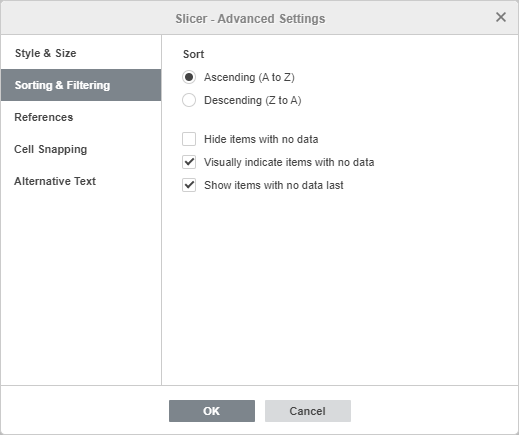
The Sorting & Filtering tab contains the following parameters:
- Ascending (A to Z) is used to sort the data in ascending order - from A to Z alphabetically, or from the smallest to the largest number for numerical data.
- Descending (Z to A) is used to sort the data in descending order - from Z to A alphabetically, or from the largest to the smallest for numerical data.
The Hide items with no data option allows you to hide items with no data from the slicer. When this option is checked, the Visually indicate items with no data and Show items with no data last options are disabled.
When the Hide items with no data option is unchecked, you can use the following options:
- The Visually indicate items with no data option allows you to display items with no data with different formatting (with a lighter color).
- The Show items with no data last option allows you to display items with no data at the end of the list.
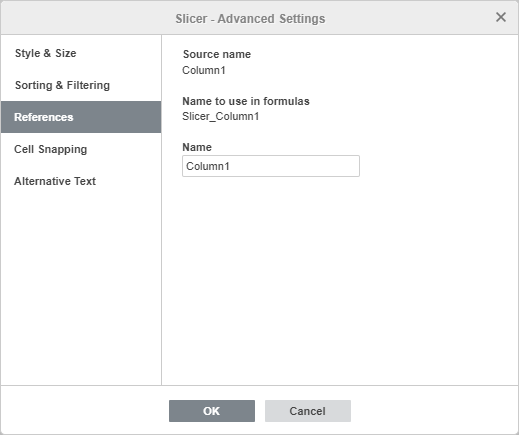
The References tab contains the following parameters:
- The Source name option allows you to view the field name corresponding to the column header from the source data set.
- The Name to use in formulas option allows you to view the slicer name which is displayed in the Name manager.
- The Name option allows you to set a custom name for a slicer to make it more meaningful and understandable.
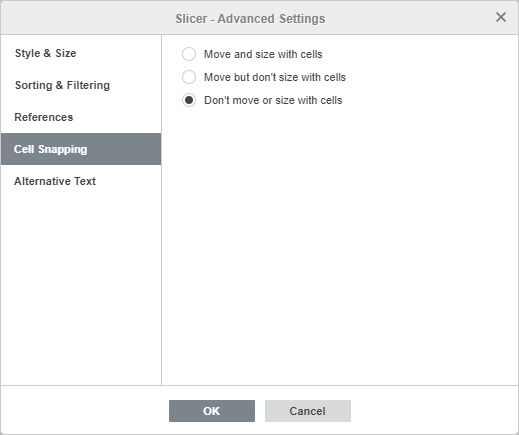
The Cell Snapping tab contains the following parameters:
- Move and size with cells - this option allows you to snap the slicer to the cell behind it. If the cell moves (e.g. if you insert or delete some rows/columns), the slicer will be moved together with the cell. If you increase or decrease the width or height of the cell, the slicer will change its size as well.
- Move but don't size with cells - this option allows you to snap the slicer to the cell behind it, preventing the slicer from being resized. If the cell moves, the slicer will be moved together with the cell, but if you change the cell size, the slicer dimensions remain unchanged.
- Don't move or size with cells - this option allows you to prevent the slicer from being moved or resized if the cell position or size was changed.
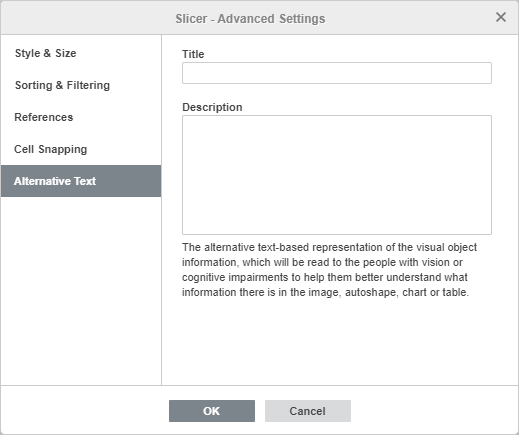
The Alternative Text tab allows you to specify the Title and the Description which will be read to people with vision or cognitive impairments to help them better understand what information the slicer contains.
Delete a slicer
To delete a slicer,
- Select the slicer by clicking it.
- Press the Delete key.
Watch video
Slicers for filtering spreadsheet data in ONLYOFFICE Docs
Try filtering values in a spreadsheet or pivot table using slicers.