Configuración del espaciado entre líneas de párrafo
En el Editor de Documentos, puedes establecer la altura de línea para las líneas de texto dentro del párrafo, así como los márgenes entre el párrafo actual y el anterior o los párrafos siguientes.
Para hacerlo,
- coloca el cursor dentro del párrafo requerido, o selecciona varios párrafos con el ratón o todo el texto presionando la combinación de teclas Ctrl+A,
-
utiliza los campos correspondientes en la barra lateral derecha para lograr los resultados deseados:
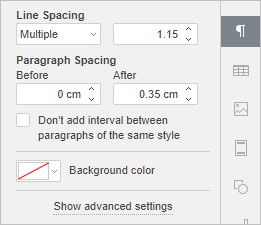
- Espaciado entre líneas - establece la altura de línea para las líneas de texto dentro del párrafo. Puedes seleccionar entre tres opciones: al menos (establece el espaciado mínimo necesario para ajustar la fuente o gráfico más grande en la línea), múltiple (establece el espaciado de línea que puede expresarse en números mayores que 1), exactamente (establece un espaciado de línea fijo). Puedes especificar el valor necesario en el campo a la derecha.
-
Espaciado de párrafo define la cantidad de espaciado entre párrafos.
- Antes define la cantidad de espaciado antes del párrafo.
- Después define la cantidad de espaciado después del párrafo.
-
No agregar intervalo entre párrafos del mismo estilo - marca esta casilla si no necesitas espaciado entre párrafos del mismo estilo.
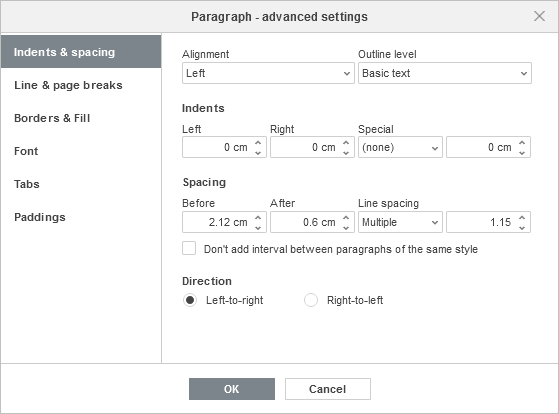
Estos parámetros también se pueden encontrar en la ventana de Configuración avanzada de párrafo. Para abrir la ventana de Configuración avanzada de párrafo, haz clic derecho en el texto y elige la opción Configuración avanzada de párrafo del menú, o utiliza la opción Mostrar configuración avanzada en la barra lateral derecha. Luego cambia a la pestaña Sangrías y espaciado y ve a la sección Espaciado.
Para cambiar rápidamente el espaciado de línea del párrafo actual, también puedes usar el icono de Espaciado de línea de párrafo  en la pestaña Inicio de la barra de herramientas superior seleccionando el valor requerido de la lista: 1.0, 1.15, 1.5, 2.0, 2.5 o 3.0 líneas, así como abrir el panel derecho correspondiente haciendo clic en el elemento del menú Opciones de espaciado de línea, y elegir si deseas Agregar o Eliminar espacio después del párrafo.