Using named ranges
Names are meaningful notations that can be assigned to a cell or cell range and used to simplify working with formulas in the Spreadsheet Editor. Creating a formula, you can insert a name as its argument instead of using a reference to a cell range. For example, if you assign the Annual_Income name to a cell range, it will be possible to enter =SUM(Annual_Income) instead of =SUM(B1:B12). Thus, formulas become clearer. This feature can also be useful in case a lot of formulas are referred to one and the same cell range. If the range address is changed, you can make the correction once by using the Name Manager instead of editing all the formulas one by one.
There are two types of names that can be used:
- Defined name – an arbitrary name that you can specify for a certain cell range. Defined names also include the names created automatically when setting up print areas.
- Table name – a default name that is automatically assigned to a new formatted table (Table1, Table2, etc.). You can edit this name later.
If you have created a slicer for a formatted table, an automatically assigned slicer name will also be displayed in the Name Manager (Slicer_Column1, Slicer_Column2 etc. This name consists of the Slicer_ part and the field name corresponding to the column header from the source data set). You can edit this name later.
Names are also classified by Scope, i.e., the location where a name is recognized. A name can be scoped to the whole workbook (it will be recognized for any worksheet within this workbook) or to a separate worksheet (it will be recognized for the specified worksheet only). Each name must be unique within a single scope, the same names can be used within different scopes.
Create new names
To create a new defined name for a selection:
- Select a cell or cell range you want to assign a name to.
-
Open a new name window in a suitable way:
- Right-click the selection and choose the Define Name option from the contextual menu,
- or click the Named ranges
 icon on the Home tab of the top toolbar and select the Define Name option from the menu.
 - or click the
 Named ranges button on the Formula tab of the top toolbar and select the Name manager option from the menu. Choose option New in the opened window.
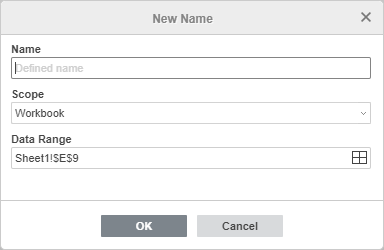
The New Name window will open:
-
Enter the necessary Name in the text entry field.
Note: a name cannot start with a number, contain spaces or punctuation marks. Underscores (_) are allowed. Case does not matter.
- Specify the name Scope. The Workbook scope is selected by default, but you can specify an individual worksheet, selecting it from the list.
-
Check the selected Data Range address. If necessary, you can change it. Click the
 icon - the Select Data Range window will open.
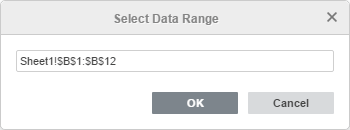
Change the link to the cell range in the entry field, or select a new range on the worksheet with the mouse and click OK.
- Click OK to save the new name.
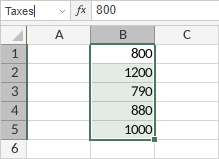
To quickly create a new name for the selected cell range, you can also enter the desired name into the name box located to the left of the formula bar and press Enter. The name created in such a way is scoped to the Workbook.
Manage names
All the existing names can be accessed via the Name Manager. To open it:
- click the Named ranges icon on the Home tab of the top toolbar and select the Name manager option from the menu,
- or click the arrow in the name field and select the Name Manager option.
The Name Manager window will open:
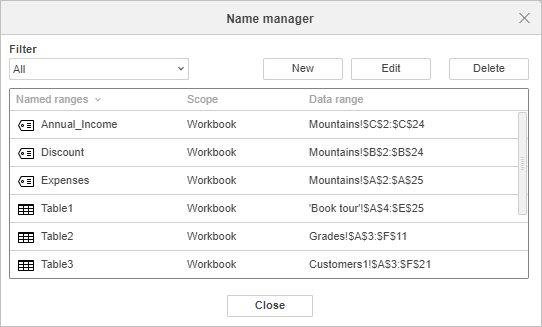
For your convenience, you can filter the names selecting the name category you want to be displayed: All, Defined names, Table names, Names Scoped to Sheet or Names Scoped to Workbook. The names that belong to the selected category will be displayed in the list, the other names will be hidden.
To change the sort order for the displayed list, you can click on the Named Ranges or Scope titles in this window.
To edit a name, select it in the list and click the Edit button. The Edit Name window will open:
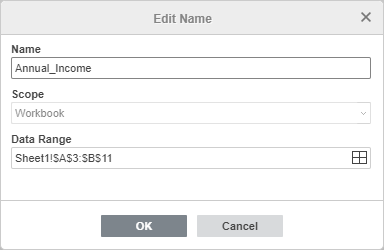
For a defined name, you can change the name and the data range it refers to. For a table name, you can change the name only. When all the necessary changes are made, click OK to apply them. To discard the changes, click Cancel. If the edited name is used in a formula, the formula will be automatically changed accordingly.
To delete a name, select it in the list and click the Delete button.
Note: if you delete the name that is used in a formula, the formula will no longer work (it will return the #NAME? error).
You can also create a new name in the Name Manager window by clicking the New button.
Use names when working with the spreadsheet
To quickly navigate through cell ranges, you can click the arrow in the name box and select the necessary name from the name list – the data range that corresponds to this name will be selected in the worksheet.
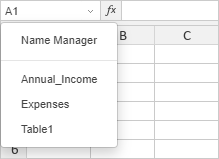
Note: the name list displays the defined names and table names scoped to the current worksheet and to the whole workbook.
To add a name as an argument of a formula:
- Place the insertion point where you need to add a name.
-
Make one of the following steps:
- enter the name of the necessary named range manually using the keyboard. Once you type the initial letters, the Formula Autocomplete list will be displayed. As you type, the items (formulas and names) that match the entered characters are displayed in it. You can select the necessary defined name or table name from the list and insert it into the formula by double-clicking it or pressing the Tab key.
-
or click the Named ranges icon on the Home tab of the top toolbar, select the Paste name option from the menu, choose the necessary name from the Paste Name window and click OK:
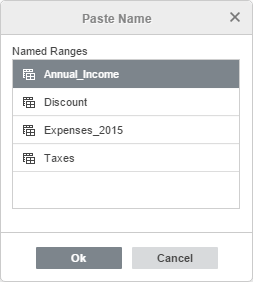
Note: the Paste Name window displays the defined names and table names scoped to the current worksheet and to the whole workbook.
To use a name as an internal hyperlink:
- Place the insertion point where you need to add a hyperlink.
- Go to the Insert tab and click the
 Hyperlink button.
 -
In the opened Hyperlink Settings window, select the Internal Data Range tab and choose a named range.
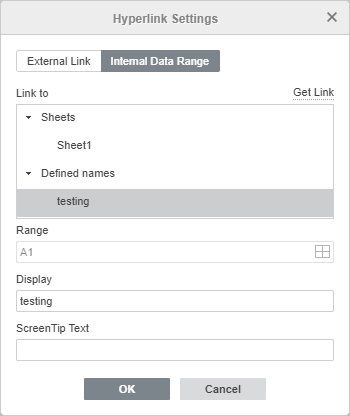
- Click OK.