ONLYOFFICE WebDAV-Server konfigurieren
Einleitung
ONLYOFFICE Workspace enthält jetzt einen eigenen WebDAV-Server. WebDAV (Web Distributed Authoring and Versioning) ist eine Erweiterung des HTTP-Protokolls, mit der Benutzer Dateien auf entfernten Webservern gemeinsam bearbeiten und verwalten können.
Sie können sich über einen Dateimanager/WebDAV-Client mit dem ONLYOFFICE-WebDAV-Server verbinden und sich mit dem Benutzernamen und Kennwort autorisieren, die Sie für den Zugriff auf Ihr Portal verwenden. Danach können Sie auf Ihrem Portal gespeicherte Dateien verwalten, erstellen und bearbeiten, indem Sie Desktop-Office-Suiten (ONLYOFFICE Desktop Editoren, MS Office usw.) verwenden.
Unterstützte Operationen:
- Bearbeiten (Erstellen, Anzeigen, Ändern, Entfernen) von Dateien
- Herunterladen von Dateien vom Server auf Ihrem Computer
- Hochladen von Dateien von Ihrem Computer auf den Server
- Kopieren von Dateien
- Verschieben von Dateien
Die Lösung wurde unter Windows 10 64-Bit mit folgender Software getestet:
- WebDAV-Clients: WinSCP, FileZilla, cyberduck, crossFTP.
- Dateimanagers: Windows File Explorer, Total Commander, SpeedCommander, FreeCommander, Multi Commander, Double Commander, XYplorer, Q-Dir, NexusFile, Directory Opus, Just Manager, Unreal Commander.
Die Lösung wurde auf Ubuntu 20.04 mit dem Standard-Dateimanager getestet.
Verbindung zum ONLYOFFICE WebDAV-Server unter Windows herstellen
Option 1: Verwenden eines Dateimanagers unter Windows
Schritt 1: Nur für Windows-Server. Überspringen Sie diesen Schritt für Windows 10
Bevor Sie sich über einen Dateimanager mit dem Webserver verbinden, installieren Sie den Windows WebDAV-Client:
- Führen Sie Windows PowerShell als Administrator aus.
-
Führen Sie den folgenden Befehl aus:
Install-WindowsFeature WebDAV-Redirector –Restart -
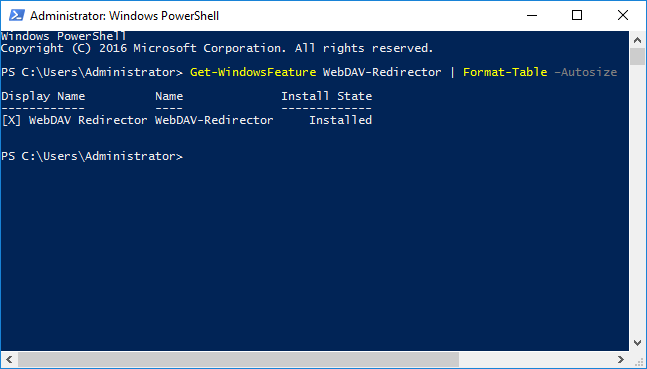
Überprüfen Sie nach dem Neustart, ob WebDAV-Redirector installiert ist:
Get-WindowsFeature WebDAV-Redirector | Format-Table –Autosize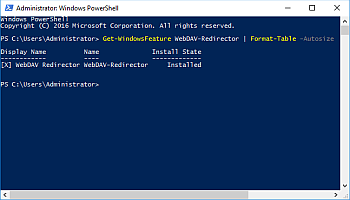
-
Zwei neue Dienste werden im System erscheinen:
WebClient(get-service WebClient) – ermöglicht Windows-Programmen, Dateien im Web zu erstellen, zu ändern und darauf zuzugreifen.MRxDAV(get-service MRxDAV) – ein Driver des Dateisystems (WebDav Client Redirector Driver).
Schritt 2: Für Windows Server und Windows 10
-
Führen Sie Windows PowerShell als Administrator aus und ändern Sie den Starttyp für zwei Dienste in „Automatisch“.
Standardmäßig sind der
WebClient-Dienst und derMRxDAV-Driver deaktiviert und für den manuellen Start eingerichtet. Ändern Sie den Starttyp auf Automatisch und starten Sie die Dienste mit den folgenden Befehlen:Set-Service WebClient -StartupType Automatic Set-Service MRxDAV -StartupType Automatic Start-Service WebClient Start-Service MRxDAV - Öffnen Sie den Windows-Datei-Explorer.
-
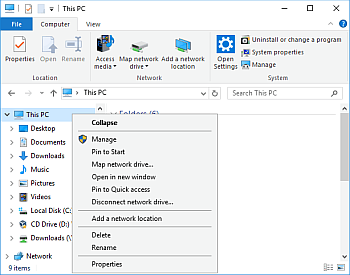
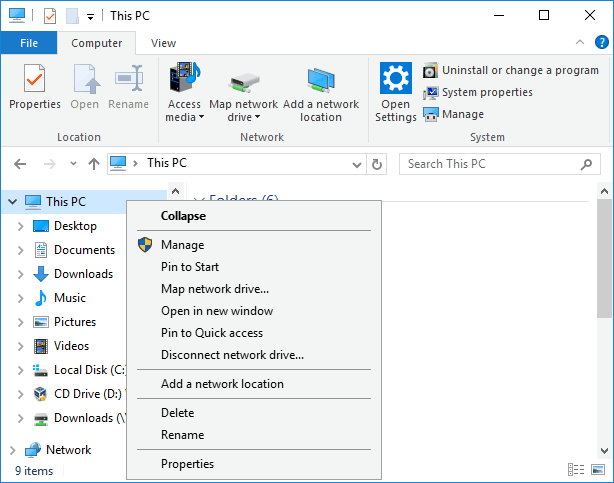
Klicken Sie im hierarchischen Baum auf der linken Seite mit der rechten Maustaste auf den Menüpunkt Dieser PC, um das Kontextmenü zu öffnen. Wählen Sie die Option Netzlaufwerk verbinden.... Wechseln Sie alternativ oben auf die Registerkarte Computer und wählen Sie die Option Netzlaufwerk verbinden.
-
Ein neues Fenster wird geöffnet. Geben Sie im Feld Drive Ihre Portaladresse ein und fügen Sie
/webdavhinzu (z. B.https://yourportal.onlyoffice.com/webdav). Klicken Sie auf die Schaltfläche Fertig stellen.
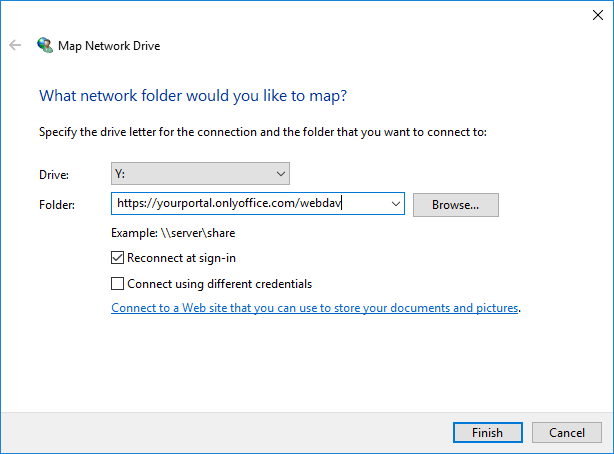
-
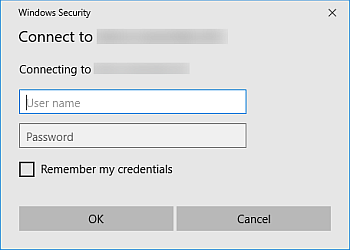
Geben Sie im sich öffnenden Autorisierungsfenster den Benutzernamen und das Passwort ein, die Sie für den Zugriff auf Ihr Konto in diesem Portal verwenden. Klicken Sie auf OK.
-
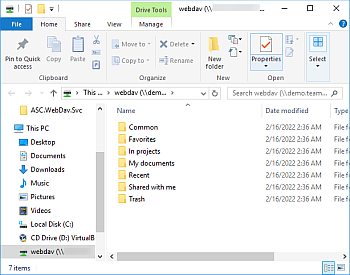
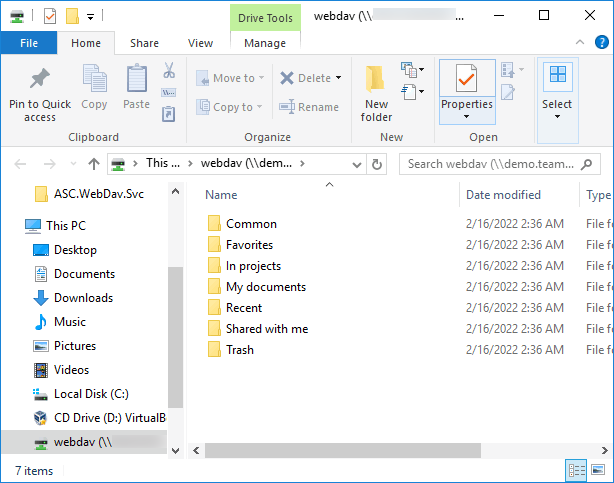
Sie sehen die Ordnerstruktur, die den Ordnern des Moduls Dokumente in Ihrem Portal entspricht:
Option 2: Verwenden eines WebDAV-Clients (WinSCP) unter Windows
- Öffnen Sie WinSCP.
- Wählen Sie oben im Menü Sitzung den Menüpunkt Neue Sitzung....
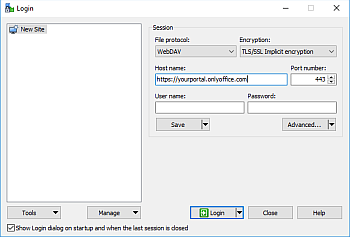
-
Das Fenster Anmeldung wird geöffnet.
- Wählen Sie in der Drop-Down-Liste Dateiprotokoll die Option WebDAV aus.
- Wählen Sie in der Drop-Down-Liste Verschlüsselung die Option TLS/SSL implizite Verschlüsselung aus.
- Geben Sie im Feld Hostname Ihre Portaladresse ein (z. B.
https://yourportal.onlyoffice.com). - Legen Sie im Feld Portnummer den Wert 443 fest.
- Geben Sie in die Felder Benutzername und Passwort den Benutzernamen und das Passwort ein, die Sie für den Zugriff auf Ihr Konto in diesem Portal verwenden.
- Klicken Sie auf die Schaltfläche Erweitert....

-
Das Fenster Erweiterte Site-Einstellungen wird geöffnet. Wählen Sie im linken Menü Umgebung den Menüpunkt Verzeichnisse. Geben Sie im Feld Remote-Verzeichnis
/webdavein. Klicken Sie auf OK.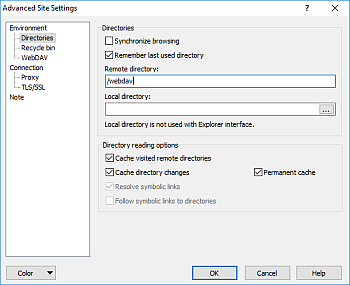
-
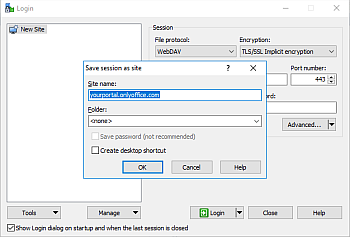
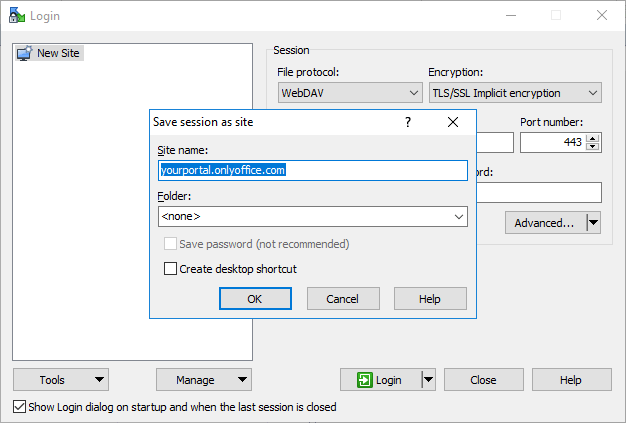
Klicken Sie im Fenster Anmeldung auf die Schaltfläche Speichern. Das Fenster Sitzung als Website speichern wird geöffnet. Klicken Sie auf OK.
- Klicken Sie auf die Schaltfläche Anmelden.
-
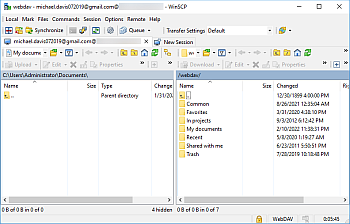
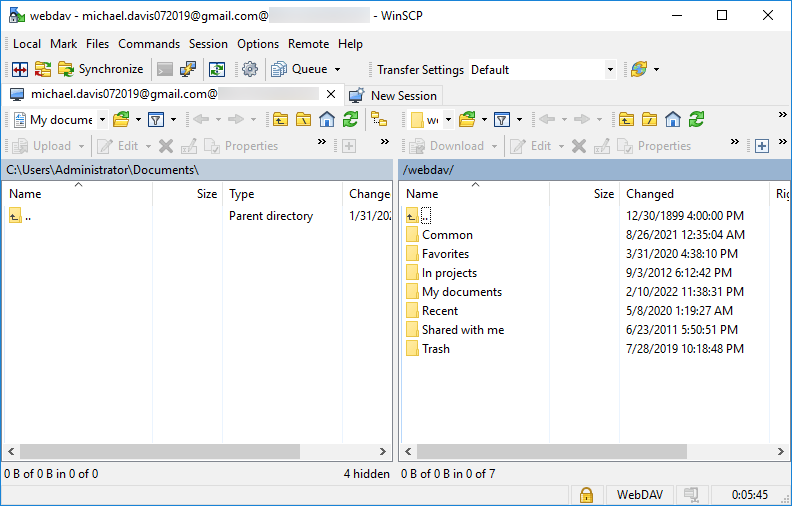
Sie werden nach Ihrem Passwort gefragt. Nach Eingabe des Passworts sehen Sie die Ordnerstruktur, die den Ordnern des Moduls Dokumente auf Ihrem Portal entspricht:
Verbindung zum ONLYOFFICE WebDAV-Server unter Ubuntu 20.04 herstellen
- Öffnen Sie den Dateimanager.
-
Klicken Sie links auf den Menüpunkt + Andere Standorte.
-
Geben Sie im Feld Mit Server verbinden in der unteren rechten Ecke Ihre Portaladresse mit dem Präfix
davs://ein und fügen Sie/webdavam Ende hinzu.Zum Beispiel,
davs://yourportal.onlyoffice.com/webdav. Klicken Sie auf die Schaltfläche Verbinden.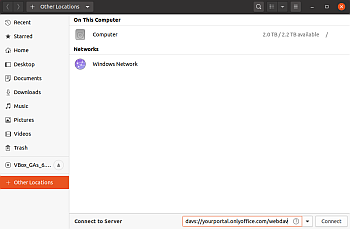
-
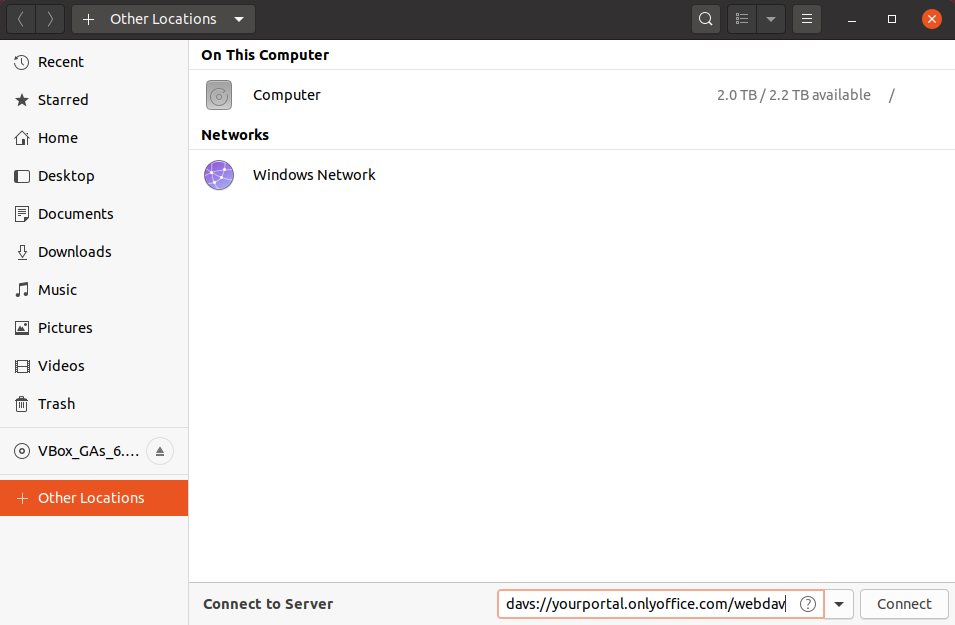
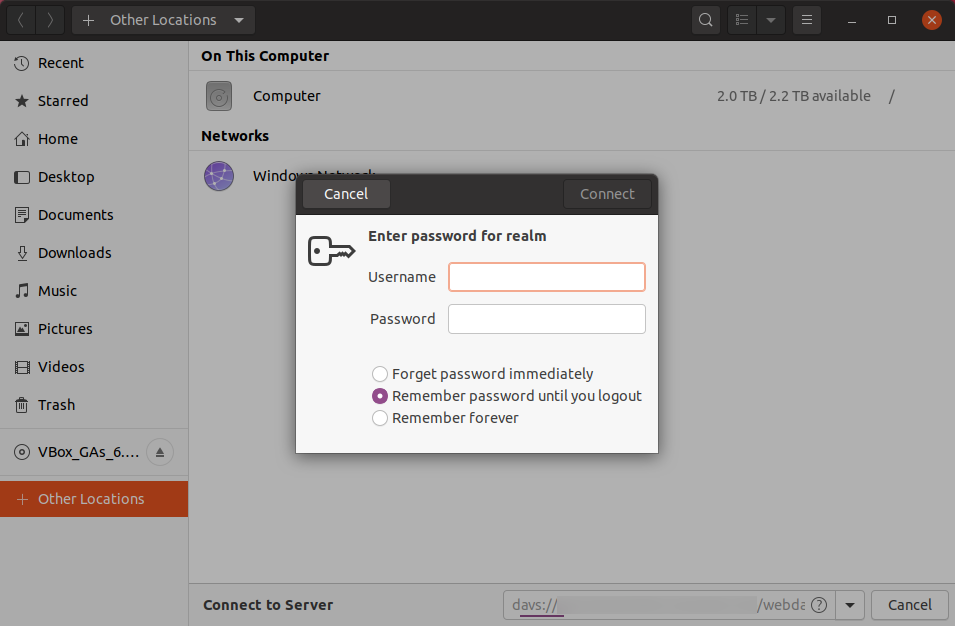
Geben Sie im sich öffnenden Autorisierungsfenster den Benutzernamen und das Passwort ein, die Sie für den Zugriff auf Ihr Konto in diesem Portal verwenden. Klicken Sie auf die Schaltfläche Verbinden.

Arbeiten mit Dokumenten
Wenn Sie sich mit dem ONLYOFFICE WebDAV-Server verbinden, können Sie mit den folgenden Abschnitten des Moduls Dokumente arbeiten: Meine Dokumente, Für mich freigegeben, Favoriten, Zuletzt verwendet, Privater Raum (falls aktiviert), Gemeinsame Dokumente, Dokumente der Projekte, Papierkorb. Je nach Abschnitt können Sie verschiedene Operationen mit Dateien durchführen.
Unterstützte Operationen für jeden Abschnitt
- Meine Dokumente: Bearbeiten (Erstellen, Anzeigen, Ändern, Entfernen), Herunterladen, Hochladen, Kopieren, Verschieben.
-
Für mich freigegeben: Bearbeiten (Anzeigen, Ändern), Herunterladen, Kopieren.
Der Zugriff auf die Dateien entspricht den Zugriffsrechten des Dateibesitzers:
- Voller Zugriff: Bearbeiten (Anzeigen, Ändern), Herunterladen, Kopieren.
- Schreibgeschützt: Bearbeiten (Anzeigen), Herunterladen, Kopieren.
- Zugriff verweigern: Es können keine Operationen ausgeführt werden.
Sie können eine Datei nicht von einem Dateimanager aus freigeben. -
Favoriten: Bearbeiten (Anzeigen, Ändern, Entfernen), Herunterladen, Kopieren.
Sie können eine Datei nicht von einem Dateimanager aus als Favorit markieren.
- Zuletzt verwendet: Bearbeiten (Anzeigen, Ändern, Löschen), Herunterladen, Kopieren.
-
Privater Raum: Nur eigene Dateien/Ordner verschieben/umbenennen.
Sie können keine anderen Operationen von einem Dateimanager ausführen.
- Gemeinsame Dokumente: Bearbeiten (Erstellen, Anzeigen, Ändern, Entfernen), Herunterladen, Hochladen, Kopieren, Verschieben.
- Dokumente der Projekte: Bearbeiten (Anzeigen, Ändern, Löschen), Herunterladen, Kopieren.
-
Papierkorb: Bearbeiten (Anzeigen, Ändern, Entfernen), Herunterladen, Kopieren.
Sie können eine Datei nicht von einem Dateimanager wiederherstellen.
Details und bekannte Probleme
Im Papierkorb ist es möglich, beliebige Operationen mit Dateien/Ordnern durchzuführen, da der Zugriff auf Dateien der vom Server empfangenen Eigenschaft access entspricht. Jedes Element im Papierkorb hat die Eigenschaft access = 0, was vollen Zugriff bedeutet. Gleichzeitig ist es nicht möglich, neue Elemente im Papierkorb zu erstellen, da die Berechtigungen nur das Anzeigen des Inhalts zulassen.
Beim Ausführen jeder Operation wird eine Anfrage an den Server gesendet. Wenn die Antwort vom Server negativ war, sollte die Operation nicht in einem Dateimanager durchgeführt werden. Je nach Dateimanager wird der Vorgang möglicherweise als abgeschlossen angezeigt. Nach dem Aktualisieren des Ordners wird alles korrekt angezeigt.
Wenn Sie mehrere Dateien (oder Ordner) mit demselben Namen in einem bestimmten Ordner auf Ihrem Portal haben, erhalten diese Dateien in einem Dateimanager eine Nummer: file_name, file_name(1), file_name(2). Dies wirkt sich nicht auf Operationen mit Dateien aus, da die Datei-ID anstelle des Dateinamens verwendet wird. Für die Umbenennung wird der tatsächliche Dateiname benötigt. Er wird im zusätzlichen Feld realTitle gespeichert.
Bearbeiten mehrere Benutzer gleichzeitig dieselbe Datei, werden nach dem Speichern die Änderungen des Benutzers angezeigt, der die Datei zuletzt gespeichert hat.
In vielen Dateimanagern, die die WebDAV-Verbindung über die Microsoft-Implementierung verwenden, ist es nicht möglich, Dateien herunterzuladen, die größer als 50000000 Byte sind. Um dieses Problem zu lösen, können Sie den entsprechenden Wert in der Windows-Registrierung wie hier beschrieben ändern.
Beim Hochladen einer Datei auf den Server wird eine Sitzung erstellt und die Datei in Blöcken an den Server gesendet. Daher kann eine Datei beliebiger Größe, die die Speicherkapazität zulässt, auf den Server hochgeladen werden.
In den Dateimanagern, die die WebDAV-Anbindung über die Microsoft-Implementierung verwenden, gibt es die Möglichkeit, einige Root-Ordner (z. B. Für mich freigegeben) zu kopieren, auf denen der Zugriffsrecht "Schreibgeschützt" gewährt wurde. Die Ordner werden mit derselben Zugriffsebene kopiert, und es können einige Probleme beim Arbeiten mit den kopierten Ordnern auftreten (wenn Sie beispielsweise den Ordner „Für mich freigegeben“ kopieren, können Sie keine Dateien in diesem Ordner hochladen, erstellen oder entfernen sowie den kopierten Ordner selbst kopieren).