Inserting tables
Insert a table
- Place the cursor where you want the table to be put.
- Tap the
 icon at the top toolbar to open the new object insertion panel.
 - Tap the
 icon
to enter the Table tab and select one of the available table templates. Each template combines certain formatting parameters, such as a background color, border style, row/column banding etc. Swipe right or left to see more templates.
icon
to enter the Table tab and select one of the available table templates. Each template combines certain formatting parameters, such as a background color, border style, row/column banding etc. Swipe right or left to see more templates.
Customize the table size by choosing the required number of columns and rows in the corresponding window that appears. The 3 by 4 cell table is selected by default. Tap OK to insert a table.
Tap within a cell to place the insertion point in it and start entering data. To select a cell, tap it. To select a range of cells, tap a cell and drag the selection handles.
Add or delete rows or columns
- Tap a cell within the necessary row/column.
- Open the text/object settings panel by tapping the
 icon at the top toolbar.
 - Switch to the Table tab.
-
Use the corresponding icons:
 — to insert a column at the left side from the column where the cursor is placed.
 — to insert a column at the right side from the column where the cursor is placed.
 — to insert a row above the row where the cursor is placed.
 — to insert a row below the row where the cursor is placed.
 — to remove the column where the cursor is placed.
 — to remove the row where the cursor is placed.
The corresponding options are also located in the toolbar below.

Adjust the table settings
- Select the table by tapping on it.
- Open the Table Settings panel by tapping the icon at the top toolbar.
-
Tap the arrow next to the necessary menu item: Table Options, Style or Wrap.
-
The Table Options section contains the following options:
- Resize to Fit Contents — enables automatic change of each column width in accordance with the text within its cells.
- ROWS & COLUMNS SIZE — adjust the width and height by double tapping the numerical value to change it manually.
- Wrap Text — enables wrapping text in a table.
- CELL MARGINS — the space between the text within the cells and the cell border used by default. The value can be altered by dragging the slider.
-
The Style section contains the following three tabs:
-
Style — to change the selected preformatted table template. Swipe right or left to see more templates.
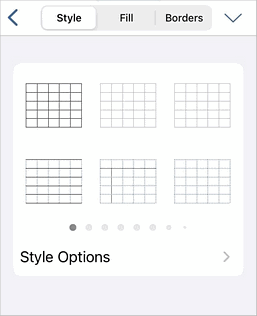
Tap the arrow next to the Style Options menu item below to use the options that allow to emphasize certain rows/columns applying a specific formatting to them, or highlight different rows/columns with the different background colors to clearly distinguish them.
- Header Row — emphasizes the topmost row in the table with a special formatting.
- Total Row — emphasizes the bottommost row in the table with a special formatting.
- Banded Row — enables the background color alternation for odd and even rows.
- First Column — emphasizes the leftmost column in the table with a special formatting.
- Last Column — emphasizes the rightmost column in the table with a special formatting.
- Banded Column — enables the background color alternation for odd and even columns.
- Repeat as Header Row — is used to insert the same header row at the top of each page in long tables.
- Fill — to choose a solid color for the table background. Select the necessary color on the Theme Colors or the Standard Colors palette, or create your own Custom Color. If you don't want to use any fill, tap the No filling option.
-
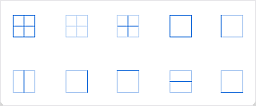
Borders — to set the border Size by dragging the slider, select its Color on the palette and choose the way it will be displayed in the cells by tapping one of the icons:
- The Wrap section allows to select a text wrapping style from the available ones and adjust some additional positioning options. To learn more, please refer to the Change text wrapping article.
-
Style — to change the selected preformatted table template. Swipe right or left to see more templates.
-
Remove the table
Select the table by tapping it and proceed in one of the following ways:
- tap the
 Delete table option in the menu below, or
 - open the Table Settings panel by tapping the icon at the top toolbar, and tap the Delete Table button.