Managing files
Managing content
To create new files or import content, tap the + icon in the top right corner and select one of the following options:
- New Document, New Spreadsheet, or New Presentation — create a new file of the selected type.
 Import File — browse and import a file from your device storage.
 Import Image — select an image from your photo library.
 Take Picture — capture a photo using your device camera.
 Scan Document — scan a printed document and convert it to an editable file.
 Connect Storage — connect a new cloud storage.
Filtering items
To access filtering settings, tap the  icon in the top right corner in the On Device or ONLYOFFICE section.
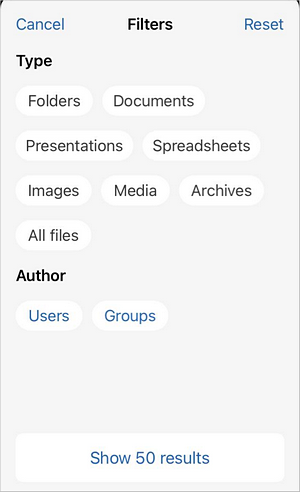
The available filtering options are:
- Type — filter by file type: Folders, Documents, Presentations, Spreadsheets, Images, Media, Archives, All files.
- Author — filter by user or group. Tap Users or Group, then select the required user or group from the list or use the search field.
- Search — exclude subfolders from the search by tapping the corresponding button.
To reset applied filters, open the Filters window and tap Reset in the top right corner.
Sort and view files
To quickly find the necessary file by name, use the Search field on the top. Tap this field, enter the required file name and tap the Search button on the keyboard.

Tap the  icon in the upper right corner to access the following options:
- Select — select files and folders for batch operations.
- Icons/List — switch between displaying files as icons or as a list.
- Sort by — sort the file list by Date, Title, Type, Size, or Author. Tap the selected criterion again to reverse the sort order. The ascending order will be marked with an upwards
 arrow. The descending order will be marked with a downwards
  arrow.
Actions on a single file
Tap and hold the necessary file in the file list to access the file menu:
Available options may differ depending on the selected app section, file type, and your access rights.
 Select — select the file for batch operations.
 Preview — preview the file.
 Edit — edit the file (available for text documents, spreadsheets, presentations, and PDFs if you have the corresponding editing rights).
 Show version history — view the file's version history.
 Mark as favorite/Remove from favorites — add the file to Favorites for quick access or remove it if no longer needed.
 Download — download the file to the local ONLYOFFICE storage on your device for offline access.
 Copy — copy the file to another location.
 Export — open the iOS share sheet to share the file via AirDrop, Mail, or other apps, or copy it to another location.
 Rename — rename the file.
 Sharing settings — open the sharing settings window. The list of created links is displayed in the window. Tap the icon in the upper right corner to add users. When adding users, you can adjust their access rights in the lower left corner: Deny access, Viewer, Commentator, Reviewer, or Full access.
 Delete — move the file to the Trash. The deleted file can be restored or permanently deleted later.
Actions on a single folder
Tap the folder in the file list to open it. To return to the root folder/section, use the  icon in the upper left corner.
Tap and hold the necessary folder in the file list to access the folder menu:
- Select — select the folder for batch operations.
- Open — open the folder.
- Rename — rename the folder.
- Move or Copy — move or copy the folder to another location. After tapping this option, choose Copy or Move, then select the destination from the available root folders (local ONLYOFFICE storage or connected clouds).
- Delete — delete the folder with all its contents, moving it to the Trash.
Actions on multiple files/folders
Tap the icon in the upper right corner and choose the Select option. You can also tap and hold any file or folder and choose Select from the menu. Mark the required items using the empty circles on the left side of the items. Tap the icon in the lower right corner that corresponds to the action you want to perform on the selected items:
 — move all the selected items to the specified section/folder.
 — copy all the selected items to the specified section/folder.
 — move all the selected items to the Trash. The deleted items can be restored or permanently deleted later.
Actions on files/folders in the Trash
Tap and hold the necessary item in the Trash to access the menu. Choose one of the available options:
 Restore — restore the selected item.
- Delete — permanently delete the selected item from the Trash.
Tap the  icon in the upper right corner and tap empty circles on the left side of the items. Tap the icon in the lower right corner that corresponds to the action you want to perform on the selected items:
 — restore all the selected items.
 — permanently delete all the selected items from the Trash.
 — empty the Trash.