Managing Active connections
If you signed in to the portal from another device and forgot to sign out, you can manually close a specific active session.
Quick Start
Follow the steps below to close a particular session:
- Sign in to your portal.
- Go to your Profile page in the upper-right corner.
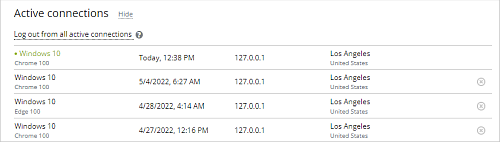
- Find the Active connections section. Click Show to open the list of all active connections of this user.
- Find the connection you need and click the
 icon located on the right.
 - Confirm the action.
The selected connection will be stopped and excluded from the list. After that, the user will need to enter their credentials once again to sign in to the portal from the same device.
The list of each active connection contains the following data: Operating system, Browser, Time and date, IP address, and Location.
To close all active connections:
- Sign in to your portal.
- Go to your Profile page in the upper-right corner.
-
- Click Log out from all active connections in the Active connections section.
or
- Click the
 icon next to the username and select the Log out from all active connections item from the drop-down list. This option can only be applied by administrators to profiles of other users.
- Click Log out from all active connections in the Active connections section.
- The Log out from all active connections window will appear:
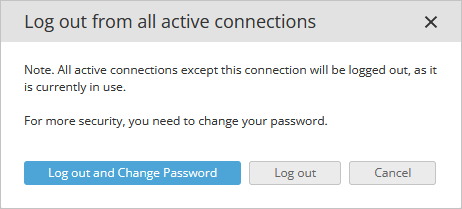
- Click Log out and Change password to log out of all connections and start the password change procedure.
- Click Log out to log out of all connections.
Additional Information
Q: Why is the Log out from all active connections item missing in the Actions
menu next to the user's name?
The Log out from all active connections function using the Actions menu can only be applied to other users. To sign out of all connections for your profile, open the Active connections section and click the Log out from all active connections button.
Enabling location detection for the server version
If you are using the server version, location detection is not available by default. To enable this feature, follow the steps below.
Chapter 1
To determine the location by IP address, you need to populate the `onlyoffice`.`dbip_location` table in the database.
The table has a specific data format.
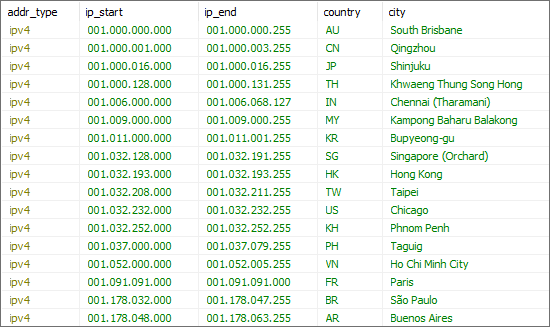
To display the location in the Active connections section, you need to populate the following columns:
`addr_type`: the type of the IP address.`ip_start`: the beginning of the IP address range.`ip_end`: the end of the IP address range.`country`: the country code in the ISO-3166-alpha2 format.`city`: the locality name.
The type of the IP address has two possible values: ipv4 or ipv6.
The IP address range is specified in an extended format containing empty positions:
127.0.0.1must be extended to127.000.000.001;::1must be extended to0000:0000:0000:0000:0000:0000:0000:0001.
The country code is specified as a two-letter abbreviation, e.g., AU, US, or JP. The ZZ value, meaning an unknown or unspecified country, is ignored.
Chapter 2
The data for populating the `onlyoffice`.`dbip_location` table can be taken from any source.
Following the instructions from Chapter 1, you can add records to the table in any convenient way.
There are many services that provide information on the geolocation of IP addresses. Most of these services allow you to download information in the .csv format.
As an example, we will use the https://db-ip.com/ service.
Download the free database in the .csv format. Use the following command, replacing {year} and {month} with the current year/month, e.g. 2022 and 08:
wget https://download.db-ip.com/free/dbip-city-lite-{year}-{month}.csv.gzUnpack the archive. Use the following command, replacing {year} and {month} with the current year/month, e.g. 2022 and 08:
gzip -dk dbip-city-lite-{year}-{month}.csv.gzChapter 3
To facilitate data transfer, we have written the IpGeolocationConverter utility that converts the source data from the .csv file into the required format.
The source code of the utility can be found on GitHub.
Building and running the executable
OS Windows
You can use Visual Studio or MSBuild in the console for building the executable. .NET Framework 4.8 Developer Pack is also required.
Download the utility, go to the directory, and run MSBuild.exe specifying the project file:
"%ProgramFiles(x86)%\Microsoft Visual Studio\2019\Community\MSBuild\Current\Bin\MSBuild.exe" IpGeolocationConverter.csprojRun the .\bin\Debug\IpGeolocationConverter.exe file.
OS Linux
You can use mono for building the executable. If ONLYOFFICE is already installed, mono is present either on the host or in the CommunityServer container.
Download the utility, go to the directory, and run the compiler specifying the source code file:
mcs -out:IpGeolocationConverter.exe Program.csRun the mono IpGeolocationConverter.exe file.
Alternatively, you can build the entire project using xbuild IpGeolocationConverter.csproj and run the mono bin/Debug/IpGeolocationConverter.exe file.
Once the executable file is launched, you will be prompted to enter the path to the .csv file containing data.
Then you will be prompted to enter the numbers of the columns in the file that correspond to the required data.
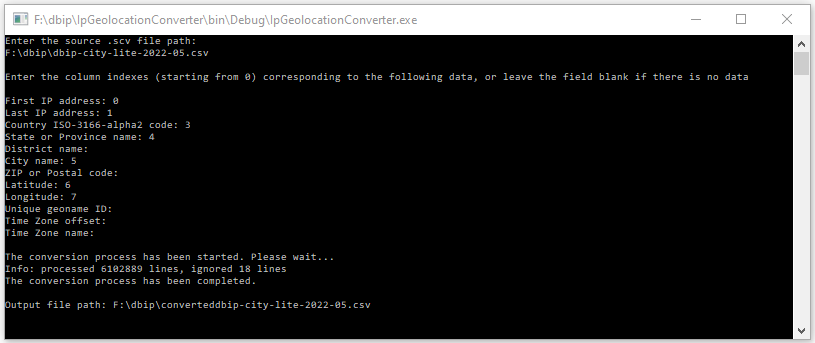
As a result, a new file containing data in the required format will be created in the directory with the specified .csv file.
Chapter 4
The output .csv file containing data must be imported to the `onlyoffice`.`dbip_location` table in the database.
Importing csv to the database
OS Windows + HeidiSQL
Open HeidiSQL.
Connect to the ONLYOFFICE MySQL database. To do that, enter the following data:
- Hostname: ONLYOFFICE Domain or IP address
- User: root
- Password: onlyoffice
- Database: onlyoffice
Then click Open.
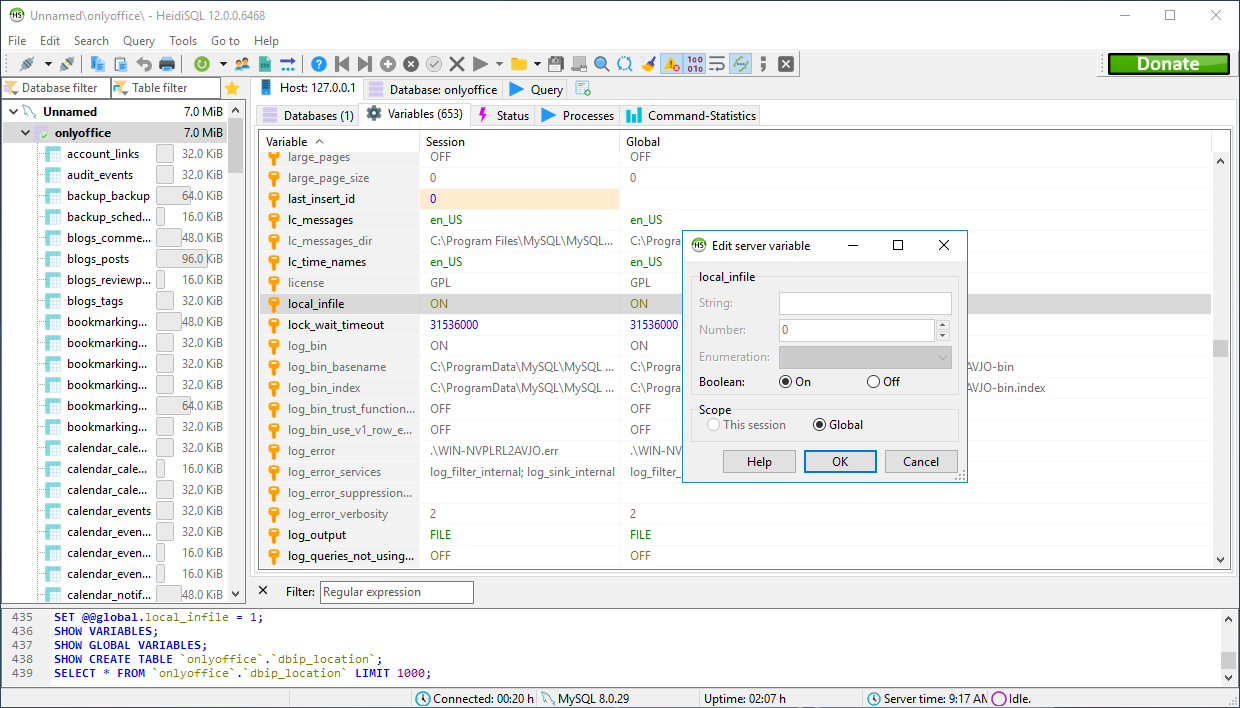
Specify the ON value for the local_infile setting.
Select the Tools > Import CSV file... menu item. Select the output file and the table, and specify the encoding, separators (Lines terminated by), and fields. Deselect the id and processed columns.
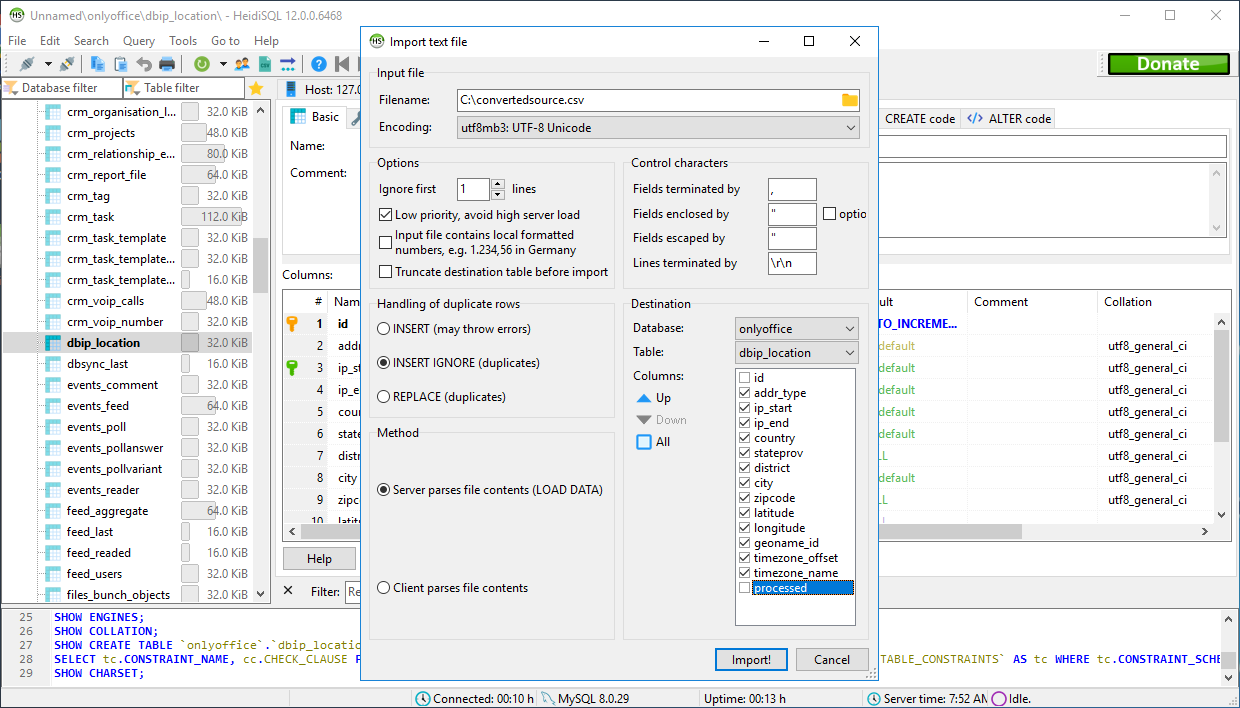
Click Import.
OS Linux + command line (ONLYOFFICE Docker version)
Copy the file containing data to the container:
docker cp ./converteddbip-city-lite-2022-05.csv onlyoffice-mysql-server:/tmp/dbip.csvEnter the container:
docker exec -it onlyoffice-mysql-server bashConnect to mysql:
mysql --local-infile=1 -u root -pmy-secret-pwMake sure that the local_infile setting has the ON value. Otherwise, you will get the following error: 'ERROR 3948 (42000): Loading local data is disabled; this must be enabled on both the client and server sides'.
SHOW GLOBAL VARIABLES LIKE 'local_infile';If not, set this value:
SET GLOBAL local_infile = true;Select the database:
use onlyoffice;Run the request:
load data local infile '/tmp/dbip.csv'
into table dbip_location
character set utf8
fields terminated by ','
enclosed by '"'
lines terminated by '\n'
(addr_type, ip_start, ip_end, country, stateprov, district, city, zipcode, latitude, longitude, geoname_id, timezone_offset, timezone_name);terminated by parameter may differ: '\n' or '\r\n'.