Managing files
Search and sorting tools
To quickly find the necessary file by name,
- tap the
 icon on the top,
 - enter the required file name or its part in the Search field that appears,
- tap the
 Search key on the keyboard.
To reset your search query, tap the  icon on the right. To close the search panel, tap the
 icon in the upper left corner of the screen.
To sort items in the file list,
- Tap the
 icon in the upper right corner.
 - Tap the Sort by option.
- Select the necessary sorting criterion: Date, Title, Type, Size, or Author.
- Tap the
 or
or  arrow next to the selected sorting criterion to sort the items in descending or ascending order.
Filtering items
To access the filtering settings, tap the  icon in the right top corner in the Clouds section to open the Filters window.
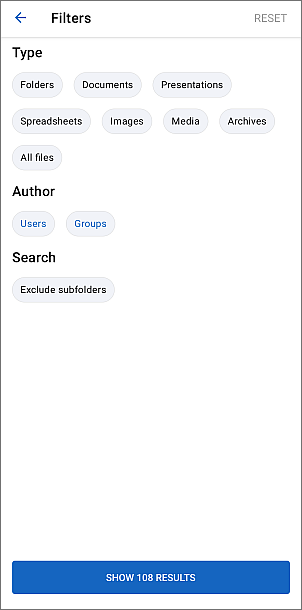
The available filtering options are:
- Filtering by Type:
- Choose which types of files you want to display: Folders, Documents, Presentations, Spreadsheets, PDF-documents, PDF-forms, Images, Media, Archives, All files.
-
Filtering by Author:
- Choose the author of the files you want to display: Users, Group.
- Depending on the previously selected option, the Select user or Select group window will open. Choose the required user/group or enter their name in the Search field above.
- Tap the Exclude subfolders option to exclude subfolders from search.
- When ready, tap the Show X results button below to apply the filtering options.
To reset previously applied filters, tap the icon in the right top corner in the Clouds section to open the Filters window and tap the RESET button at the top right corner.
Actions on a single file
Touch the  icon to the right of the necessary document in the file list to access the file menu.
Available options may differ depending on the selected app section, file type and your access rights.
Tap one of the menu items to choose the necessary action:
 Edit document - to open the file in the editing mode (this option is only available if you have corresponding rights to edit the file).
 View - view the file in the viewing mode.
 Show version history - to view all previous versions of the file and restore an earlier version if needed.
 Share - to share the file with your portal users or groups selecting one of the following access types: Full access, Editing, Fill forms (only available for
 .pdfforms), Comment, Review (the Review option is only available for the.docxfiles), Read Only, Deny access. Create room - create a dedicated collaboration room for the file to work together with other users in real time.
 Get link for external access - to quickly grant Read only access to the file using an external link. Once you tap this option, Read only access to the file will be enabled and the secret link will be copied to the clipboard. To change the access type, use the Share option from the file menu.
 Add to Favorites - to add the file to the Favorites section.
 Send a copy - share a copy of the file via email or messaging apps without giving access to the original file.
 Move - to move the file to the specified section/folder in the Documents app. Select the necessary Documents section and, optionally, the folder, then tap the Move here button.
 Copy - to create a copy of the file and move the created copy to the specified section/folder in the Documents app. Select the necessary Documents section and, optionally, the folder, then tap the Copy here button.
 Download - to save the file on your device. When the download is over, the
  icon will be displayed on the status bar. The file can be found in your default Downloads folder.
 Upload to cloud - to upload the file to the current cloud account storage, if connected.
 Rename - to change the file name.
 Delete - to move the file to the Trash. The deleted file can be permanently deleted later.
Actions on a single folder
Tap the folder name in the file list to open it. To return to the root folder use the
icon in the upper left corner.
Touch the icon to the right of the necessary folder in the file list to access the folder menu and select the action you want to perform by tapping one of the menu items:
- Share - to share the folder with your portal users or groups selecting one of the following access types: Full access, Editing, Review, Comment, Read Only, Deny access.
- Create room - create a dedicated collaboration room for the folder to work together with other users.
- Get link for external access - to quickly grant Read only access to the folder using an external link. Once you tap this option, Read only access to the folder will be enabled and the secret link will be copied to the clipboard. To change the access type, use the Share option from the folder menu.
- Add to Favorites - to add the folder to the Favorites section.
- Move - to move the folder to a different location. Select the necessary Documents section and, optionally, the folder, then tap the Move here button.
- Copy - to create a copy of the folder and move the created copy to the specified section/folder in the Documents app. Select the necessary Documents section and, optionally, the folder, then tap the Copy here button.
- Download - to save the folder on your device as a .tgz archive. When the download is over, the icon will be displayed on the status bar. The folder can be found in your default Downloads folder.
- Rename - to change the folder name.
- Delete - to delete the folder with all its contents moving it to the Trash.
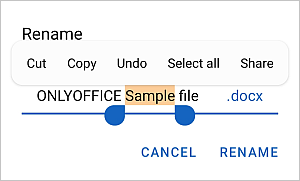
Rename items
To rename the selected file or folder, enter a new name in the dialog window that appears and press the RENAME button.
Select several items
Tap the
icon in the upper right corner, choose the Select option and tap the circular icons
 to the right of the necessary items one at a time.
The selected item icon will look like this: 
Tap the icon once again to access the Select All option. To clear the selection, tap the icon and choose the Deselect option.
Actions on multiple files or folders
You can delete, move, or copy several selected items at once.
To Create room for multiple files/folder, select the necessary Documents, tap the Create room button, and select your desired room type.
To delete the selected items, tap the
 icon in the upper right corner and tap Delete in the confirmation window. All the selected items will be moved to the Trash. The items can be permanently deleted later.
To move or copy the selected items to a different section or folder:
- Tap the
icon in the upper right corner.
- Choose the Move or Copy option from the menu.
- Select the necessary location: My documents or Rooms.
- Optionally, tap the folder within this section where you want to move/copy the items to.
- Tap the Move here or Copy here button in the lower right corner.
To download the selected items:
- Tap the
icon in the upper right corner.
- Tap the Download option from the menu. All the selected items will be saved as a .zip file.
When the download is over, the icon will be displayed on the status bar.
Actions on files or folders in the Trash
Swipe left to the end of the ribbon to find the Trash section.
- To restore a single item, touch the icon to the right of the necessary item in the Trash, then tap the
 Restore menu item, select the necessary Documents section and, optionally, the folder, then tap the RESTORE HERE button.
 - To restore all the selected items, tap the
icon in the upper right corner and select the Restore menu item. Select the necessary Documents section and, optionally, the folder, then tap the RESTORE HERE button.
- To permanently delete a single item, touch the icon to the right of the necessary item in the Trash, then tap the
 Delete menu item and tap DELETE in the confirmation window.
 - To permanently delete all the selected items from the Trash, tap the
icon on the top and tap Delete in the confirmation window. You can also select several items and restore or permanently delete all of them at once.
- To empty the Trash, tap the
icon in the upper right corner, tap Select all, then tap the Delete icon in the upper right corner, and tap Delete in the confirmation window.