Sending for electronic signature
Introduction
Once you integrate your portal with the DocuSign service, you will be able to send documents, spreadsheets, and presentations for electronic signature directly from your portal and receive signed documents as PDF files stored in the specified folder of the Documents module.
This is a great way to simplify and accelerate your document workflow. You can sign documents without printing and scanning them. This step-by-step guide describes how to send a document for approval and receive its signed copy.
Connecting DocuSign
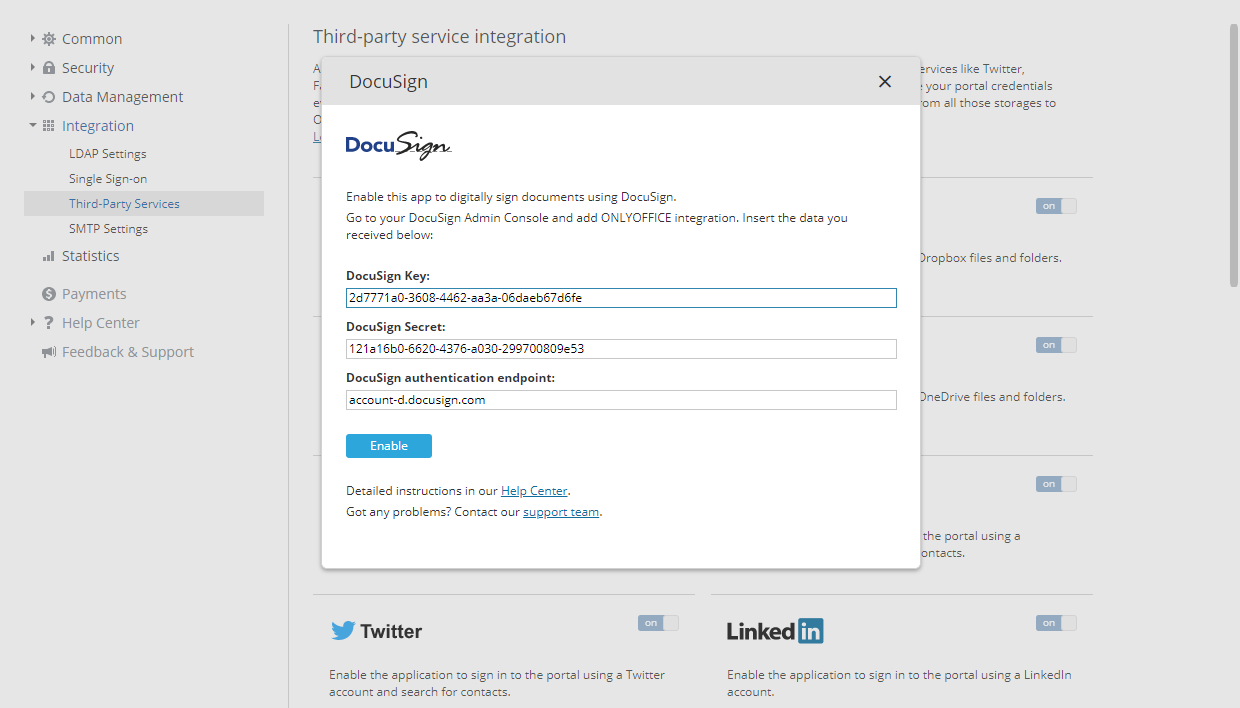
First, you need to add integration keys in the Settings > Integration > Third-Party Services section on your portal. You can use these instructions. This operation can be performed by the portal owner or full-access administrator only.
Once the integration keys are added and the Allow users to connect third-party storages setting is enabled, each portal user who wants to be able to send documents for signature must connect their DocuSign account in the Documents module. This operation does not require administrator permissions. To connect the DocuSign service:
- On your portal, go to the Documents module.
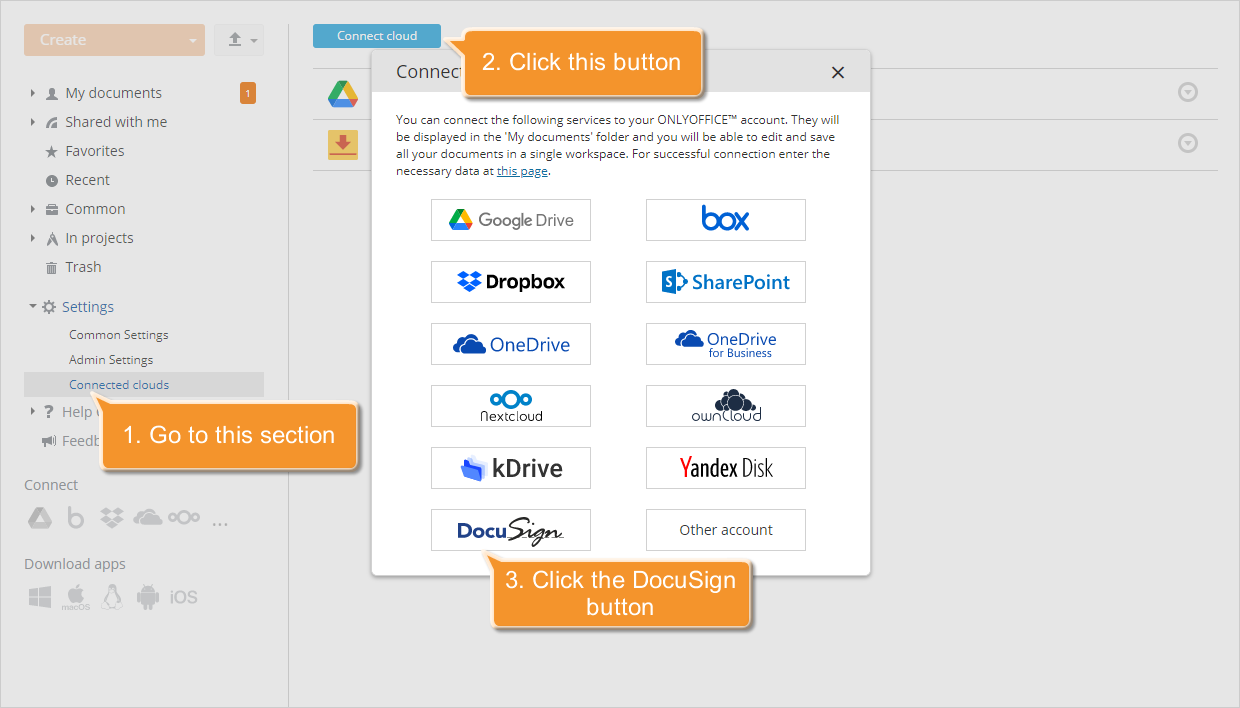
- Click the Connect link in the left sidebar.
Alternatively, you can expand the Settings section in the left sidebar, go to the Connected clouds section, and click Connect cloud. - Click DocuSign in the Connecting account window.
- In a new window that opens, sign in to your DocuSign account. To do that, specify your Email address and click Continue, then enter your Password and click Log in.
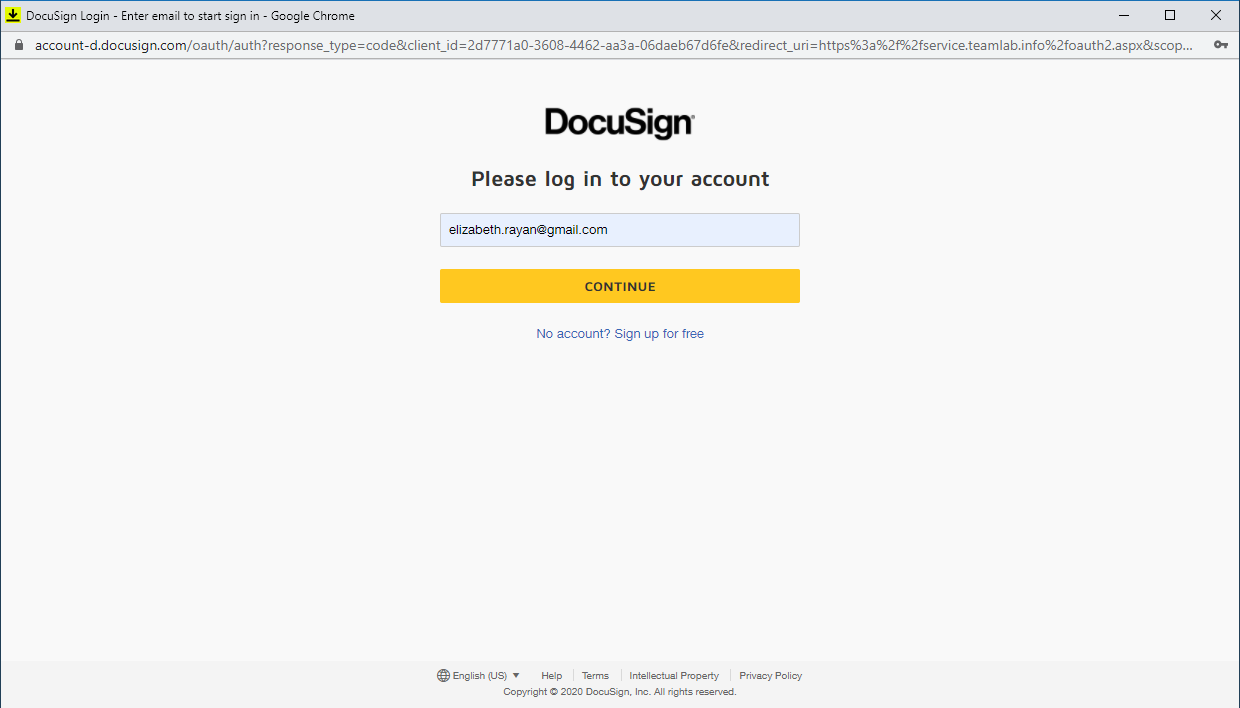 Pay attention to the address displayed in the address bar. Depending on the environment that has been used by the administrator when adding the DocuSign integration keys (DocuSign Sandbox or Production account), other portal users should also use corresponding accounts.
- https://account-d.docusign.com: if a sandbox is used.
- https://account.docusign.com: if a production account is used.
E.g., if a user has a DocuSign account previously registered at https://www.docusign.com/, they access this account at https://account.docusign.com. If the portal administrator connected the sandbox DocuSign application, the https://account-d.docusign.com address is used, so the user will not be able to connect their DocuSign account available at https://account.docusign.com. In such a case, the user will need to register a new account at https://account-d.docusign.com.
- Click Accept to let ONLYOFFICE access your DocuSign account.
Sending documents for signing
On your portal, go to the Documents module and select the document you want to send for signature.
- Right-click the document or use the Actions
 icon to the right of the file you need, then select the Sign with DocuSign option from the menu.
 - In the Sign document window that opens, change the document name for the signed file, if necessary.
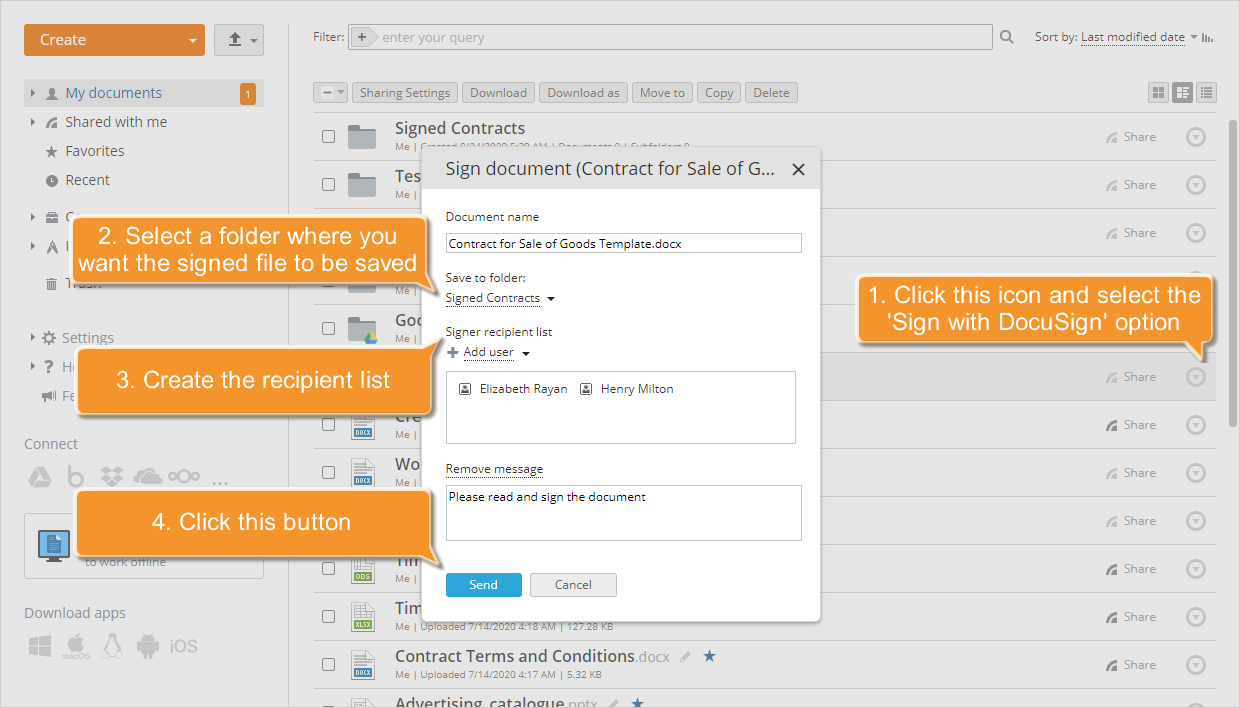
- Select the folder you want the signed file to be saved to. The My documents section is selected by default.
- Create the Signer recipient list. Click the Add user link, select the portal users you need from the list, and click Save. If you need to remove a user from the list, hover the mouse pointer over the
 user icon so that it turns into the
  trash icon. Click this icon to delete the user from the recipient list.
If you leave the recipient list unchanged (i.e., empty), you will need to add at least one recipient from your DocuSign account contacts later to complete the sending operation.
trash icon. Click this icon to delete the user from the recipient list.
If you leave the recipient list unchanged (i.e., empty), you will need to add at least one recipient from your DocuSign account contacts later to complete the sending operation. - Click the Add message link to display the text entry field and add an accompanying message for all the recipients.
- Click Send. You will be redirected to your DocuSign account that opens in a new web browser tab.
- Verify the recipient list and change it, if necessary. To do that, click Other actions in the upper-right corner and select the Edit Recipients option. When the recipient list is adjusted, click Done.
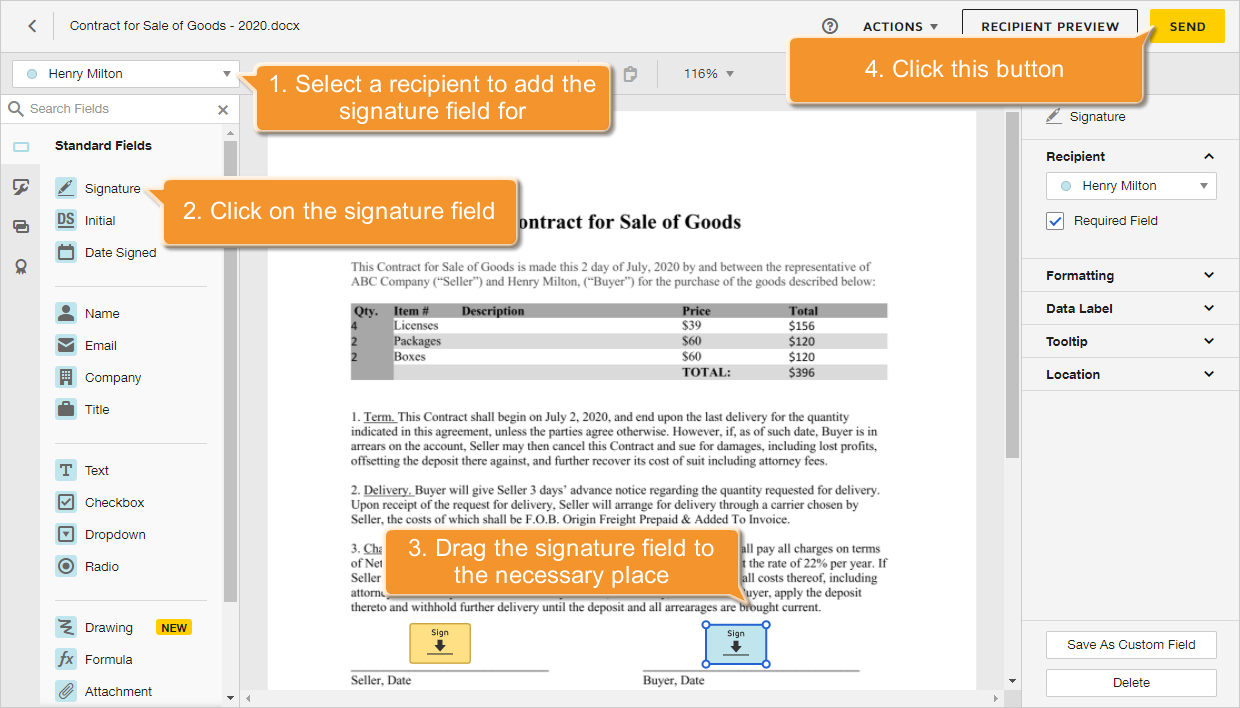
- You need to add a particular signature field for each of the recipients. First, select the recipient you want to add the signature field for using the list in the upper-left corner. In the Standard Fields panel on the left, find the field type you need. In this case, the Signature option is used. Click the selected field and drag it to the place in the document where you want the signature to be added. The signature field is marked with a color that corresponds to the selected recipient. Repeat the operation to add signature fields for all the recipients.
 To learn more about adding signing fields to a document, you can also refer to the official DocuSign documentation.
 - Click Send in the upper-right corner. You will be redirected to the Documents module of your portal.
Signing documents
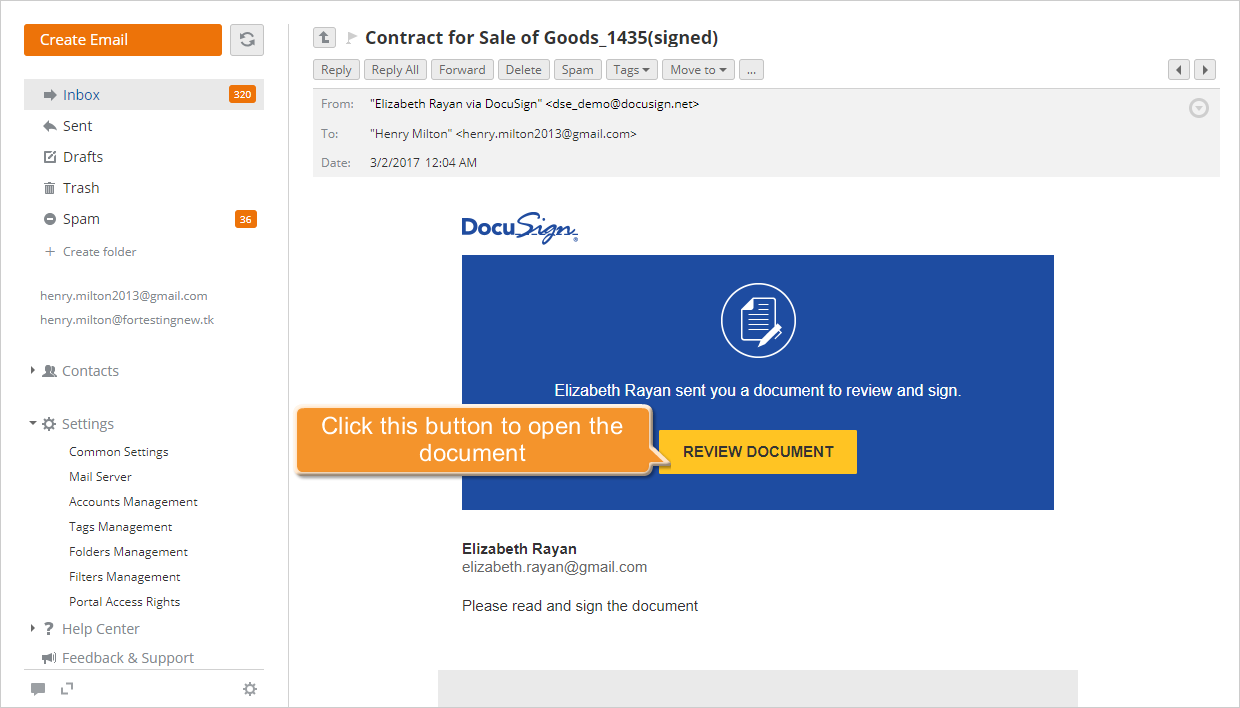
Each recipient will receive an email notification that the document has been sent to them for signing. They will not have to create their own DocuSign account and connect it to the portal to sign the document. It is sufficient to do the following:
- Click Review document in the received email message. The document will open in a new browser tab.
- Accept the service terms by selecting the I agree to use electronic records and signatures checkbox and click Continue.
If you want to decline the signing request, click Other actions in the upper-right corner and select the Decline to Sign option.
- Click the Start label, then click the signature field in the document where your signature is required.
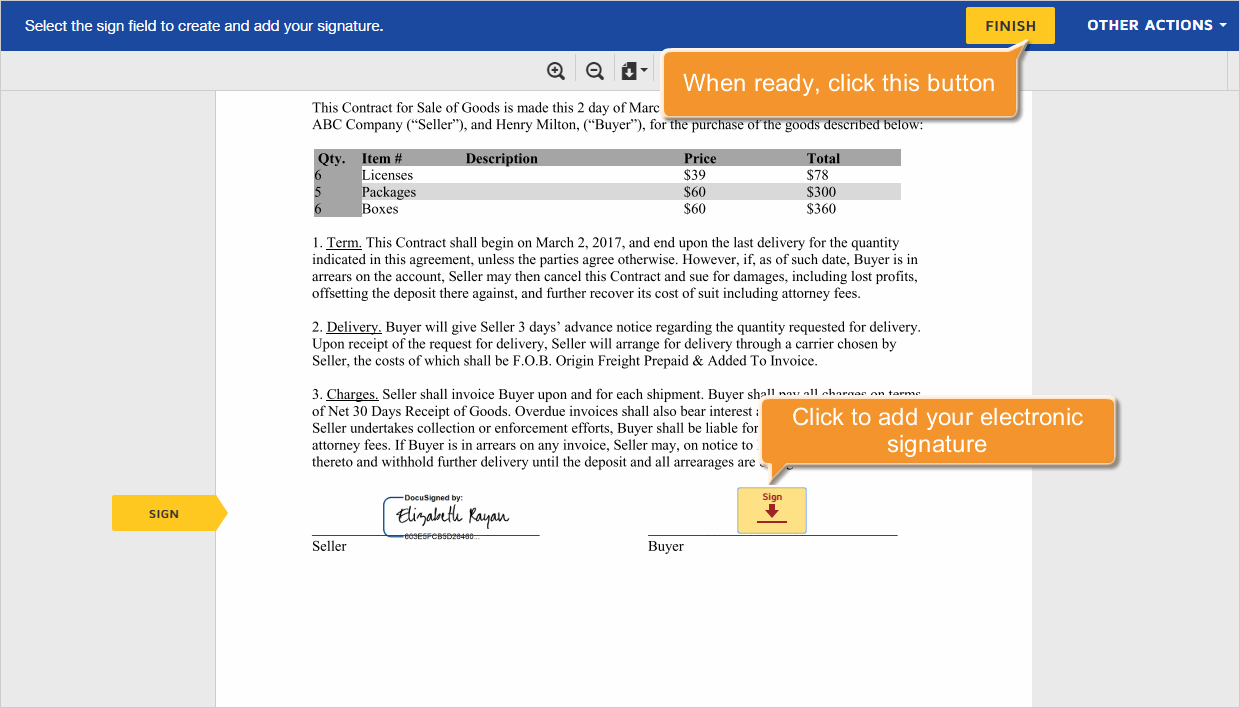
- In a new window that opens, select a preferred signature style or draw your signature with the mouse, then click Adopt and sign to apply the signature.
- Click Finish in the upper-right corner.
If you have already used the DocuSign service before, you will not need to perform some of the actions listed above.
Viewing signed files
Once all recipients have signed the document using DocuSign, you will receive a notification via email and/or Talk that the document is completed. If one of the signers declined signing, you will also receive the corresponding notification.
The signed document will be automatically saved in the specified folder of the Documents module as a PDF file.
Each recipient will also receive an email with the signed file in the PDF format as an attachment. You can Download it, View, or Save to Documents using the Actions menu on the right.