Moodle
Introdução
O ONLYOFFICE permite editar os arquivos armazenados em sua conta Moodle e colaborar neles usando editores ONLYOFFICE online e desktop. Assim, você pode usar não apenas ferramentas de colaboração online, mas também os recursos disponíveis apenas em seu aplicativo desktop:
- usar fontes do sistema,
- usar impressoras do sistema,
- copiar e colar.
Para aproveitar ao máximo todas essas opções de edição, você precisará instalar e configurar vários componentes:
- Supõe-se que você já tenha uma instância de servidor Moodle instalada e configurada.
- Instale o ONLYOFFICE Docs. Observe que o servidor Moodle e o ONLYOFFICE Docs devem ser acessíveis um ao outro pela rede. Para encontrar instruções mais detalhadas sobre como instalar o ONLYOFFICE Docs, você pode consultar nossos artigos.
- Habilite nosso aplicativo de integração oficial na conta de administrador do Moodle. Para saber mais detalhes sobre a configuração do aplicativo de integração, você pode consultar o artigo correspondente para o Moodle.
Etapa 1. Conectar ao Moodle
Inicie o ONLYOFFICE Desktop Editors. Para conectar o Desktop Editors ao seu Moodle, execute as seguintes ações:
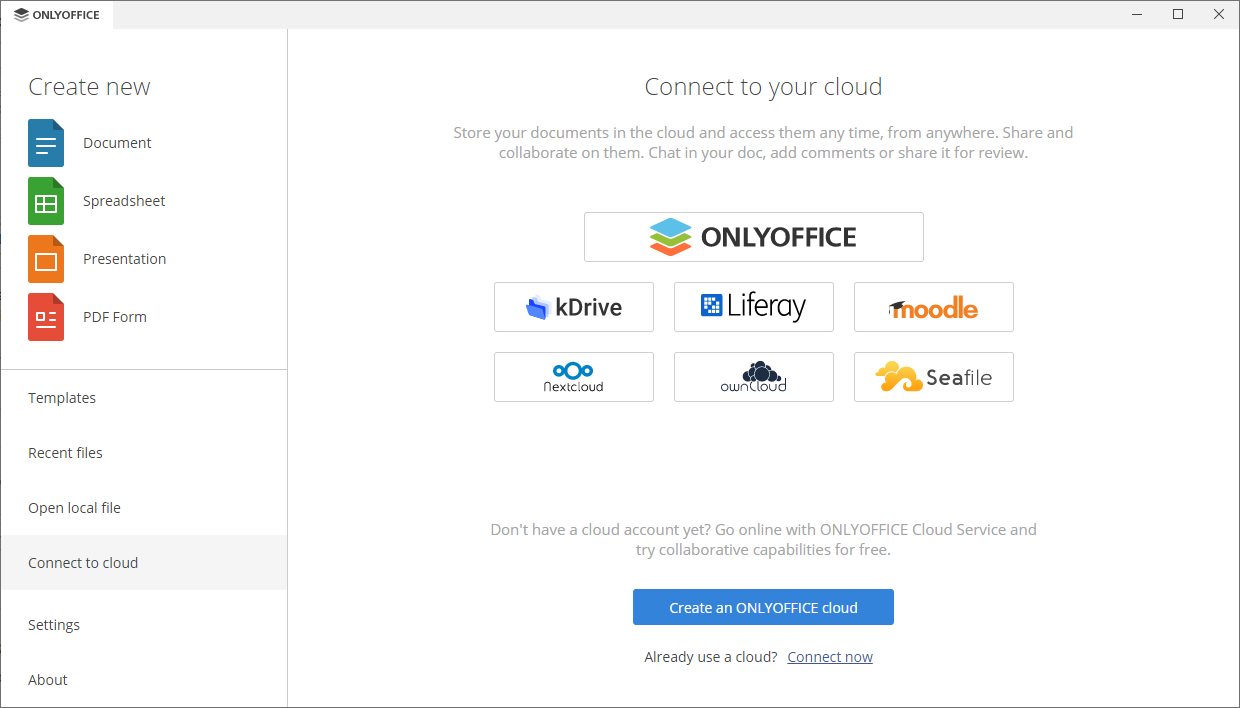
- Mude para a seção Conectar à nuvem no painel lateral esquerdo.
-
Clique no botão Moodle. Alternativamente, você pode usar o link Conectar agora na parte inferior.

-
Se você pressionou o botão do serviço Moodle, a janela Conectar ao escritório na nuvem abre com o Moodle selecionado. Se você usou o link Conectar agora, escolha o armazenamento de nuvem Moodle na lista suspensa. No campo URL do escritório na nuvem, digite o nome de domínio ou endereço IP do seu servidor Moodle. Quando estiver pronto, clique no botão Conectar agora.


-
A página principal do Moodle abrirá em uma nova guia da interface do Desktop Editors.
- se o curso estiver configurado para acesso de convidado, você pode usá-lo,
- ou use o link interno Entrar,
-
ou prossiga com o curso que requer acesso estendido e faça login lá.
- Especifique seu Nome de usuário e a Senha que você usa para acessar sua conta Moodle,
- Clique no botão Entrar.


Agora você pode editar seus arquivos existentes e criar novos, compartilhar seus documentos e colaborar neles com usuários do Moodle usando editores ONLYOFFICE, desde que todos tenham direitos de acesso correspondentes, bem como ir para o Modo de edição do portal se você for um administrador.
Etapa 2. Gerenciar suas contas conectadas
Clique no logotipo no canto superior esquerdo da interface do Desktop Editors para retornar à janela principal do programa, depois mude para a seção Conectar à nuvem para visualizar a lista de Nuvens conectadas. Clique com o botão direito em um escritório na nuvem conectado e use uma das opções de menu contextual disponíveis:
- Abrir - para mudar para a guia de armazenamento de nuvem correspondente se você já estiver conectado a esta conta, ou para abrir a janela Conectar ao escritório na nuvem se você não estiver conectado no momento (neste caso, você precisará inserir suas credenciais),
-
Sair - para sair de sua conta,
Você também pode clicar no ícone
 à direita da conta para sair dela.
- Remover da lista - para desconectar a conta selecionada e removê-la da lista.
Se você tiver várias contas ou nuvens, use o botão Adicionar nuvem para conectar mais uma conta.

