Sharing files and folders
Available access types
Using the Documents app, you can share a file/folder with your portal users/groups or provide access to a file for anyone else by sharing a link to a document. The following access types can be selected:
 Full Access — the user or group will be able to view and edit the document/folder contents,
 Fill forms — the user or group will be able only to view the form and fill in the form fields inserted into it,
 Comment — the user or group will be able only to view the document and add comments, as well as manage them,
 Review — the user or group will be able to suggest corrections without actually editing the document (this option is only available for the .docx),
 Read Only — the user or group will be able only to view the document/folder contents,
 Deny Access — permissions previously granted to the user or group will be revoked.
Share files and folders with portal users
To share your file/folder with other users on your portal:
- Open the Share settings panel:
- Touch the
 icon to the right of the necessary document/folder in the file list to access the file/folder menu,
- Select the
 Share settings option from the menu.
- Touch the
- Tap the
 icon in the top right corner of the screen to open the Select Members panel.
- Select users/groups/guests you want to share the file/folder with:
-
The Select Members panel has three tabs: Members, Groups, and Guests.
-
Tap the necessary user/group names in the list one at a time. To quickly find the necessary persons, you can also use the
 Search field above the user list. When sharing the file with groups, you can also choose the Admin or Everyone option.

The number of selected users/groups will be displayed at the bottom of the screen. To clear the selection, use the
 icon in the lower left corner.
-
- Set a default access type for all the persons/groups you want to share the document with. The Read Only access type is granted by default. If necessary, change it by tapping to the right of the Access rights menu item and selecting the necessary access type.
- Tap Next button in the bottom right corner of the screen. The selected users/groups will be displayed in the list at the Share settings panel.
- If necessary, change the access type for each user/group separately. To do that, tap the icon to the right of the user name and select the necessary access type.
- To remove a person/group from the list, tap the icon to the right of the user name and select the Deny access option.
- Tap icon in the Shared links section in Share settings panel. The link will be copied to the clipboard and you will be able to send it via a messenger or in any other way.
- To close the sharing settings panel, tap the
 icon in the upper left corner of the Share settings panel.
Share files using the external link
To share a file via an external link with advanced settings:
-
Open the Share settings panel:
- Touch the icon to the right of the necessary document in the file list to access the file menu,
- Select the Share settings option from the menu.
- Touch the
-
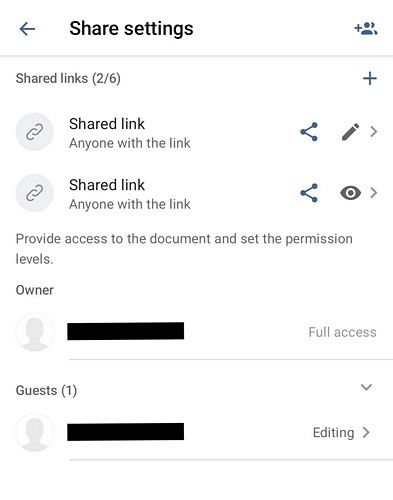
In the Shared links section, tap the
 icon to create a new shared link. To edit an existing link, tap the
 icon and change the Access rights settings.
-
The Edit link panel will open with the following settings:
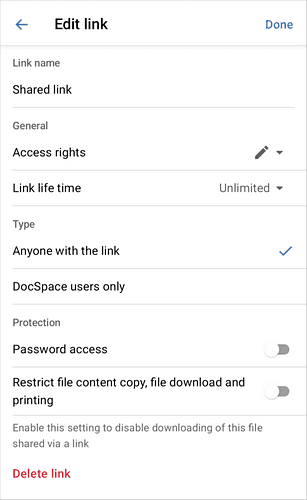
Link name: Enter a custom name for your shared link (default is "Shared link").
Access rights: Tap the icon next to the Access rights menu item to select the access type for users who will access the file via this link:
- Editing
- Review
- Comment
- Read only
Link life time: Set how long the link will remain active. Tap to choose from:
- 12 hours
- 1 day
- 7 days
- Unlimited
- Custom (set a specific expiration date and time)
Type: Choose who can access the file:
- Anyone with the link — anyone who has the link can access the file.
- Apps users only — only authenticated Apps users can access the file.
Protection section:
- Password access: Enable this toggle to require a password to access the file. Tap to set a custom password.
- Restrict file content copy, file download and printing: Enable this toggle to disable downloading, copying, and printing of the file shared via a link.
-
Tap Done in the top right corner to save your settings.
-
Share the link using one of these methods:
- Tap the Share icon to send the link directly via your installed messaging apps.
- Tap the Copy link icon to copy the link to the clipboard and paste it anywhere you need.
-
To manage existing shared links, return to the Share settings panel. You will see a list of all active shared links. The counter next to the section title shows how many links are currently active out of the total number allowed.
-
For each shared link, you can:
- Tap the icon to share the link again.
- Tap the icon to access edit link settings.
- Tap the
-
To delete a shared link, tap Delete link button at the bottom of the Edit link panel.