Insert content controls
Content controls are objects containing different types of contents, such as text, objects etc. Depending on the selected content control type, you can create a form with input fields that can be filled in by other users, or protect some parts of the document from being edited or deleted etc.
Note: the possibility to add new content controls is available in the paid version only. In the open source version, you can edit existing content controls, as well as copy and paste them.
Currently, you can add the following types of content controls: Plain Text, Rich Text, Picture, Combo box, Drop-down list, Date, Check box.
- Plain Text is an object containing text that can be formatted. Plain text content controls cannot contain more than one paragraph.
- Rich Text is an object containing text that can be formatted. Rich text content controls can contain several paragraphs, lists, and objects (images, shapes, tables etc.).
- Picture is an object containing a single image.
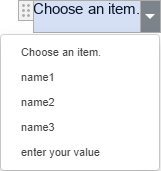
- Combo box is an object containing a drop-down list with a set of choices. It allows to choose one of the predefined values from the list and edit the selected value if necessary.
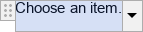
- Drop-down list is an object containing a drop-down list with a set of choices. It allows to choose one of the predefined values from the list. The selected value cannot be edited.
- Date is an object containing a calendar that allows to choose a date.
- Check box is an object that allows to display two states: check box is selected and check box is cleared.
Adding content controls
Create a new Plain Text content control
- position the insertion point within a line of the text where you want the control to be added,
or select a text passage you want to become the control contents.
- switch to the Insert tab of the top toolbar.
- click the arrow next to the Content Controls icon.
- choose the Plain Text option from the menu.
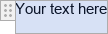
The control will be inserted at the insertion point within a line of the existing text. Replace the default text within the control ("Your text here") with your own one: select the default text, and type in a new text or copy a text passage from anywhere and paste it into the content control. Plain text content controls do not allow adding line breaks and cannot contain other objects such as images, tables etc.
Create a new Rich Text content control
- position the insertion point at the end of a paragraph after which you want the control to be added,
or select one or more of the existing paragraphs you want to become the control contents.
- switch to the Insert tab of the top toolbar.
- click the arrow next to the Content Controls icon.
- choose the Rich Text option from the menu.
The control will be inserted in a new paragraph. Replace the default text within the control ("Your text here") with your own one: select the default text, and type in a new text or copy a text passage from anywhere and paste it into the content control. Rich text content controls allow adding line breaks, i.e. can contain multiple paragraphs as well as some objects, such as images, tables, other content controls etc.
Create a new Picture content control
- position the insertion point within a line of the text where you want the control to be added.
- switch to the Insert tab of the top toolbar.
- click the arrow next to the Content Controls icon.
- choose the Picture option from the menu - the control will be inserted at the insertion point.
- click the image icon in the button above the content control border - a standard file selection window will open. Choose an image stored on your computer and click Open.
The selected image will be displayed within the content control. To replace the image, click the image icon in the button above the content control border and select another image.
Create a new Combo box or Drop-down list content control
The Combo box and Drop-down list content controls contain a drop-down list with a set of choices. They can be created in nearly the same way. The main difference between them is that the selected value in the drop-down list cannot be edited, while the selected value in the combo box can be replaced with your own one.
- position the insertion point within a line of the text where you want the control to be added.
- switch to the Insert tab of the top toolbar.
- click the arrow next to the Content Controls icon.
- choose the Combo box or Drop-down list option from the menu - the control will be inserted at the insertion point.
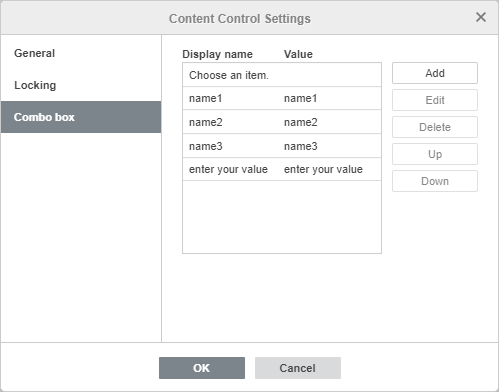
- right-click the added control and choose the Content control settings option from the contextual menu.
- in the the Content Control Settings window that opens switch to the Combo box or Drop-down list tab, depending on the selected content control type.
-
to add a new list item, click the Add button and fill in the available fields in the window that opens:
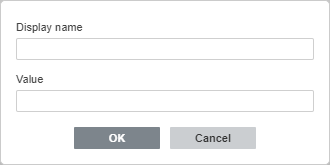
- specify the necessary text in the Display name field, e.g. Yes, No, Other. This text will be displayed in the content control within the document.
- by default, the text in the Value field corresponds to the one entered in the Display name field. If you want to edit the text in the Value field, note that the entered value must be unique for each item.
- click the OK button.
- you can edit or delete the list items by using the Edit or Delete buttons on the right or change the item order using the Up and Down button.
- when all the necessary choices are set, click the OK button to save the settings and close the window.
You can click the arrow button in the right part of the added Combo box or Drop-down list content control to open the item list and choose the necessary one. Once the necessary item is selected from the Combo box, you can edit the displayed text replacing it with your own one entirely or partially. The Drop-down list does not allow to edit the selected item.
Create a new Date content control
- position the insertion point within a line of the text where you want the control to be added.
- switch to the Insert tab of the top toolbar.
- click the arrow next to the Content Controls icon.
- choose the Date option from the menu - the control with the current date will be inserted at the insertion point.
- right-click the added control and choose the Content control settings option from the contextual menu.
-
in the the Content Control Settings window that opens switch to the Date format tab.
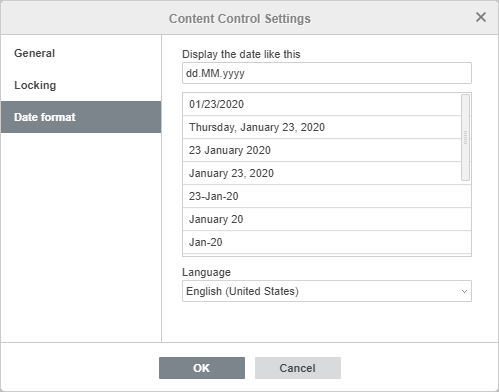
- choose the necessary Language and select the necessary date format in the Display the date like this list.
- click the OK button to save the settings and close the window.
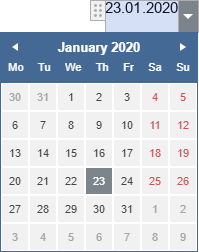
You can click the arrow button in the right part of the added Date content control to open the calendar and choose the necessary date.
Create a new Check box content control
- position the insertion point within a line of the text where you want the control to be added.
- switch to the Insert tab of the top toolbar.
- click the arrow next to the Content Controls icon.
- choose the Check box option from the menu - the control will be inserted at the insertion point.
- right-click the added control and choose the Content control settings option from the contextual menu.
-
in the the Content Control Settings window that opens switch to the Check box tab.
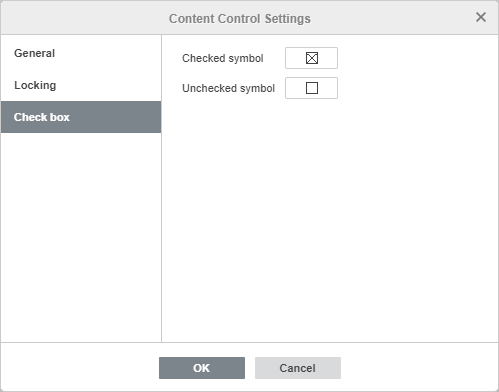
- click the Checked symbol button to specify the necessary symbol for the selected check box or the Unchecked symbol to select how the cleared check box should look like. The Symbol window will open. To learn more on how to work with symbols, you can refer to this article.
- when the symbols are specified, click the OK button to save the settings and close the window.
The added check box is displayed in the unchecked mode.
If you click the added check box it will be checked with the symbol selected in the Checked symbol list.
Note: The content control border is visible when the control is selected only. The borders do not appear on a printed version.
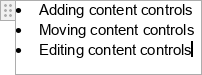
Moving content controls
Controls can be moved to another place in the document: click the button to the left of the control border to select the control and drag it without releasing the mouse button to another position in the document text.

You can also copy and paste content controls: select the necessary control and use the Ctrl+C/Ctrl+V key combinations.
Editing plain text and rich text content controls
Text within the plain text and rich text content controls can be formatted using the icons on the top toolbar: you can adjust the font type, size, color, apply decoration styles and formatting presets. It's also possible to use the Paragraph - Advanced settings window accessible from the contextual menu or from the right sidebar to change the text properties. Text within rich text content controls can be formatted like a regular text of the document, i.e. you can set line spacing, change paragraph indents, adjust tab stops.
Changing content control settings
No matter which type of content controls is selected, you can change the content control settings in the General and Locking sections of the Content Control Settings window.
To open the content control settings, you can proceed in the following ways:
- Select the necessary content control, click the arrow next to the Content Controls icon at the top toolbar and select the Control Settings option from the menu.
- Right-click anywhere within the content control and use the Content control settings option from the contextual menu.
A new window will open. At the General tab, you can adjust the following settings:
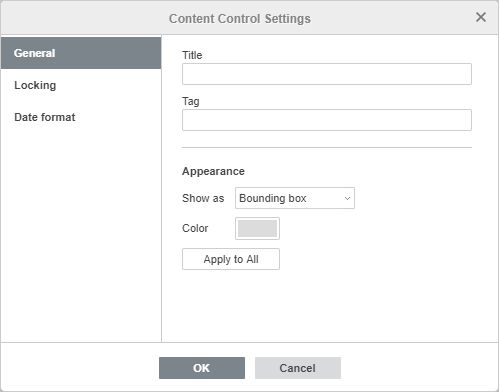
- Specify the content control Title or Tag in the corresponding fields. The title will be displayed when the control is selected in the document. Tags are used to identify content controls so that you can make reference to them in your code.
- Choose if you want to display the content control with a Bounding box or not. Use the None option to display the control without the bounding box. If you select the Bounding box option, you can choose this box Color using the field below. Click the Apply to All button to apply the specified Appearance settings to all the content controls in the document.
At the Locking tab, you can protect the content control from being deleted or edited using the following settings:
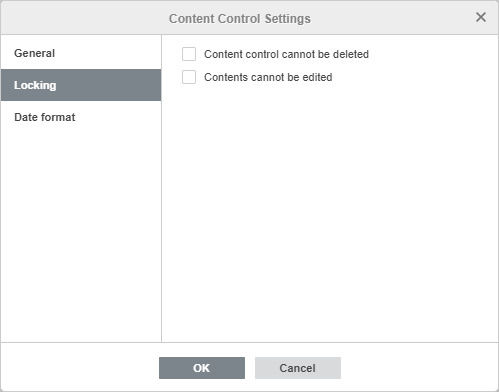
- Content control cannot be deleted - check this box to protect the content control from being deleted.
- Contents cannot be edited - check this box to protect the contents of the content control from being edited.
For certain types of content controls, the third tab is also available that contains the settings specific for the selected content control type only: Combo box, Drop-down list, Date, Check box. These settings are described above in the sections about adding the corresponding content controls.
Click the OK button within the settings window to apply the changes.
It's also possible to highlight content controls with a certain color. To highlight controls with a color:
- Click the button to the left of the control border to select the control,
- Click the arrow next to the Content Controls icon at the top toolbar,
- Select the Highlight Settings option from the menu,
- Select the necessary color on the available palettes: Theme Colors, Standard Colors or specify a new Custom Color. To remove previously applied color highlighting, use the No highlighting option.
The selected highlight options will be applied to all the content controls in the document.
Removing content controls
To remove a control and leave all its contents, click the content control to select it, then proceed in one of the following ways:
- Click the arrow next to the Content Controls icon at the top toolbar and select the Remove content control option from the menu.
- Right-click the content control and use the Remove content control option from the contextual menu.
To remove a control and all its contents, select the necessary control and press the Delete key on the keyboard.
Alla pagina precedente