SharePoint
About replacing Office Online Server with ONLYOFFICE Docs
Microsoft ends support for Office Online Server (OOS) on December 31, 2026. After this date, OOS no longer receives security updates, bug fixes, or technical assistance. To keep editing your documents within SharePoint Server Subscription Edition, you can replace OOS with ONLYOFFICE Docs.
OOS connects to SharePoint over WOPI, a REST-based protocol that issues HTTP requests to a set of REST endpoints when a client establishes a connection to the server with your data. ONLYOFFICE Docs supports the same protocol, so replacing OOS comes down to redirecting the SharePoint WOPI bindings from OOS to ONLYOFFICE Docs. Your files, document libraries, and access rights remain unchanged.
As an alternative to WOPI, you can connect ONLYOFFICE Docs using the official ONLYOFFICE connector for SharePoint. Both methods allow editing documents directly in SharePoint, but differ in supported features and formats. For more information, please visit the ONLYOFFICE to SharePoint connector GitHub page. The connector is distributed under the AGPL-3.0 license.
To learn more about how the ONLYOFFICE connector for SharePoint works, please visit our API documentation page.
Requirements
- ONLYOFFICE Docs v9.4 or later (server version) with WOPI enabled. Follow this instruction to enable WOPI. The instance must be resolvable and connectable from both SharePoint and any end clients, and the SharePoint server address must be accessible from ONLYOFFICE Docs. Please refer to the official documentation page to learn more about installing ONLYOFFICE Docs.
- SharePoint Server Subscription Edition
- Access to the SharePoint Management Shell with farm administrator rights
The requirements for the official connector are listed in its section.
We strongly recommend choosing only one method of connecting ONLYOFFICE Docs and not using it together with OOS. If documents can be opened over different methods at the same time, co-editing conflicts may occur and changes may be lost. For this reason, OOS and ONLYOFFICE Docs cannot run side by side on the same farm.
Replacing Office Online Server using WOPI
Enabling the authorization header
The wopi.sendAuthorizationHeader parameter adds the Authorization: Bearer <access_token> header to WOPI requests. It is available starting from ONLYOFFICE Docs v9.4 and is disabled by default. For SharePoint Server Subscription Edition, this parameter must be enabled. Without it, an Invalid access token error occurs and document editing fails.
To enable wopi.sendAuthorizationHeader, use one of the following ways:
-
Add the following to the
local.jsonconfiguration file (/etc/onlyoffice/documentserver/local.jsonon Linux and in Docker,%ProgramFiles%\ONLYOFFICE\DocumentServer\config\local.jsonon Windows). Do not edit thedefault.jsonfile: it is overwritten when ONLYOFFICE Docs is updated.{"wopi": {"sendAuthorizationHeader": true}}After making changes, restart the services:
DEB/RPM:
systemctl restart ds-converter ds-docserviceDocker:
sudo docker exec <containerID> supervisorctl restart ds:converter ds:docserviceWindows PowerShell:
Restart-Service DsConverterSvc, DsDocServiceSvc -
In commercial builds, this parameter can also be configured via the Admin Panel.
When using WOPI, access tokens expire after a certain period of time. Set the access_token_ttl property to 10 hours for the Fast co-editing mode.
Adding SharePoint to the trusted hosts
Starting from ONLYOFFICE Docs v10.0, the server contacts a WOPI host only if a rule in the IP filter names this host explicitly. The catch-all * rule does not count. Without such a rule, ONLYOFFICE Docs refuses the requests with the 403 error, and documents from SharePoint do not open.
Add a rule with the host name or IP address of your SharePoint server to the local.json configuration file. You can also use a wildcard pattern, such as *.example.com. Rules are checked from top to bottom, and the first matching rule is applied, so put your rule above the catch-all * rule. The list in local.json replaces the default one, so keep the * rule at the end of it:
{
  "services": {
    "CoAuthoring": {
      "ipfilter": {
        "rules": [
          {"address": "sharepoint.example.com", "allowed": true},
          {"address": "*", "allowed": true}
        ]
      }
    }
  }
}
Then restart the services as described above.
In commercial builds, you can add the rule on the IP Filtering page of the Admin Panel.
Removing the Office Online Server bindings
-
Open your SharePoint server and run the SharePoint Management Shell console. Check the current WOPI bindings on the farm. These are the bindings to your Office Online Server:
Get-SPWOPIBindingWe recommend saving the output of this command, as it contains the name of the OOS server previously used by SharePoint.
-
Delete these bindings:
Remove-SPWOPIBinding -All:$true
Connecting ONLYOFFICE Docs over WOPI
-
In the SharePoint Management Shell console, set the needed WOPI zone:
Set-SPWOPIZone -Zone "external-http"The zone must match the one that ONLYOFFICE Docs advertises in its WOPI discovery. By default, it is
external-http, as set in thewopi.wopiZoneparameter of ONLYOFFICE Docs. If you change this parameter, set the same zone in SharePoint. -
Create new bindings for default actions as per file types.
To create bindings for all file types at once:
New-SPWOPIBinding -ServerName ip_or_domain.com:portTo create bindings for particular file types only:
New-SPWOPIBinding -ServerName ip_or_domain.com:port -Extension DOCXIf SSL is not used, add
-AllowHTTPat the end of the command. -
Go to your SharePoint document library and click any document. The document will open in ONLYOFFICE Docs.
Creating new documents
The following instructions are valid for the WOPI connection method only.
To be able to create new documents, set up the parameters described below. This example is provided for DOCX files only, but you can add XLSX, PPTX, and other files similarly.
-
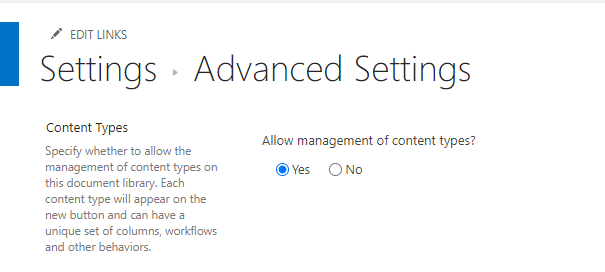
Enable the Allow management of content types setting: go to Documents → Library settings → Advanced settings. In the Allow management of content types section, select Yes and click OK.
-
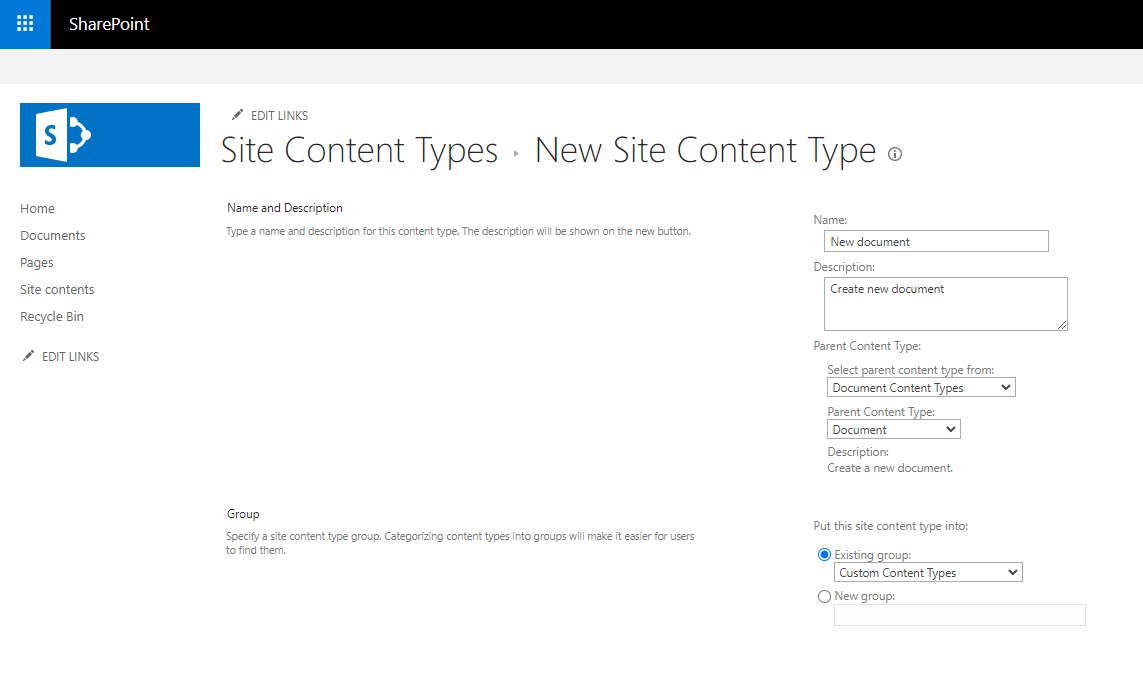
In the Documents library, go to Site contents → Site Settings → Site content types. Click Create. Fill in the form: Name (New document), Description. In the Parent Content type, choose Document content types, Document. In the Existing group, choose Custom Content Types and click OK.
-
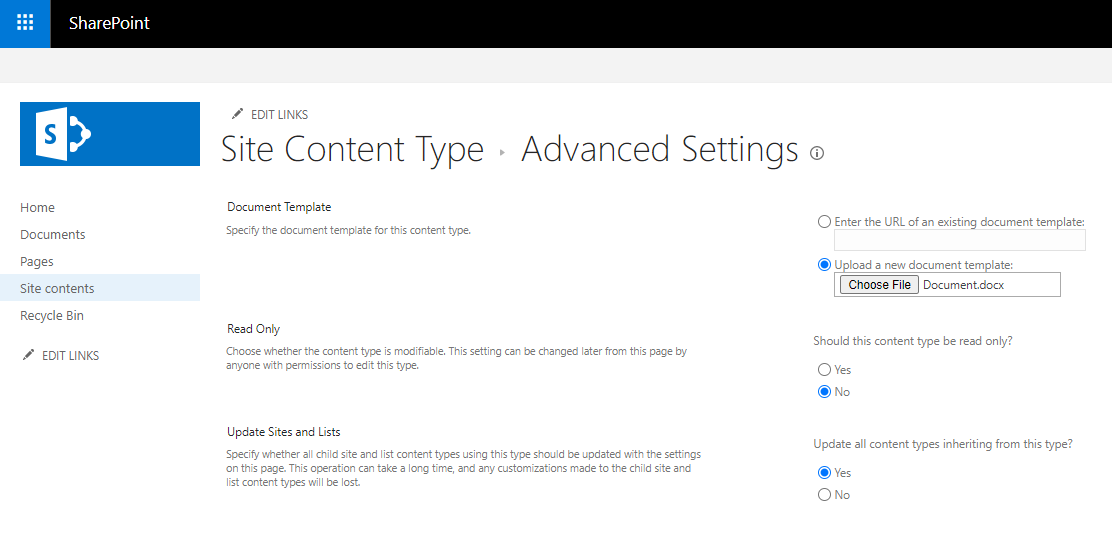
In the Documents library, go to Site contents → Site Settings → Site content types. Select the recently added New document. Go to Advanced settings → Document Template → Upload a new document template. Click the Choose File button, upload the necessary document, and click OK.
-
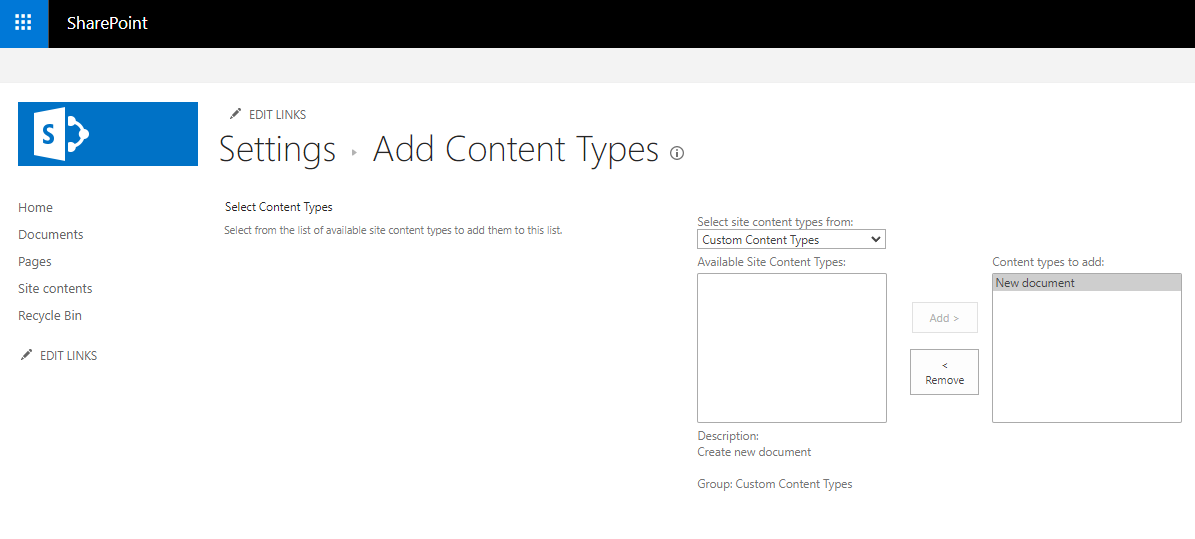
Go to Documents library → Library settings. In the Content Types section, select Add from existing site content types. In the Select site content types from list, select Custom content types. In the Available Site Content Types field, choose New document. Click the Add > button, then click OK.
-
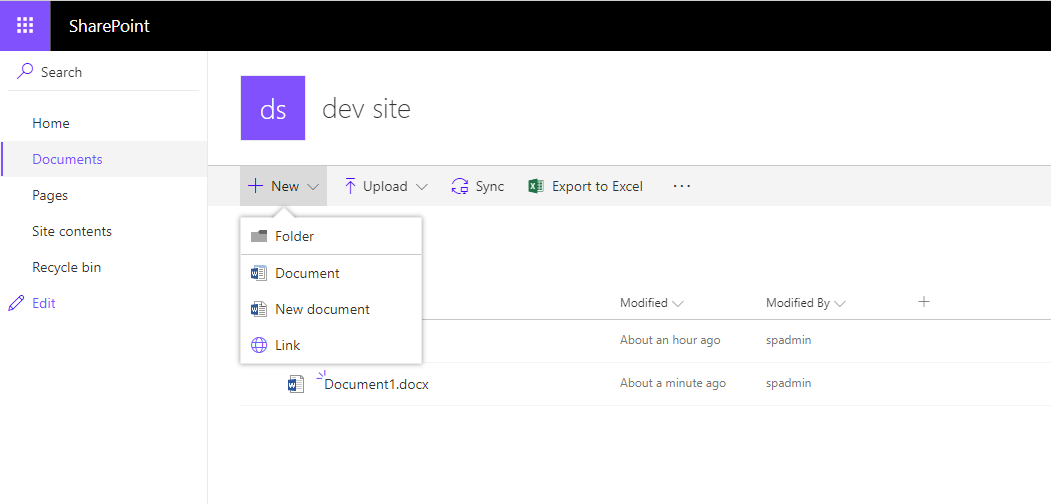
In the Documents library, refresh the page and press the New button.
-
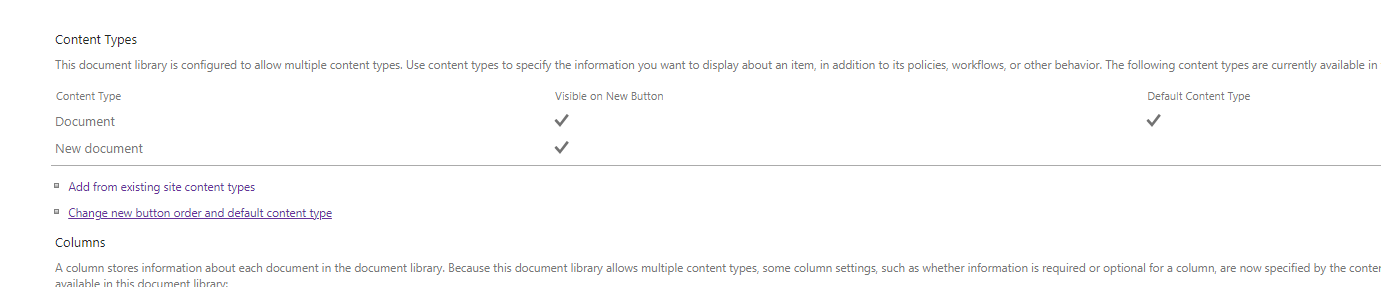
The Document content type will be automatically added as the parent type. It must be hidden: go to Documents library → Library settings. In the Content Types section, select Change new button order and default content type.
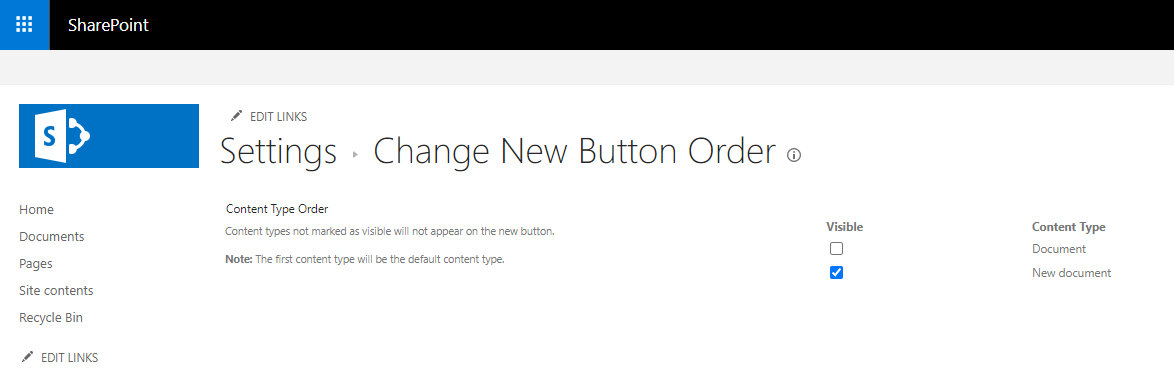
In the Visible column, deselect the checkbox for the Document content type and click OK.
-
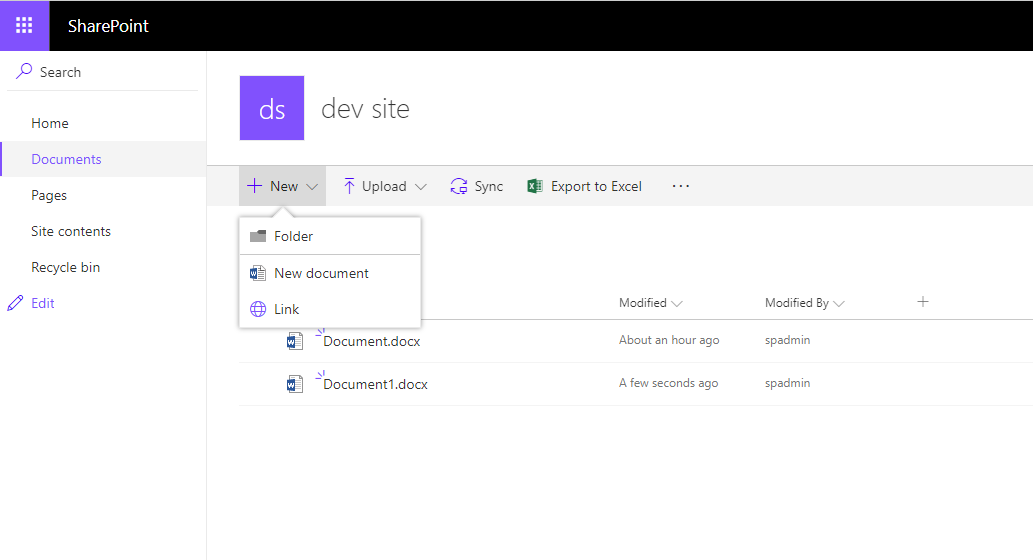
In the Documents library, refresh the page and press the New button — only the New document menu item will be available.
Replacing Office Online Server using the official connector
Instead of WOPI, you can connect ONLYOFFICE Docs to SharePoint using the official ONLYOFFICE connector. Compared to WOPI, it additionally supports the Strict co-editing mode, the Track Changes feature, and comparing documents. Documents are opened using the Open in ONLYOFFICE option in the context menu of the file or on the ribbon.
Before installing the connector, remove the Office Online Server bindings as described in the Removing the Office Online Server bindings section above.
Requirements
- ONLYOFFICE Docs v7.1 (server or cloud version) or later. The instance must be resolvable and connectable from both SharePoint and any end clients, and must be able to POST directly to SharePoint.
- SharePoint Server Subscription Edition
- ONLYOFFICE Connector 3.2.0 for SharePoint
The connector version 3.2.0 has been tested with SharePoint Server Subscription Edition. Earlier versions of the connector were tested with SharePoint 2019.
Installing and configuring
The ONLYOFFICE SharePoint integration solution is an official ONLYOFFICE connector available on the GitHub page under the GNU AGPL v.3 licence.
-
Click Start, point to All Programs, point to Administrative Tools, then click Services, and make sure that the SharePoint Administration service is started.
-
Click Start, open the SharePoint Management Shell, and navigate to the directory containing the .wsp file.
-
Run the Install.ps1 script:
PS> .\Install.ps1 -
Enter your SharePoint site address:
https://<yoursharepointsite>Instead of steps 3 and 4 you can type the following command:
Add-SPSolution -LiteralPath <solutionpath>/onlyoffice.wspOn the SharePoint Central Administration home page, click System Settings → Farm Management → Manage farm solutions. On the Solution Management page, click onlyoffice.wsp, then click Deploy Solution.
-
On the SharePoint Central Administration home page, under Application Management, click Manage web applications.
-
Make sure you select your site and click the Authentication Providers icon.
-
In the Authentication Providers pop-up window, click Default zone.
-
Under Edit Authentication, check Enable anonymous access and click Save.
-
Going back to Web Application Management, click on the Anonymous Policy icon.
-
Under Anonymous Access Restrictions, select your Zone and set the Permissions to None – No policy and click Save.
-
In SharePoint, open the
/_layouts/15/Onlyoffice/Settings.aspxpage with administrative settings. In the ONLYOFFICE Docs address field, enter the following address:https://<documentserver>/Where documentserver is the name of the server with ONLYOFFICE Docs installed. The address must be accessible for the user browser and from the SharePoint server. The SharePoint server address must also be accessible from ONLYOFFICE Docs for correct work.
If you have subsites set up with SharePoint, you will need to additionally configure ONLYOFFICE Docs connection with each of them. Go to each subsite settings and enter the ONLYOFFICE Docs address in the proper field.
To try the connector before installing ONLYOFFICE Docs, select the Connect to the ONLYOFFICE Docs demo server checkbox in the settings. The demo server is a public test server available for 30 days, so please do not use it to store private or sensitive data.
Starting from ONLYOFFICE Docs v7.2, JWT is enabled by default and the secret key is generated automatically. You need to enable it on the SharePoint side as well: find your secret key in the ONLYOFFICE Docs configuration file, then specify the same key in the ONLYOFFICE Docs secret key field of the connector settings. For more details, see the Enabling JWT section below.
If JWT protection is enabled, it is necessary to specify a custom header name in the JWT header field, since the SharePoint security policy blocks external 'Authorization' headers. This header should be specified in the ONLYOFFICE Docs signature settings as well (further information can be found here).
Compiling the solution
There are two ways to compile the ONLYOFFICE SharePoint integration solution:
-
Using MS Visual Studio:
- Enter the SharePoint server and open this project in Visual Studio.
- In Solution Explorer, open the shortcut menu for the project and choose Publish.
- In the Publish dialog box, choose the Publish to File System option button.
- Click the Publish button. When the publishing process is finished, the solution .wsp file will be created.
- Copy the resulting file to the folder with the Install.ps1 file (BuildAndInstall folder by default).
-
Using the build.bat file:
- Go to the BuildAndInstall folder.
- Run the build.bat file.
- The resulting solution .wsp file will be created and placed in the BuildAndInstall folder.
How it works
The ONLYOFFICE integration follows the API documented here.
-
The user navigates to a document within SharePoint and selects the Open in ONLYOFFICE action in the context menu or on the ribbon.
-
SharePoint makes a request to the editor page (URL of the form:
/_layouts/15/Onlyoffice/editorPage.aspx?SPListItemId={ItemId}&SPListURLDir={ListUrlDir}&action=track). -
SharePoint prepares a JSON object with the following properties:
- url — the URL that ONLYOFFICE Docs uses to download the document;
- callbackUrl — the URL that ONLYOFFICE Docs informs about the status of the document editing;
- DocumentServerHost — the URL that the client needs to reply to ONLYOFFICE Document Server (can be set at the settings page);
- Key — the file identifier from SharePoint;
- FileName — the document title (name);
- CurrentUserId — the user identifier;
- CurrentUserLogin — the user login.
-
SharePoint constructs a page, filling in all of those values so that the client browser can load up the editor.
-
The client browser makes a request to the JavaScript library from ONLYOFFICE Docs and sends ONLYOFFICE Docs the DocEditor configuration with the above properties.
-
Then ONLYOFFICE Docs downloads the document from SharePoint and the user begins editing.
-
When all users and client browsers are done with editing, they close the editing window.
-
After 10 seconds of inactivity, ONLYOFFICE Docs sends a POST to
callbackUrlletting SharePoint ONLYOFFICE solution know that the clients have finished editing the document and closed it. -
SharePoint downloads a new version of the document, replacing the old one.
To learn more about the most common problems and the ways to solve them, please visit our troubleshooting guide.
Enabling JWT
To protect documents from unauthorized access, ONLYOFFICE editors use the JSON Web Token (JWT). The token is added in the configuration when the Document Editor is initialized and during the exchange of commands between inner ONLYOFFICE Docs services. The secret key is used to sign the JSON web token and validate the token upon the request to ONLYOFFICE Docs.
Starting from ONLYOFFICE Docs v7.2, JWT is enabled by default and the secret key is generated automatically. You need to find your secret key in the ONLYOFFICE Docs configuration file, then specify the same secret key in the connector settings.
Step 1: Find your secret key in the ONLYOFFICE Docs configuration file
-
Open the local.json file with any available text editor:
-
For Linux:
/etc/onlyoffice/documentserver/local.json -
For Windows:
%ProgramFiles%\ONLYOFFICE\DocumentServer\config\local.json -
For Docker: enter the ONLYOFFICE Docs container using
docker exec -it <containerID> bashand open/etc/onlyoffice/documentserver/local.json. Alternatively, run:sudo docker exec <containerID> /var/www/onlyoffice/documentserver/npm/json -f /etc/onlyoffice/documentserver/local.json 'services.CoAuthoring.secret.session.string'
The local.json file should look like this:
{"services": {"CoAuthoring": {"token": {"enable": {"request": {"inbox": true,"outbox": true},"browser": true}},"secret": {"inbox": {"string": "yoursecret"},"outbox": {"string": "yoursecret"},"session": {"string": "yoursecret"}}}}} -
-
The
truevalue is specified in three sections, meaning token validation is enabled:services.CoAuthoring.token.enable.browserservices.CoAuthoring.token.enable.request.inboxservices.CoAuthoring.token.enable.request.outbox
-
The automatically generated secret key is specified in three sections. You can replace the default value with your own key — it must be the same in all three sections:
services.CoAuthoring.secret.inbox.stringservices.CoAuthoring.secret.outbox.stringservices.CoAuthoring.secret.session.string
-
If you make changes, save them and restart the services:
DEB/RPM:
systemctl restart ds-converter ds-docserviceDocker:
sudo docker exec <containerID> supervisorctl restart ds:converter ds:docserviceWindows PowerShell:
Restart-Service DsConverterSvc, DsDocServiceSvc
Step 2: Specify the same secret key in the connector settings
In the connector settings, specify the same secret in the ONLYOFFICE Docs secret key field and save the settings. If the field is left empty, the connector shows a warning.
Feature comparison
Office Online Server and ONLYOFFICE Docs
The table below shows how the main features of Office Online Server correspond to ONLYOFFICE Docs connected over WOPI.
| Feature | Office Online Server | ONLYOFFICE Docs (WOPI) |
|---|---|---|
| Word, Excel, and PowerPoint documents | Viewing and editing | Viewing and editing |
| OneNote notebooks | Viewing and editing | ✗ |
| Visio diagrams | ✗ | Viewing 1 |
| Co-editing | ✓ | ✓ |
| Previews in document libraries and search results | ✓ | Test in your environment |
| Access rights | Taken from SharePoint | Taken from SharePoint |
1 Only in ONLYOFFICE Docs Enterprise Edition and Developer Edition.
Office Online Server provides browser-based versions of Word, Excel, PowerPoint, and OneNote only.
WOPI and the official connector
The table below shows the main features available when ONLYOFFICE Docs is connected over WOPI and using the official connector.
| Feature | WOPI | Official connector |
|---|---|---|
| Opening documents | Click the file, or Open → Open in office online in the context menu | Open in ONLYOFFICE in the context menu or on the ribbon |
| Editing DOCX, XLSX, PPTX | ✓ | ✓ |
| Editing DOCM, XLSM, PPTM | ✓ | ✓ |
| Editing PDF | ✓ | ✓ |
| ODT, ODS, ODP | Editing | Viewing only |
| XLS | Editing | Viewing only |
| DOC, PPT | Viewing only | Viewing only |
| Viewing Visio diagrams | ✓ 1 | ✓ |
| OneNote | ✗ | ✗ |
| Fast co-editing mode | ✓ | ✓ |
| Strict co-editing mode | ✗ 2 | ✓ |
| Track changes | ✗ | ✓ |
| Comments, built-in chat | ✓ | ✓ |
| Version History | ✓ 3 | ✓ |
| Compare documents | ✗ | ✓ |
| Mail Merge | ✓ | ✓ |
| Insert image from storage | ✗ | ✗ |
| Macros | JavaScript macros | JavaScript macros |
| Access rights | Taken from SharePoint | Taken from SharePoint |
1 Only in ONLYOFFICE Docs Enterprise Edition and Developer Edition.
2 Strict co-editing mode may negatively affect the access token parameter when using WOPI.
3 When using WOPI, the version history option in the editor opens the version history page of SharePoint. The built-in ONLYOFFICE version history is available with the official connector only.
Supported formats
WOPI:
- For viewing and editing: CSV, DOCM, DOCX, DOTM, DOTX, EPUB, FB2, HTML, MD, ODP, ODS, ODT, OTP, OTS, OTT, PDF, POTM, POTX, PPSM, PPSX, PPTM, PPTX, RTF, TSV, TXT, XLS, XLSB, XLSM, XLSX, XLTM, XLTX
- For viewing only: DJVU, DOC, DOT, DPS, DPT, ET, ETT, FODP, FODS, FODT, GDOC, GSHEET, GSLIDES, HML, HTM, HWP, HWPX, KEY, MHT, MHTML, NUMBERS, ODG, OFD, OXPS, PAGES, POT, PPS, PPT, STW, SXC, SXI, SXW, VSDM, VSDX, VSSM, VSSX, VSTM, VSTX, WPS, WPT, XLT, XML, XPS
When editing CSV, EPUB, FB2, HTML, MD, ODP, ODS, ODT, OTP, OTS, OTT, RTF, TSV, TXT, and XLS files, some formatting may be lost on saving, as these formats do not support all the features of the editors.
Visio formats (VSDM, VSDX, VSSM, VSSX, VSTM, VSTX) can be viewed over WOPI in ONLYOFFICE Docs Enterprise Edition and Developer Edition only.
Official connector:
- For viewing and editing: DOCM, DOCX, DOTM, DOTX, PDF, POTM, POTX, PPSM, PPSX, PPTM, PPTX, XLSB, XLSM, XLSX, XLTM, XLTX
- For viewing only: CSV, DJVU, DOC, DOT, DPS, DPT, EPUB, ET, ETT, FB2, FODP, FODS, FODT, HML, HTM, HTML, HWP, HWPX, KEY, MD, MHT, MHTML, NUMBERS, ODG, ODP, ODS, ODT, OTP, OTS, OTT, OXPS, PAGES, POT, PPS, PPT, RTF, STW, SXC, SXI, SXW, TXT, VSDM, VSDX, VSSM, VSSX, VSTM, VSTX, WPS, WPT, XLS, XLT, XML, XPS
The available formats depend on your ONLYOFFICE Docs version and the selected connection method.
What's new in version 3.2.0
Added
- Version history support
- Plugin description and useful links in the administrative settings
- Connection to the ONLYOFFICE Docs demo server
- Link to ONLYOFFICE Docs Cloud
- The
shardkeyparameter in the URL of requests to ONLYOFFICE Docs - A warning popup when the JWT secret is empty
The full change log is available here.
FAQ
What works the same
Do I need to move or convert my files? No. Your files remain in the SharePoint document libraries. ONLYOFFICE Docs works with the DOCX, XLSX, and PPTX formats natively, without converting them.
Do access rights change? No. ONLYOFFICE Docs takes access rights from SharePoint. If a user has access to a file in SharePoint, they can open it in ONLYOFFICE Docs with the same rights.
Can several users edit a document at the same time? Yes. Real-time co-editing is available with both connection methods. Users can also leave comments and communicate in the built-in chat.
Is the version history preserved? Yes. File versions remain in SharePoint. When using WOPI, the version history option in the editor opens the version history page of SharePoint. The official connector shows the version history in the editor itself, starting from version 3.2.0.
What works differently
How do users open documents? When using WOPI, click the file or select Open → Open in office online in the context menu. When using the official connector, select Open in ONLYOFFICE in the context menu of the file or on the ribbon.
Will documents look exactly the same? For most documents, compatibility is high. Minor visual differences may occur in documents with unusual fonts that need to be substituted or with heavily customized templates.
Will the interface be familiar to users? The toolbar layout and formatting options follow the conventions users know from Microsoft Word, Excel, and PowerPoint. Some options may be located on different tabs.
What happens to VBA macros? ONLYOFFICE Docs uses JavaScript macros instead of VBA. VBA code can be converted into ONLYOFFICE-compatible JavaScript using the AI plugin. Standard macros are converted directly, while heavily customized scripts may need to be reviewed.
Can users create new documents? Yes. When using WOPI, you need to add a custom content type to your document library first. For more details, see the Creating new documents section.
Do file previews and embedded document views work? Some SharePoint features that relied on Office Online Server outside the editors may work differently. We recommend testing them in your environment.
What is not supported
Can I use OOS and ONLYOFFICE Docs at the same time? No. Only one connection method can be used. If documents can be opened over different methods at the same time, changes may be lost.
Which features are not available when using WOPI? Connecting ONLYOFFICE Docs over WOPI lacks some features due to the WOPI architecture:
- The Strict co-editing mode is not supported.
- The Track Changes feature is not supported.
- Comparing documents is not supported.
- Inserting an image from storage is not supported.
The official connector supports all these features except inserting an image from storage.
Is OneNote supported? No. ONLYOFFICE Docs does not support OneNote notebooks.