LDAP
When using ONLYOFFICE Apps, the first thing that you need to do is to create accounts for all your company employees. But if your company numbers more than 50 persons, the process of creating new workspace users will take a lot of time. The LDAP Settings option allows you to import the necessary users and groups from an LDAP Server (e.g. OpenLDAP Server or Microsoft Active Directory) to your workspace, literally, in several minutes. The newly created users, in turn, do not need to memorize new passwords and logins because they will sign in to the workspace using their credentials stored on your LDAP Server.
Users will be imported immediately after the settings are saved. Users added later will be imported the first time they sign in to the workspace.
This is a Paid feature (available for the paid Business plan only).
Importing users and groups
MaxPageSize = 1000 using the ntdsutil. The detailed instructions on how this can be done are available here.
- Sign in to your ONLYOFFICE Apps workspace.
- Use the
 menu in the lower left corner and select the Settings option.
- Open the LDAP Settings page in the Integration section on the left sidebar.
- Click the LDAP Authentication toggle (use the Show link next to the LDAP Settings title to display the parameter form if it is not the first time you are altering the settings).
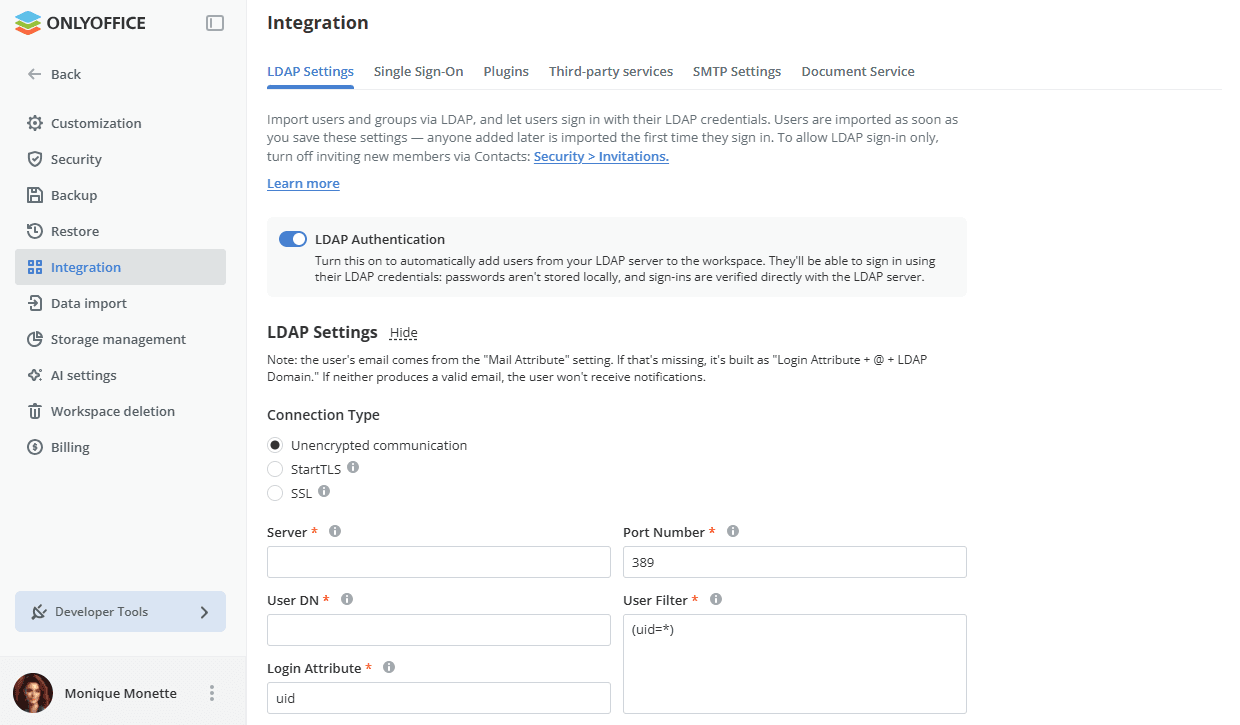
- In the Connection Type section, select one of the options: Unencrypted communication (used by default), StartTLS to secure your connections by using the StartTLS technology (in this case, the default port 389 is used), or SSL to use the SSL protocol (in this case, port 636 is used).
-
Fill out the fields necessary for user import (the obligatory fields are marked with an asterisk):
 Warning Please note that in case you have already imported some users and changed some of the settings (e.g. Server, User Filter, User DN, Group Filter, Group DN), the existing users and all their data, including documents, emails, etc. not matching these new settings will be DISABLED. We strongly recommend creating a backup before you change any settings.
- in the Server field, enter the LDAP server URL address in the form protocol://host, e.g. LDAP://example.com for a regular LDAP connection or LDAPS://example.com for a secure LDAP connection over SSL. You can also specify the server IP address instead of its DNS name: LDAP://192.168.3.202;
- specify a Port Number that is used to access LDAP server. The default port for regular LDAP connections is 389. If you have enabled the StartTLS option, the default port 389 is also used. If the SSL option is enabled, port 636 is used;
- in the User DN (User Distinguished Name) field, specify the absolute path to the top level directory containing users you want to import. This parameter defines the node where the search starts. You can specify the root directory, e.g.
dc=example,dc=com, to search for users within the entire directory, or specify a certain search area, e.g.ou=groupname,dc=example,dc=com, to search for users within the specified group; -
specify the Login Attribute value (an attribute in a user record that corresponds to the login that LDAP server users will use to sign in to ONLYOFFICE);
For OpenLDAP Server, use the following settings:
- User Filter –
(uid=*) - Login Attribute –
uid
For Active Directory, use the following settings:
- User Filter –
(userPrincipalName=*) - Login Attribute –
sAMAccountName
- User Filter –
-
fill out the User Filter field if you need to import the users who correspond to the specified search criteria. The default filter value
(uid=*)or(userPrincipalName=*)allows importing all users;You can find the search filter syntax examples here.
-
The Attribute mapping section allows you to set up a correspondence between the user data fields in the workspace and the attributes in the LDAP server user record. Specify the LDAP server attributes that correspond to the following workspace user fields:
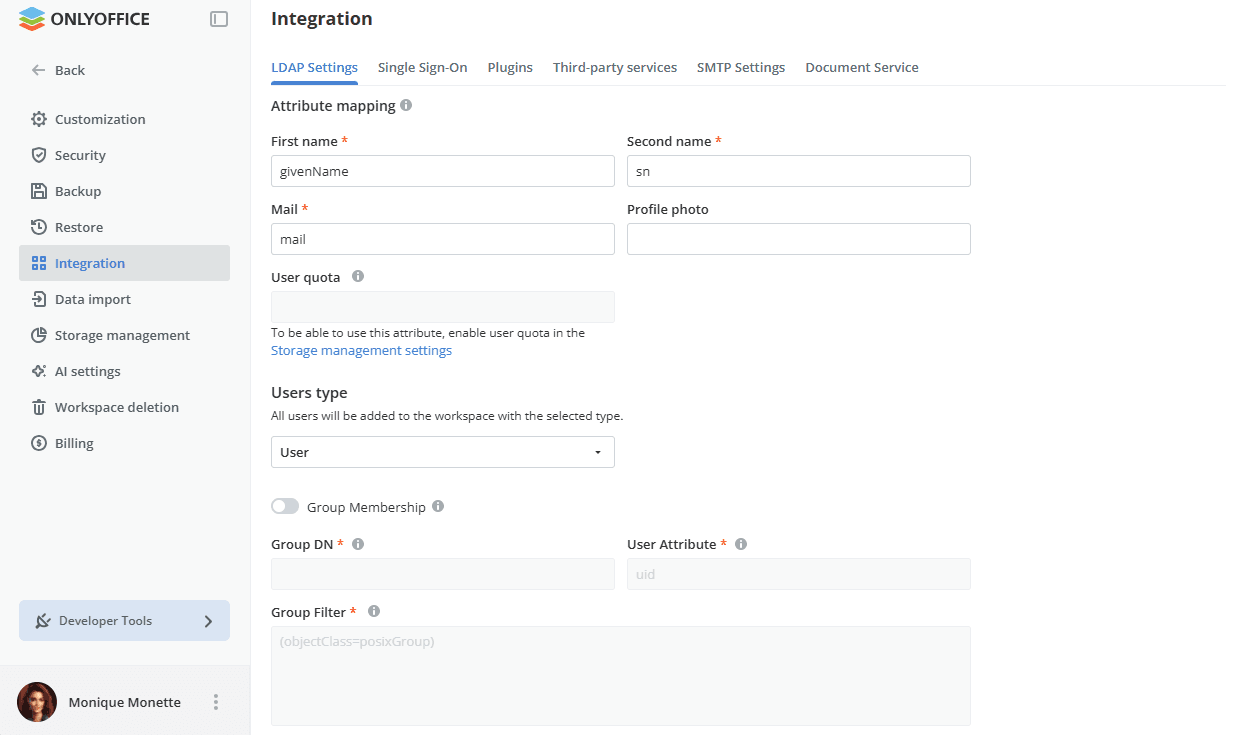
- First name (an attribute in a user record that corresponds to the user's first name)
- Second name (an attribute in a user record that corresponds to the user's second name)
- Mail (an attribute in a user record that corresponds to the user's email address)
- Profile photo (an attribute in a user record that corresponds to the user's photo)
You can also add the following attributes:
- User quota – to set a storage quota for this user, enter an integer value for this attribute in the LDAP directory. It will display the quota value in bytes. This attribute will be applied only during the first setup and can be changed manually in the Contacts section. To be able to use this attribute, enable the user quota in the Storage management settings.
- Users type – all users will be added to the workspace with the selected type (User, Room admin, Full admin). The User type is selected by default. Users can only access the rooms they are invited to by admins, and cannot create their own rooms, folders or files. Select another type to provide more permissions. Otherwise, you can change the type manually in the Contacts section.
-
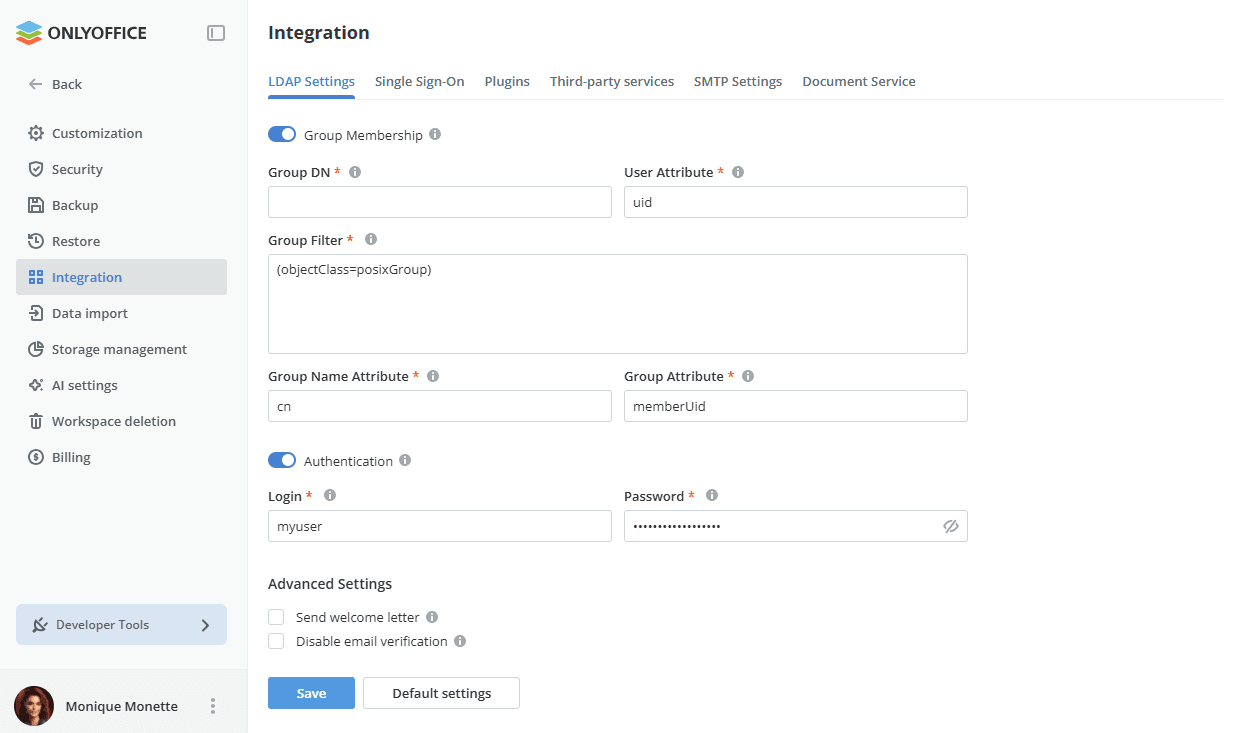
Turn on the Group Membership toggle if you want to add groups from LDAP server to your workspace and fill out the necessary fields:
Please note that if you decide to add groups, only users who belong to at least one group will be added.
 Warning Please note that in case you have already imported some users and changed some of the settings (e.g. Server, User Filter, User DN, Group Filter, Group DN), the existing users and all their data, including documents, emails, etc. not matching these new settings will be DISABLED. We strongly recommend creating a backup before you change any settings.
- in the Group DN (Group Distinguished Name) field, specify the absolute path to the top level directory containing groups you want to import, e.g.
ou=Groups,dc=example,dc=com. - fill out the Group Filter field if you need to import the groups which correspond to the specified search criteria. The default filter value
(objectClass=posixGroup)or(objectClass=group)allows importing all groups. -
the following parameters are set by default, but you can change them if it is necessary:
- User Attribute (an attribute that determines whether this user is a member of the groups)
- Group Name Attribute (an attribute that corresponds to a name of the group where the user is included)
- Group Attribute (an attribute that specifies the users that the group includes)
For OpenLDAP Server, use the following settings:
- Group Filter –
(objectClass=posixGroup) - User Attribute –
uid - Group Attribute –
memberUid
For Active Directory, use the following settings:
- Group Filter –
(objectClass=group) - User Attribute –
distinguishedName - Group Attribute –
member
- in the Group DN (Group Distinguished Name) field, specify the absolute path to the top level directory containing groups you want to import, e.g.
- Turn on the Authentication toggle if the current Windows user does not have rights to read from LDAP server/Active Directory. In the Login and Password fields, enter the credentials of the user who has rights to read data from LDAP server (set to the current Windows session login and password by default).
- Select the Send welcome letter checkbox in the Advanced Settings section if you want to send invitations by email to all new users. The welcome message contains a button that allows users to go to the workspace login page and activate the email. This option is only available if the mail attribute mapping is configured.
- Select the Disable email verification checkbox in the Advanced Settings section if you want to disable email activation for LDAP users. If this checkbox is selected, LDAP users will not need to verify their email after the first authorization in the workspace.
- Click the Save button. To roll the form back to the default values, use the Default settings button next to it.
- In the Confirmation of import window that appears, click the OK button to start importing users.
The import process will take some time depending on the number of users, groups, computer specifications, etc.
Login Attribute + @ + LDAP Domain.
- In case there is a previously created user with such email in the workspace, this user will be automatically synchronized with the LDAP user.
- In case such email does not exist, the user will not receive any workspace notifications.
There are some special features:
- the workspace owner is not affected by changing access rights via LDAP;
- if the workspace owner has been excluded from the user/group filter, they cease to be an LDAP user but always remain active;
-
when disabling LDAP, all access rights provided for users via LDAP are taken away;
- if the user who has disabled LDAP should lose admin rights, their admin rights are unaffected and the user receives a notification;
- if a user has been excluded from the user/group filter, they remain active and receive a notification that the LDAP password is no longer active and it should be changed at the profile settings page;
- if a user attempts to take away admin rights from themselves (both via access rights settings and by excluding themselves from the user/group filter), their admin rights are unaffected and the user receives a notification.
Authenticating LDAP users
Each imported user will be able to sign in to the workspace using the login that is formed according to the following schemes:
- Login Attribute, e.g.
Andrew.Stone - Login Attribute + @ + LDAP Domain, e.g.
Andrew.Stone@example.com - LDAP Domain + \ + Login Attribute (incomplete domain names are supported), e.g.
example\Andrew.Stone
On the authorization page, the Sign in to domain option is available which allows transferring a password in an explicit form. Workspace users outside of the domain can clear this setting. In such a case, a password will be transferred in a hashed form.
Imported user profiles in the Contacts section will be marked with the  icon for the workspace administrators. The user profile fields that have been imported using LDAP are blocked for editing, excepting Users type and User quota specified as initial ones.
Synchronizing LDAP data
If you change data in your LDAP server (e.g. add new users/groups, rename existing groups or edit some information in a user record), you can easily synchronize the workspace data with the new information from your LDAP server.
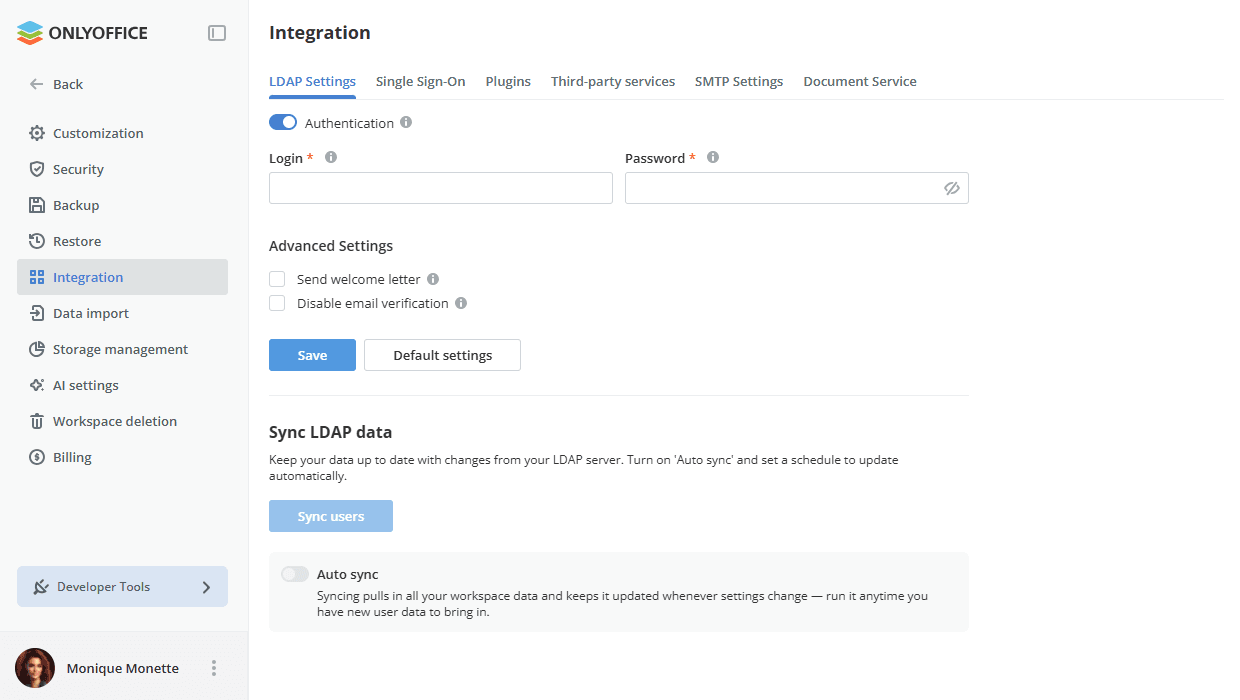
To adjust the synchronization options, go to the Sync LDAP data section, turn on the Auto sync toggle and set the necessary time to perform the automatic synchronization: you can synchronize data every hour at specified minutes, or every day at a specified time, as well as every week or month at a specified day and time. Click Save to apply the settings. It is also possible to synchronize data manually by clicking the Sync users button in the Sync LDAP data section at the bottom of the page. Alternatively, you can use the Save button below the LDAP Settings section.
The information about a separate user will also be synchronized after this user has logged in to the workspace.