Storage Management
Storage management
The Storage management section is used to view the disk space used by your workspace, define quotas, and view statistics.
Here you can view the following general information:
- The workspace created date.
- Number of active employees registered in your workspace.
- The designated data storage region for your cloud workspace. Your data is stored on a secure server that complies with security standards.
- The Disk space used section showing the Total storage available to your workspace and the space currently Used.
- The storage space used by each section (Files, Trash, Archive, Rooms, AI agents, Forms).
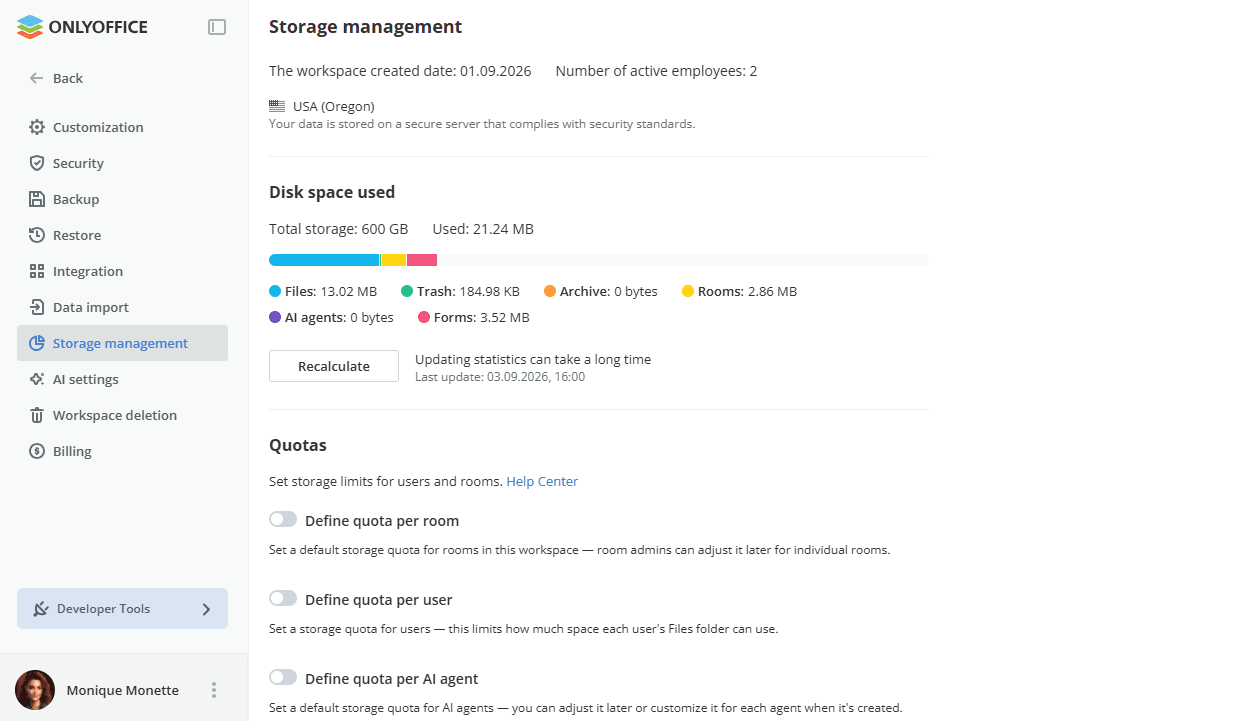
The Recalculate button is used to recalculate the space used by rooms and users displayed in the Statistics section. Updating the statistics can take a long time; the date and time of the last update are displayed next to the button.
Quotas
The Quotas section allows you to set storage limits for rooms, users, and AI agents. In the SaaS version, this is a Paid feature (available for the paid Business plan only). In the server version, this feature is available in the Enterprise edition.
- Define quota per room – set a default storage quota for rooms in this workspace. Room admins can adjust it later for individual rooms.
- Define quota per user – set a storage quota for users. This limits how much space each user's Files folder can use.
- Define quota per AI agent – set a default storage quota for AI agents. You can adjust it later or customize it for each agent when it is created.
In the free version, the Quotas section is marked with the Paid label and the switchers are inactive.
Manage quotas per room
To enable and set the default memory quota that will be applied to all new rooms and existing rooms:
- Turn on the Define quota per room switcher.
- Set the necessary value in the input field and choose the unit of measure from the dropdown list (bytes, Kb, Mb, Gb, Tb).
- Click Save.
To disable the default quota, turn off the Define quota per room switcher.
When the default quota is set in the Storage management settings, the room administrator can change the quota for several rooms selected in the Rooms list or for a certain room in the Rooms list / room Info panel.
To change the quota for a certain room:
- Click the quota value to the right of the room name in the list or in the Info panel.
- Select the Change quota option from the dropdown list.
- A new window opens. Set the necessary value in the input field and choose the unit of measure from the dropdown list (bytes, Kb, Mb, Gb, Tb).
- Click OK.
If the memory quota you set is less than the memory used by the selected room, you'll get an error.
To set the changed quota to default, use the Set to default option to the right of the room name in the list or in the Info panel. The quota value will change to the default one.
To disable the quota, use the Disable quota option to the right of the room name in the list or in the Info panel. The quota value will change to Unlimited.
When a room quota is set and the limit has been exceeded, a notification banner appears in the room header to alert the room administrator.
Manage quotas per user
This quota limits how much space the Files folder of each user can use. To enable and set the default memory quota that will be applied to all new users and existing users:
- Turn on the Define quota per user switcher.
- Set the necessary value in the input field and choose the unit of measure from the dropdown list (bytes, Kb, Mb, Gb, Tb).
- Click Save.
To disable the default quota, turn off the Define quota per user switcher.
When the default quota is set in the Storage management settings, a Full admin can change or disable the quota for several users selected in the Contacts list or for a certain user in the Contacts list / user Info panel.
To change the quota for a certain user:
- Click the quota value to the right of the user name in the list or in the Info panel.
- Select the Change quota option from the dropdown list.
- A new window opens. Set the necessary value in the input field and choose the unit of measure from the dropdown list (bytes, Kb, Mb, Gb, Tb).
- Click OK.
If the memory quota you set is less than the memory used by the selected user, you'll get an error.
To set the changed quota to default, use the Set to default option to the right of the user name in the list or in the Info panel. The quota value will change to the default one.
To disable the quota, use the Disable quota option to the right of the user name in the list or in the Info panel. The quota value will change to Unlimited.
Manage quotas per AI agent
To enable and set the default memory quota that will be applied to all new AI agents and existing agents:
- Turn on the Define quota per AI agent switcher.
- Set the necessary value in the input field and choose the unit of measure from the dropdown list (bytes, Kb, Mb, Gb, Tb).
- Click Save.
To disable the default quota, turn off the Define quota per AI agent switcher.
When the default quota is set in the Storage management settings, the AI agent administrator can change the quota for several AI agents selected in the AI agents list or for a certain AI agent in the AI agents list / AI agent Info panel.
To change the quota for a certain AI agent:
- Click the quota value to the right of the AI agent name in the list or in the Info panel.
- Select the Change quota option from the dropdown list.
- A new window opens. Set the necessary value in the input field and choose the unit of measure from the dropdown list (bytes, Kb, Mb, Gb, Tb).
- Click OK.
If the memory quota you set is less than the memory used by the selected AI agent, you'll get an error.
To set the changed quota to default, use the Set to default option to the right of the AI agent name in the list or in the Info panel. The quota value will change to the default one.
To disable the quota, use the Disable quota option to the right of the AI agent name in the list or in the Info panel. The quota value will change to Unlimited.
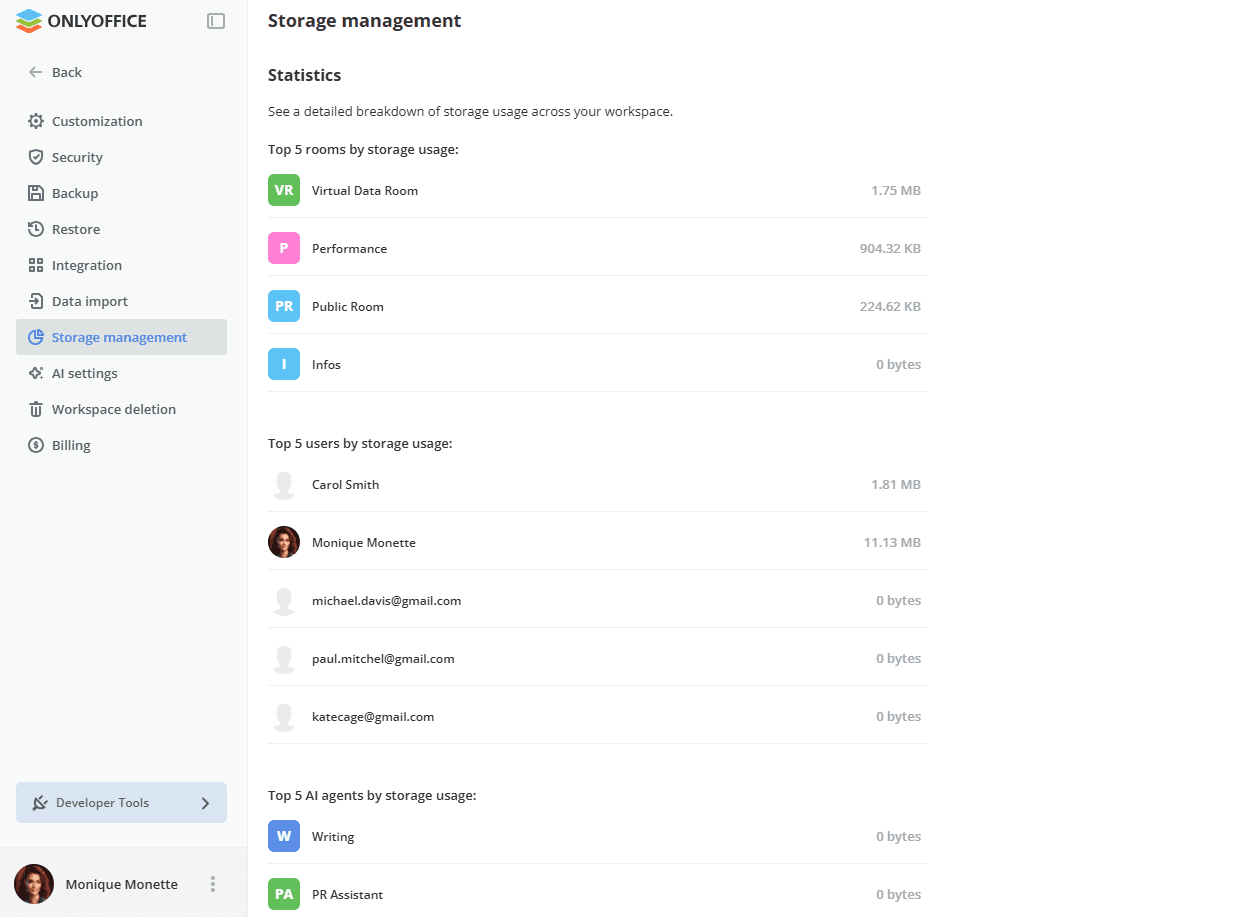
Statistics
The Statistics section shows a detailed breakdown of storage usage across your workspace. In the SaaS version, this is a Paid feature (available for the paid Business plan only). In the server version, this feature is available in the Enterprise edition. Here you can view the following detailed data:
- Top 5 rooms by storage usage: used space / quota per room, if specified
- Top 5 users by storage usage: used space / quota per user, if specified
- Top 5 AI agents by storage usage: used space / quota per AI agent, if specified