Single Sign-on
Introduction
The Single Sign-On section allows you to enable third-party authentication via SAML, giving users a faster, easier and more secure way to access the workspace.
In the SaaS version, this is a Paid feature (available for the paid Business plan only).
Generally, the Single Sign-on technology allows users to sign in only once and then get access to multiple applications/services without re-authentication. E.g., if a web service includes several large independent sections (forum, chat, blogs, etc.), a user can undergo the authentication procedure within one of the services and automatically get access to all other services without entering credentials several times.
An Identity Provider (IdP) is a service that creates, maintains and manages user identity information and provides user authentication to other Service Providers within a federation. Such services as OneLogin, ADFS etc. act as Identity Providers. A Service Provider (SP) is an entity that provides web services and relies on a trusted Identity Provider for user authentication. In our case, the Service Provider is ONLYOFFICE Apps.
You can enable SSO on the base of SAML for the authentication/authorization data exchange between an Identity Provider and a Service Provider:
- SAML (Security Assertion Markup Language) – an XML standard that makes it possible to transmit user authentication/authorization data between an identity provider and a service provider through security tokens which contain assertions.
Enhanced security is enabled by means of the fact that ONLYOFFICE Apps does not store user passwords, instead of that it uses the results of the authentication on the Identity Provider side. All the necessary user information is transmitted through an authentication token. If the user information changes on the Identity Provider side, it will be automatically updated in your workspace during the next SSO authentication (note that the data can only be synchronized in one direction: from the Identity Provider to ONLYOFFICE Apps).
After the Identity Provider and ONLYOFFICE Apps are mutually configured to ensure SSO, the user SSO authentication process will be performed on the Identity Provider side. ONLYOFFICE Apps will receive an authentication token (SAML) from the Identity Provider. After the token is validated (by using digital signatures and the token lifetime), ONLYOFFICE Apps allows the user to access the workspace.
Enabling SSO
To enable and configure SSO authentication for your workspace, proceed as follows:
Check the Identity Provider configuration before adjusting the Service Provider.
- Use the
 menu in the lower left corner and select the Settings option.
- In the workspace settings, open the Integration section on the left.
- Switch to the Single Sign-On tab.
- Turn on the Enable single sign-on authentication switcher.
- In the ONLYOFFICE service provider settings section, click Show and fill in the required fields. The necessary information can be specified in several different ways:
- Enter the URL address to the metadata file. If your IdP metadata is accessible from outside by the link, insert the link into the URL to identity provider metadata XML field and click the
 button to load data. When the data is loaded, all the required parameters will be automatically displayed in the extended form.
- Upload the metadata file. If your IdP provides a metadata file, use the Select file button to browse for the file stored on your local machine. When the file is uploaded, all the required parameters will be automatically displayed in the extended form.
- Specify the required parameters manually. If the metadata file is not available, enter the necessary parameters manually. To obtain the necessary values, please contact your IdP administrator.
- Enter the URL address to the metadata file. If your IdP metadata is accessible from outside by the link, insert the link into the URL to identity provider metadata XML field and click the
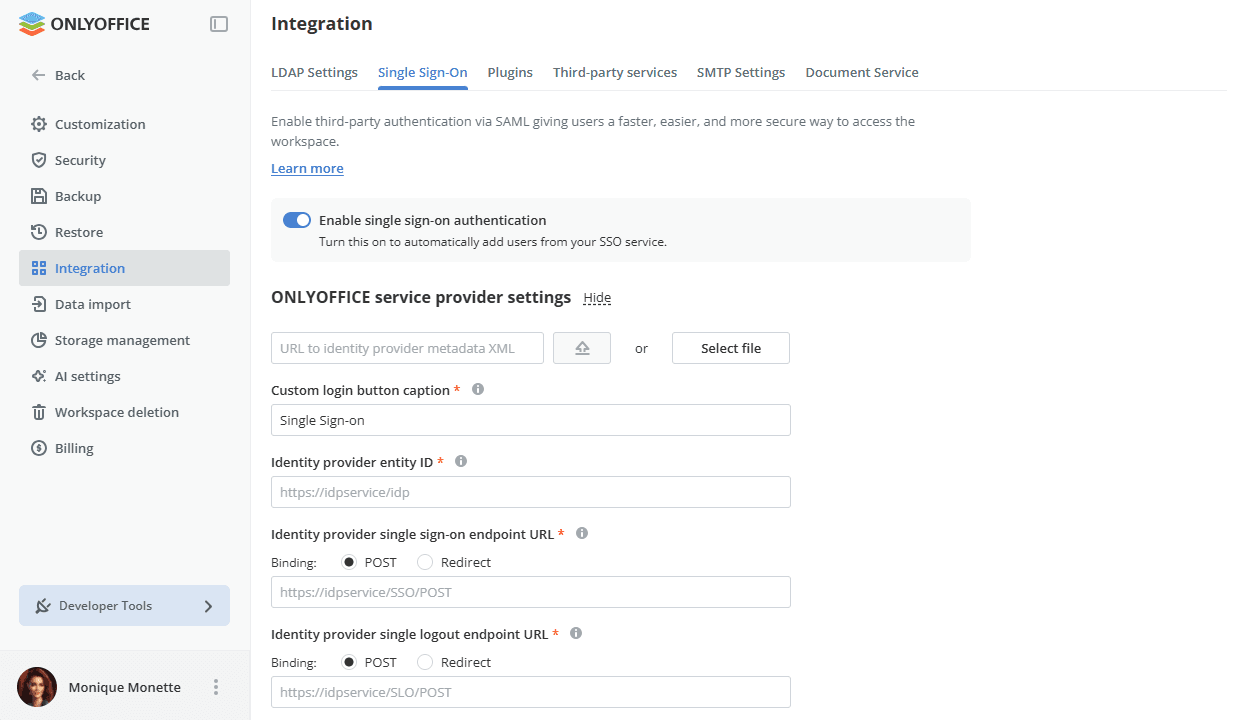
The following parameters are available:
-
Identity provider entity ID (obligatory field) – the Identity Provider identifier or URL address which will be used by the Service Provider to unequivocally identify the IdP.
https://example.com/idp/shibbolethwhere example.com is your SSO service domain name
-
Identity provider single sign-on endpoint URL (obligatory field) – the URL used for the single sign-on on the Identity Provider side. It is the endpoint address in your IdP to which SP sends authentication requests.
Set the necessary Binding type selecting one of the corresponding radio buttons. Bindings specify the way in which authentication requests and responses are transmitted between the IdP and SP over the underlying transport protocol: using the HTTP POST or HTTP Redirect binding.
-
Identity provider single logout endpoint URL – the URL used for the single logout on the Service provider side. It is the endpoint address in your IdP to which SP sends logout requests/responses.
Set the necessary Binding type selecting one of the corresponding radio buttons. Bindings specify the way in which logout requests and responses are transmitted between the IdP and SP over the underlying transport protocol: using the HTTP POST or HTTP Redirect binding.
-
NameID format – the NameID parameter allows SP to identify a user. Select one of the available formats from the list.
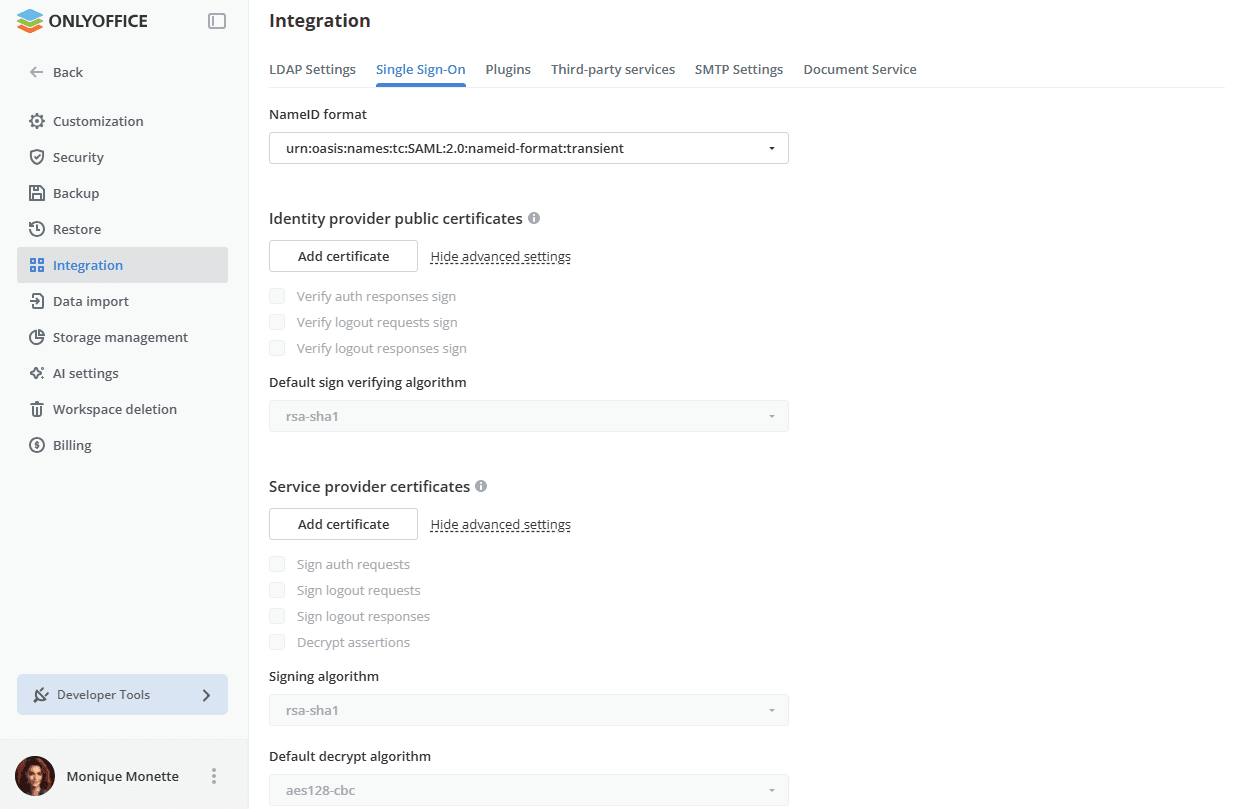
It's possible to customize the button used to log in to the workspace with the Single Sign-on service at the ONLYOFFICE Apps authentication page. You can do it using the Custom login button caption field in the ONLYOFFICE service provider settings section.
You can also add the IdP and SP certificates.
Identity provider public certificates
The Identity provider public certificates section allows you to add the Identity Provider public certificates used by the SP to verify the requests and responses from the IdP.
If you have loaded the IdP metadata, these certificates will be added to your workspace automatically. Otherwise, the certificates can be found in your IdP account. To add a certificate manually, click the Add certificate button. The New Certificate window opens. Enter the certificate in the Public Certificate field and click the OK button.
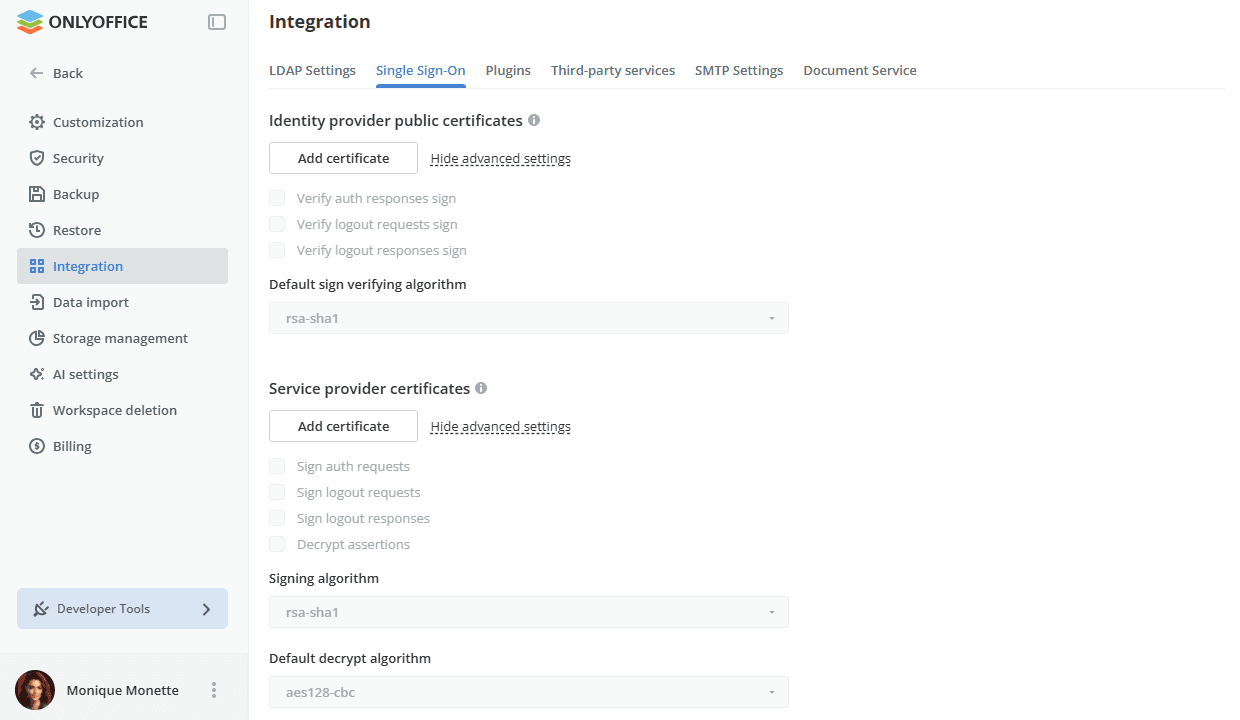
Use the Show advanced settings link to display the additional parameters, then set them by checking the corresponding boxes. Use Hide advanced settings to collapse the section again.
Specify which signatures of requests/responses sent from IdP to SP should be verified:
- Verify auth responses sign – to verify signatures of the SAML authentication responses sent to SP.
- Verify logout requests sign – to verify signatures of the SAML logout requests sent to SP.
- Verify logout responses sign – to verify signatures of the SAML logout responses sent to SP.
Select the necessary algorithm from the Default sign verifying algorithm list: rsa-sha1, rsa-sha256 or rsa-sha512.
Default settings are used only in cases if the IdP metadata does not specify which algorithm should be used.
You can edit or delete the added certificates using the corresponding link.
Service provider certificates
The Service provider certificates section allows you to add the Service Provider certificates used to sign and encrypt the requests and responses from the SP.
If your IdP requires that input data is signed and/or encrypted, create or add corresponding certificates in this section.
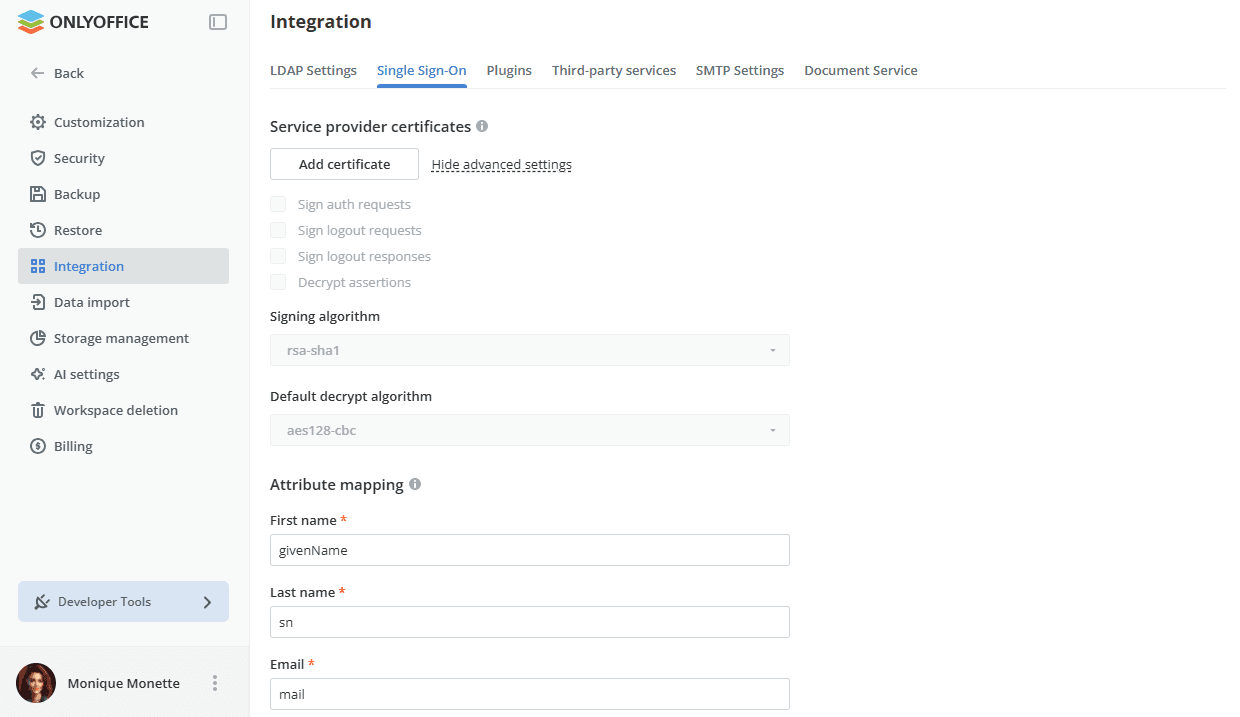
Click the Add certificate button. The New Certificate window opens. You can generate a self-signed certificate or add an existing certificate in the Public Certificate field and the corresponding private key in the Private Key field. In the Use for list, select one of the available options: signing, encrypt, signing and encrypt. When ready, click the OK button.
Depending on the certificate purpose selected in the Use for list when uploading/generating the certificate, the certificate additional parameters are specified. The following parameters define which requests/responses sent from SP to IdP should be signed:
- Sign auth requests – to have SP sign the SAML authentication requests sent to IdP.
- Sign logout requests – to have SP sign the SAML logout requests sent to IdP.
- Sign logout responses – to have SP sign the SAML logout responses sent to IdP.
If you have selected the encrypt or signing and encrypt option in the Use for list, the Decrypt assertions parameter is also checked. The decryption is performed using the corresponding Private Key.
Select the necessary algorithms from the lists:
- Signing algorithm:
rsa-sha1,rsa-sha256orrsa-sha512. - Default decrypt algorithm:
aes128-cbc,aes256-cbcortripledes-cbc.
You can edit or delete the added certificates using the corresponding link.
Attribute mapping
The Attribute mapping section allows you to set the correspondence of the fields in the Contacts section to the user attributes which will be returned from the IdP. When a user signs in to ONLYOFFICE Apps using the SSO credentials, the service provider receives the required attributes and populates the full name and email address fields in the user account with the values received from the IdP. If the user does not exist in the Contacts section, it will be created automatically. If the user information has been changed on the IdP side, it will be updated in SP as well.
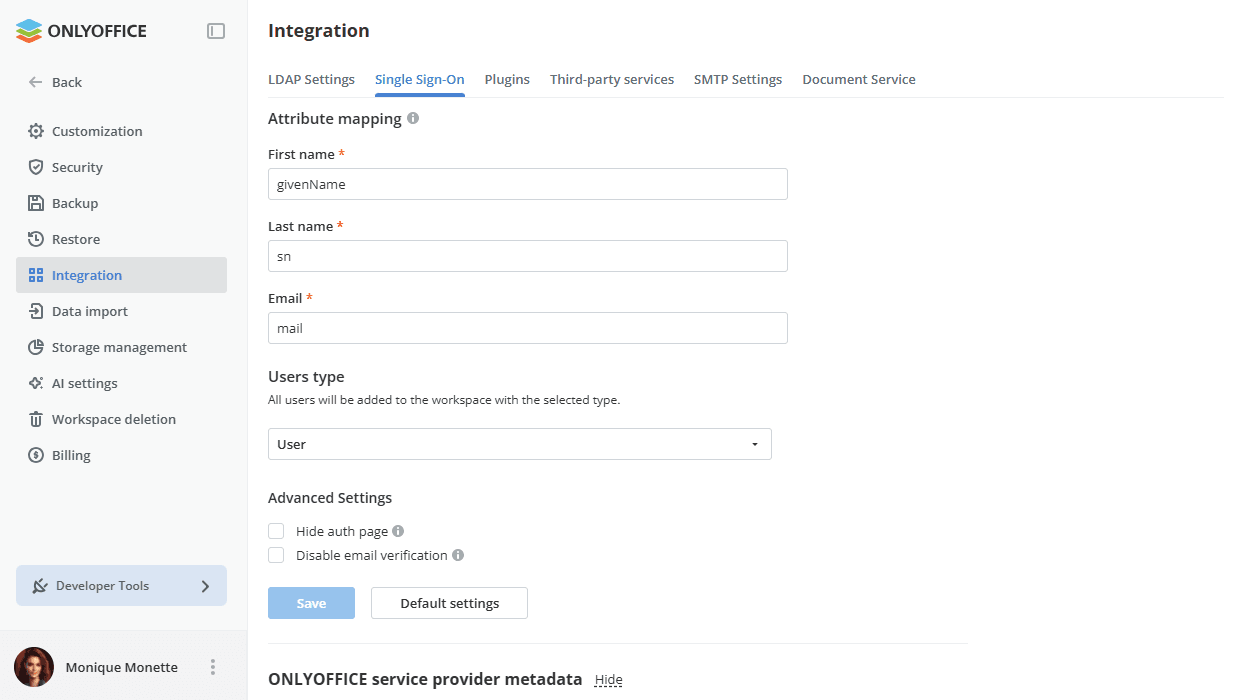
The available attributes are:
- First name (obligatory field) – an attribute in a user record that corresponds to the user's first name.
- Last name (obligatory field) – an attribute in a user record that corresponds to the user's second name.
- Email (obligatory field) – an attribute in a user record that corresponds to the user's email address.
Users type
All users will be added to the workspace with the selected type (User, Room admin, Full admin). The User type is selected by default. Users can only access the rooms they are invited to by admins and cannot create rooms or AI agents. Select another type to provide more permissions. Otherwise, you can change the type manually in the Contacts section.
Advanced Settings
The Hide auth page option allows you to hide the default authentication page and automatically redirect to the SSO service.
If you need to restore the default authentication page (to be able to access your workspace if your IdP server fails), you can add the /login?skipssoredirect=true key after the domain name of your workspace in the browser address bar.
Check the Disable email verification box if you want to disable email activation for SSO users. If this box is checked, SSO users will not need to verify their email after the first authorization in the workspace.
When all the settings are specified, click the Save button. The ONLYOFFICE service provider metadata section will open. To discard the current configuration and return every field to its initial state, use the Default settings button next to Save.
Registering ONLYOFFICE as a trusted Service Provider in your Identity Provider
Now you need to add ONLYOFFICE Apps as a trusted Service Provider in your IdP account specifying the service provider metadata in the IdP.
To receive necessary data, refer to the ONLYOFFICE service provider metadata section of the Single Sign-On page. Verify that the SP data is publicly accessible. To do that, click the Download service provider metadata XML button. The XML file contents will be displayed in a new browser tab. Save the data as an XML file to be able to upload it to the IdP.
Alternatively, you can manually copy separate parameters clicking the  button in the corresponding fields.
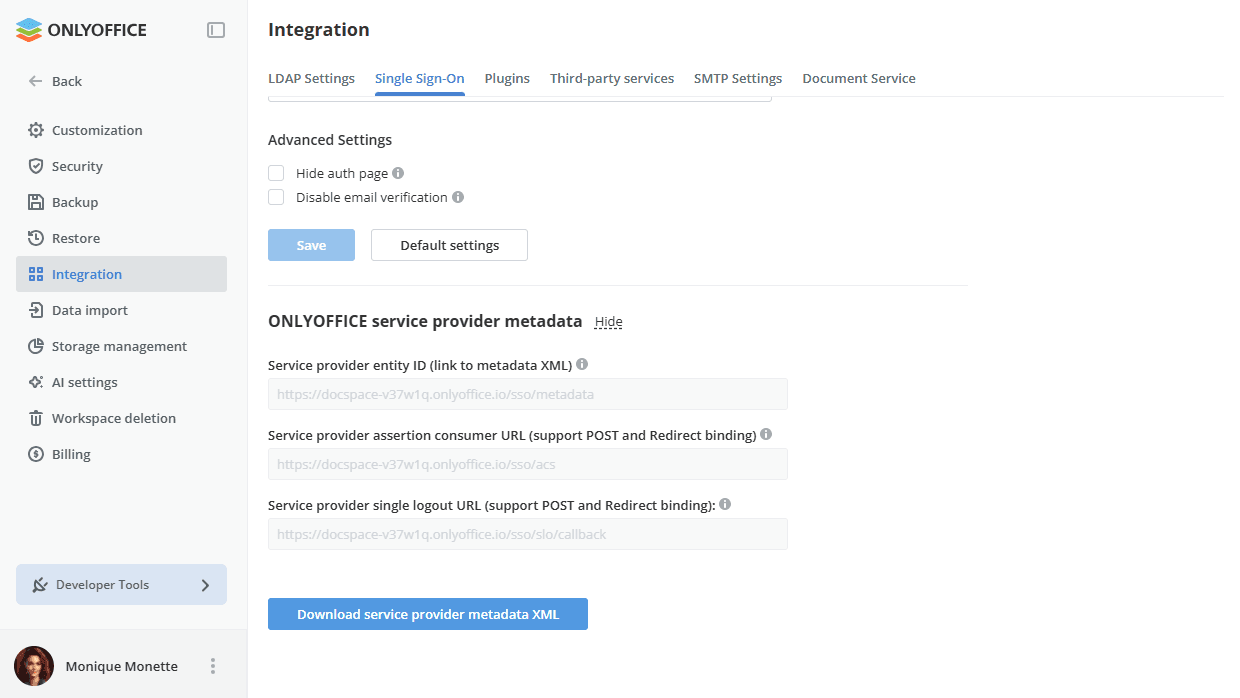
The following parameters are available:
- Service provider entity ID (link to metadata XML) – the Service Provider XML URL address which can be downloaded and used by the Identity Provider to unequivocally identify the SP. By default, the file is located at the following address:
http://example.com/sso/metadatawhere example.com is your workspace domain name or public IP. - Service provider assertion consumer URL (support POST and Redirect binding) – the Service Provider URL address where it receives and processes assertions from the Identity Provider. By default, the following address is used:
http://example.com/sso/acswhere example.com is your workspace domain name or public IP. - Service provider single logout URL (support POST and Redirect binding) – the URL used for the single logout on the Identity Provider side. It is the endpoint address in your SP where it receives and processes logout requests/responses from the Identity Provider. By default, the following address is used:
http://example.com/sso/slo/callbackwhere example.com is your workspace domain name or public IP.
These parameters and XML contents differ depending on your workspace configuration, e.g., if you specify a domain name, the parameters will also be changed and you will need to reconfigure your IdP.
Logging in to ONLYOFFICE Apps
After the SSO is enabled and configured, the logging in process is performed in the following way:
- A user requests access to ONLYOFFICE Apps by clicking the Single Sign-on button (the caption may differ if you have specified your own text when configuring the service provider) at the ONLYOFFICE Apps authentication page (SP-initiated SSO).
- If all the IdP and SP settings are set correctly, ONLYOFFICE Apps sends the authentication request to the IdP and redirects the user to the IdP page where he/she is asked for credentials.
- If the user is not already logged in to the IdP, he/she provides credentials in the IdP.
- IdP creates the authentication response that contains user data and sends it to ONLYOFFICE Apps.
- ONLYOFFICE Apps receives the authentication response from the Identity Provider and validates it.
- If the response is validated, ONLYOFFICE Apps allows the user to log in (the user will be created automatically if missing, or the data will be updated if changed in the IdP).
It's also possible to use the sign-in page on the Identity Provider side (IdP-initiated SSO), enter credentials and then access the workspace without re-authentication.
Logging out from ONLYOFFICE Apps
Logout can be made using 2 available ways:
- From the workspace using the Sign Out menu (in this case the request will be sent from IdP to logout). The user should also be automatically logged out from the IdP in case he/she is logged out from all other applications previously accessed via SSO authentication.
- From the IdP logout page.
Editing user profiles created using SSO
The users created using the SSO authentication are marked with the SSO icon in the user list for the workspace administrator.
The possibility to edit such user profiles in the Contacts section is restricted. The user profile fields that have been created using the SSO authentication are disabled for editing from the Contacts section. The user data can be changed on the IdP side only.