Managing active sessions
Signed in to your workspace from another device, but then forgot to sign out? You can manually close a specific active session.
The list of active sessions is available only for your profile, and only the sessions of your profile can be terminated.
Closing a particular session
-
Click the
 icon next to your name in the lower left corner and select the Profile option, or click your name.
-
On the My profile page, open the Login tab and find the Active sessions section. You will see the list of all your active sessions in three columns: Sessions (the operating system and the browser), Date (the date and time), and Location (the IP address; in the SaaS version, the country and city are also displayed). The session you are currently working in is marked with a check mark.

-
Find the required session and click the
 icon on the right.
-
In the Log out from active connection window that opens, click Log out to confirm the action, or Cancel to keep the session running.

The selected session will be terminated and removed from the list.
Closing all active sessions
-
Click the
icon next to your name in the lower left corner and select the Profile option, or click your name. -
On the My profile page, open the Login tab and find the Active sessions section.
-
Click the Terminate all sessions except the current one link.
-
In the Sign out window that opens:

- For more security, you can select the Change password after logging out checkbox.
- Click the Log out button.
All sessions except the current one will be terminated and removed from the list. If you selected the Change password after logging out option, you will be signed out of all sessions and prompted to create a new password. After creating a new password, you will need to enter your credentials to sign in to your workspace.
Enabling location detection for the server version
If you are using the server version, location detection is not available by default. To enable this feature, follow the steps below.
Step 1
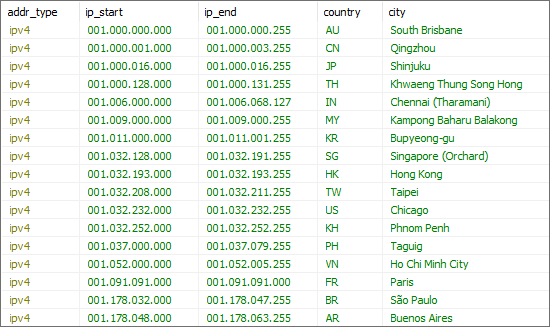
To determine the location by IP address, you need to fill in the dbip_lookup table in the database with data.
The table has a specific data format.
To display location in the Active sessions section, you need to fill in the following columns:
addr_type- the type of the IP address.ip_start- the beginning of the IP addresses range.ip_end- the end of the IP addresses range.country- the country code in the ISO-3166-alpha2 format.city- the locality name.
The type of the IP address has two possible values: "ipv4" or "ipv6".
The IP addresses range is specified in an extended format containing empty positions:
- "127.0.0.1" must be extended to "127.000.000.001".
- "::1" must be extended to "0000:0000:0000:0000:0000:0000:0000:0001".
The country code is specified as a two-letter abbreviation (for example, "AU", "US" or "JP"). The "ZZ" value is ignored (unknown or unspecified country).
Step 2
The data for filling in the dbip_lookup table can be taken anywhere.
Following the instructions from Step 1, you can add records to the table in any accessible and convenient way.
There are many services that provide information on the geolocation of IP addresses. Most of them allow you to download information in the .csv format.
As an example, we will use the https://db-ip.com/ service.
Download the free database in the .csv format. Use the following command, replacing {year} and {month} with the current year/month, for example 2022 and 08:
wget https://download.db-ip.com/free/dbip-city-lite-{year}-{month}.csv.gz
Unpack the archive. Use the following command, replacing {year} and {month} with the current year/month, for example 2022 and 08:
gzip -dk dbip-city-lite-{year}-{month}.csv.gz
Step 3
Enabling location detection on Windows
Use the PHP utility to import the source data from the .csv file to the dbip_lookup table in the database.
The source code of the utility can be found here.
Launch the utility, specifying the path to the .csv file and the database access details:
C:\PHP\php.exe -f "C:\dbip-phpsrc-4.0\import.php" -- -f "C:\dbip-phpsrc-4.0\dbip-city-lite-2024-10.csv" -d city-lite -b onlyoffice -t dbip_lookup -u root -p root
If you are using a hostname other than localhost or a custom port, change the connection string in the import.php file.
To run the utility, you need to enable the PHP drivers for working with MySQL PDO and mbstring. Follow the instructions below on Windows:
- Download: https://windows.php.net/download/
- Install: https://www.sitepoint.com/how-to-install-php-on-windows/#h-installing-php
- Make changes for running: https://www.php.net/manual/en/install.windows.commandline.php
To enable additional drivers in PHP, remove the semicolon from the following lines in the php.ini file:
extension=mbstring
extension=pdo_mysql
After running the utility, data should appear in the dbip_lookup table and location detection in the workspace should work.
Enabling location detection on Linux
-
Install the required packages:
sudo yum install mysql-client wget php php-mbstring php-mysqlnoteIn the command above,
yumis used, which is intended for RPM-based systems. On DEB-based systems, useapt-getinstead. -
Download the free database:
wget https://download.db-ip.com/free/dbip-city-lite-2024-10.csv.gz -
Download the update utility:
wget https://download.db-ip.com/free/dbip-phpsrc-4.0.tgz -
Unpack the archives:
tar -xvf dbip-phpsrc-4.0.tgzgunzip dbip-city-lite-2024-10.csv.gz -
For the Docker version, edit the
import.phputility in the source folder:vi import.phpSpecify 127.0.0.1 as the host and 33060 as the port.
$db = new PDO("mysql:host=127.0.0.1;port=33060;dbname={$dbname};charset=utf8mb4", $username, $password); -
Run the update utility:
/import.php -f ../dbip-city-lite-2024-10.csv -d city-lite -b docspace -t dbip_lookup -u <user> -p <password>