Editing rooms
To control each step of collaboration, administrators in ONLYOFFICE Apps can perform various operations with the existing rooms: sort and filter the room list to easily find the necessary room, pin some important rooms to the top of the list, move old rooms to the archive, edit the room info, add new members, resend invitations, change the active user permission levels or remove users from the room.
As for managing rooms in the workspace, the available actions differ depending on the user type:
| Section\User type | Owner | Full admin | Room admin | User | Guest |
|---|---|---|---|---|---|
| Files | ✔ | ✔ | ✔ | ✔ | ✖ |
| Creating, uploading, moving, copying, renaming, downloading, deleting files and folders | ✔ | ✔ | ✔ | ✔ | ✖ |
| Rooms | ✔ | ✔ | ✔ | ✔ | ✔ |
| Viewing all rooms | ✔ | ✔ | ✖ | ✖ | ✖ |
| Viewing own rooms | ✔ | ✔ | ✔ | ✖ | ✖ |
| Viewing rooms the user is invited to | ✔ | ✔ | ✔ | ✔ | ✔ |
| Creating and editing rooms | ✔ | ✔ | ✔ | ✖ | ✖ |
| Pinning rooms to top | ✔ | ✔ | ✔ | ✔ | ✔ |
| Viewing room info (contacts, history, details) | ✔ | ✔ | ✔ | ✔ | ✔ |
| Inviting external users (guests) to a room | ✔ | ✔ | ✔ | ✔ | ✔ |
| Inviting internal users to a room | ✔ | ✔ | ✔ | ✔ | ✖ |
| Assigning permission levels of own room members | ✔ | ✔ | ✔ | ✔ | ✔ |
| Changing permission levels of own room members | ✔ | ✔ | ✔ | ✖ | ✖ |
| Removing users from own room | ✔ | ✔ | ✔ | ✖ | ✖ |
| Archiving own rooms | ✔ | ✔ | ✔ | ✖ | ✖ |
| Creating a copy of own room | ✔ | ✔ | ✔ | ✖ | ✖ |
| Creating a copy of someone else's room | ✔ | ✔ | ✖ | ✖ | ✖ |
| Editing someone else's rooms: inviting users, assigning and changing permission levels of the room members, removing users from the room | ✖ | ✖ | ✖ | ✖ | ✖ |
| Viewing links of someone else's public room | ✖ | ✖ | ✖ | ✖ | ✖ |
| Changing the owner of someone else's room | ✔ | ✔ | ✖ | ✖ | ✖ |
| Archiving someone else's room | ✔ | ✔ | ✖ | ✖ | ✖ |
| Archive | ✔ | ✔ | ✔ | ✔ | ✔ |
| Viewing all archived rooms | ✔ | ✔ | ✖ | ✖ | ✖ |
| Viewing own archived rooms | ✔ | ✔ | ✔ | ✖ | ✖ |
| Viewing archived rooms the user is invited to | ✔ | ✔ | ✔ | ✔ | ✔ |
| Editing archived rooms | ✖ | ✖ | ✖ | ✖ | ✖ |
| Pinning archived rooms to top | ✖ | ✖ | ✖ | ✖ | ✖ |
| Viewing archived room info (contacts, history, details) | ✔ | ✔ | ✔ | ✔ | ✔ |
| Inviting users to an archived room, assigning and changing permission levels of members | ✖ | ✖ | ✖ | ✖ | ✖ |
| Restoring, copying, or removing someone else's archived rooms | ✔ | ✔ | ✖ | ✖ | ✖ |
| Restoring, copying, or removing own archived rooms | ✔ | ✔ | ✔ | ✖ | ✖ |
Operations in the room list
Using tools on the top toolbar, you can perform the following operations:
-
Search for a room name using the search bar at the top of the room list.
-
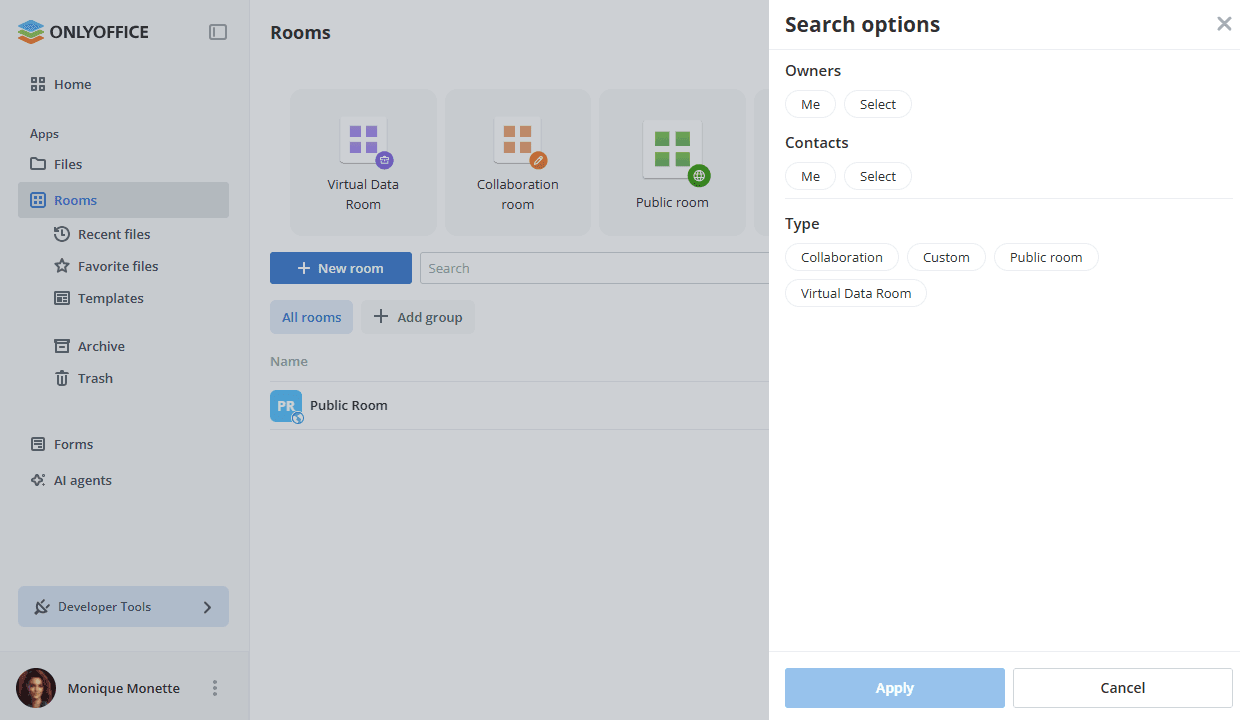
Filter rooms by owner or contacts, type (Collaboration, Custom, Public room, Virtual Data Room), the existing tags, third-party resources using the
 button. Select the necessary filter parameters and click Apply. To clear the filter, use the
 icon in the upper right corner.
-
Sort rooms by parameters (Name, Type, Tags, Owner, Last activity date, Storage) using the
 button. Click the arrow next to the selected parameter to change the sort order.
-
Switch between the available display modes (Thumbnails or Compact) using the
 or
 button.
-
Use the
 icon to display or hide the Type, Tags, Owner, Last activity, Storage / Quota columns in the room list (Compact view).
-
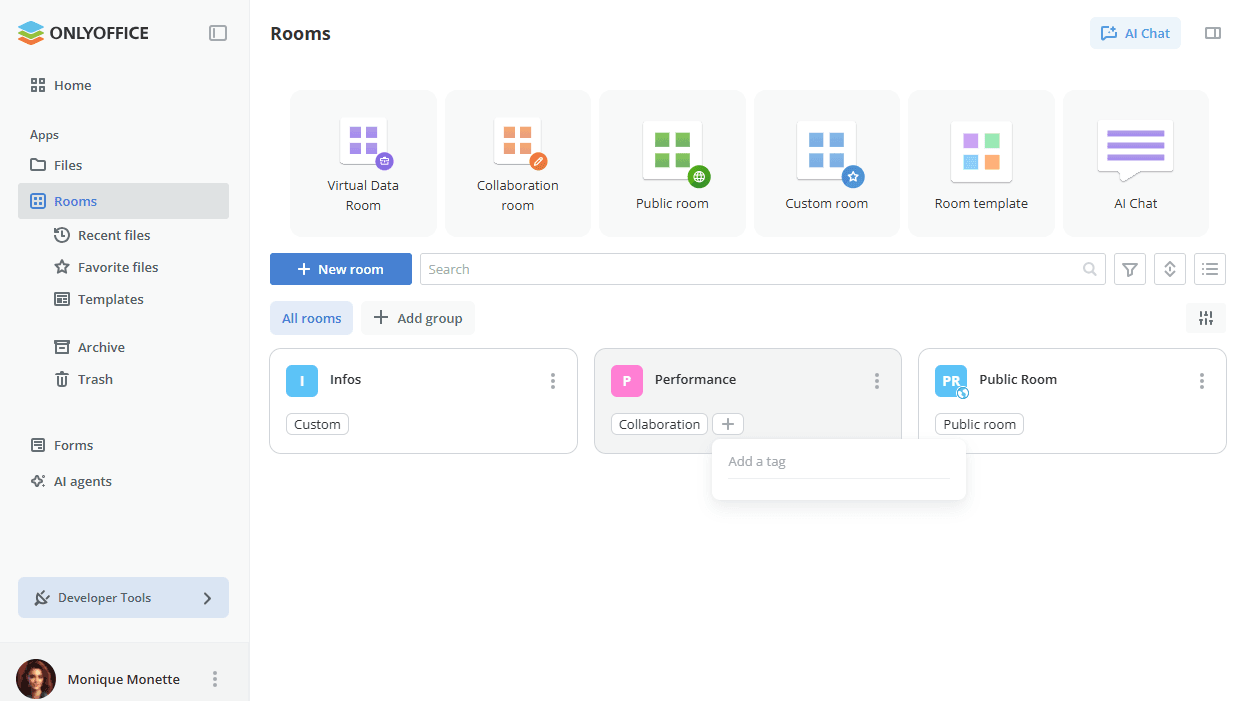
Add a tag quickly by clicking the + icon on a room card. Type the tag name in the input field that appears and press Enter to apply. To remove or rename an existing tag, click it directly on the card — the tag becomes editable so you can update its name, or press Delete to remove it.
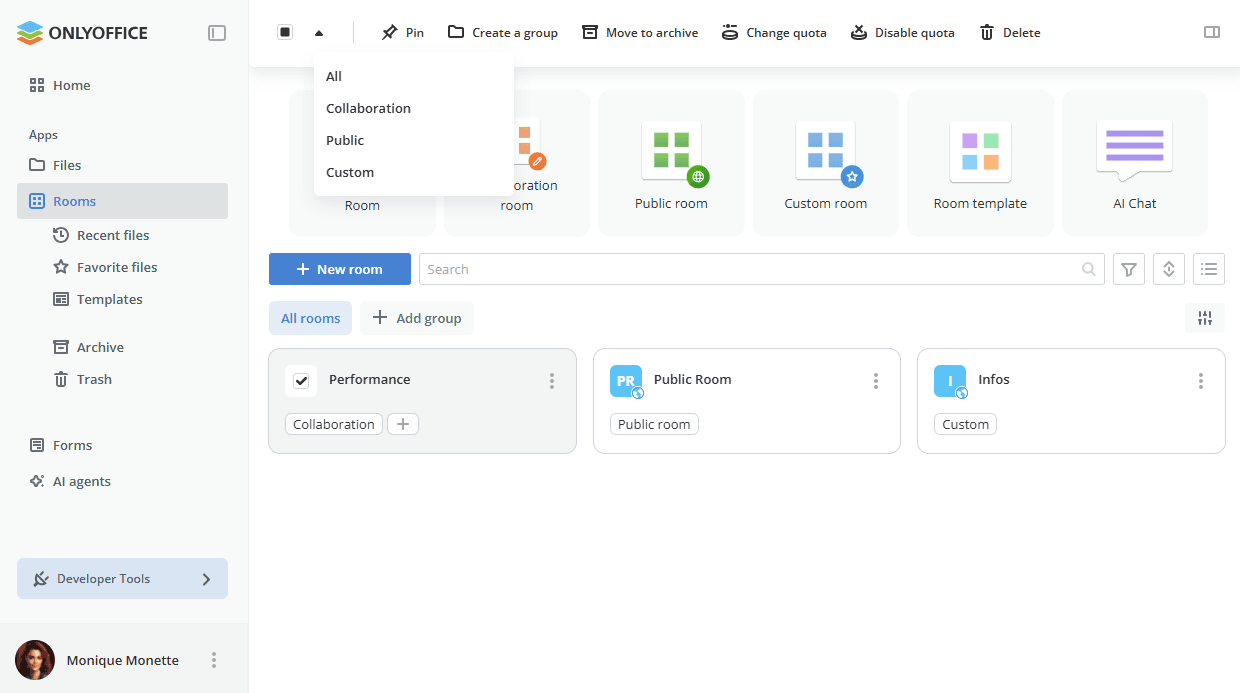
Using the top panel that appears when one or several rooms are selected in the list, you can perform the following operations:
-
Select rooms by type (All, Virtual Data Room, Collaboration, Public, Custom) using the
 icon. The list includes the types of the rooms that have already been created.
-
Pin/unpin the selected room(s) to top.
-
Create a group from the selected room(s) using the Create a group option.
-
Move the selected room(s) to the archive.
-
Change a quota per room (if a quota per room has been set).
-
Disable the quota (if a quota per room has been set).
-
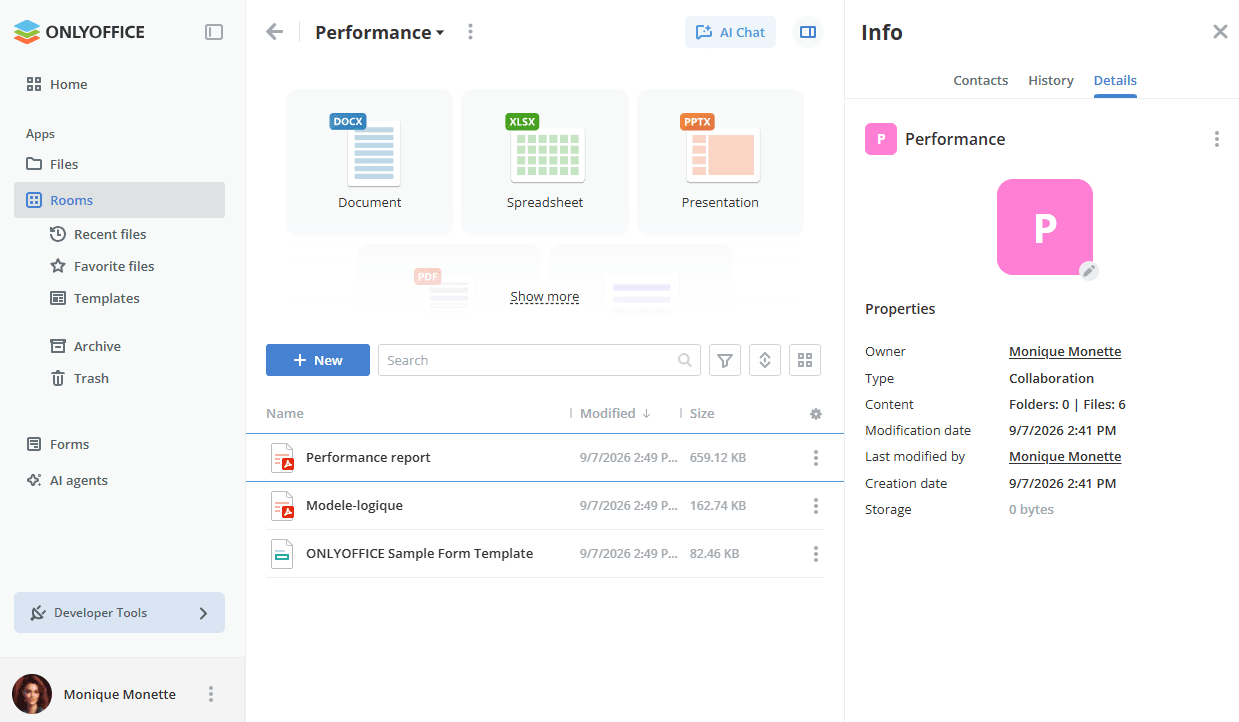
View info about the single selected room using the
 icon.
-
Delete the room.
Using the right-click menu or the  icon next to the room name, you can perform the following actions:
 Select – to select the room in the list. When the room is selected, you can Pin/Unpin it or move to archive using the top toolbar options or view info using the icon.
 Open – to open the room.
 Pin to top – to display the room at the top of the list. You can unpin the pinned room by clicking the
 icon or using the Unpin option in the menu.
 Disable notifications – to disable notifications for this room. You can re-enable notifications using the
 Enable notifications option in the menu.
 Edit room – to rename the room, add tags or an image, change the room owner.
 Invite people – to send invitations to users or guests.
 Copy link – to copy a link to the Public or Custom room. The contents of the room accessed via this link will be available for viewing without authorization.
- More options:
-
 Save as template – to save the selected room as a template. You will be able to quickly create new rooms based on existing templates.
-
 Duplicate – to duplicate the room.
-
 Download – to download the room.
-
 Room info – to view the following information:
-
Contacts – lists the room Administration, Users, Expected users. The Contacts screen also allows you to add new members, resend invitations, change the active user permission levels or remove a user from the room.

-
History – lists recent activities in the room and allows you to filter the history by date as well as to export all the history or a custom date range.

-
Details – lists the room owner, type, content, the last modification date and who made the modification, the creation date, the tags that can be added right away, and the storage / quota information.

-
-
 Change room owner – to change the room owner.
-
 Create a group – to add the room to a new group of rooms.
 Leave the room – to leave the room. If you are the room owner, you will need to assign another owner first.
 Move to archive – to archive the room. Archived rooms can be restored or deleted.
 Delete room – to permanently delete the room. In the warning window that appears, select the I understand the consequences and want to delete the room checkbox and click the Delete permanently button.
In compact view, using the right-click menu in the Storage / Quota column next to the room name, you can perform the following actions:
- Change quota (if the default quota is enabled) – to set a custom quota per room.
- Set to default (if the default quota is enabled and changed) – to set a custom quota to the default value.
- Disable quota (if the default quota is enabled) – to disable the quota.
When a room quota is set and the limit has been exceeded, a notification banner appears in the room header to alert the room administrator.
Operations within the room
When you open a room by clicking its name in the list, you can use the top toolbar to perform the following actions:
- Return to the room list using the
 arrow.
- Create new documents, spreadsheets, presentations, PDF forms, folders using the
 Plus icon.
- Manage the room using the icon:
- Edit room – to rename the room, add tags or an image, change the room owner.
- Invite people – to send invitations to users or guests.
 Copy link – to copy a link to the Public or Custom room. The contents of the room accessed via this link will be available for viewing without authorization.
- More options:
- Save as template – to save the selected room as a template. You will be able to quickly create new rooms based on existing templates.
- Duplicate – to duplicate the room.
- Download – to download the room.
- Room info – to view the following information:
- Contacts – lists the room Administration, Users, Expected users. The Contacts screen also allows you to add new members, resend invitations, change the active user permission levels or remove a user from the room.
- History – lists recent activities in the room and allows you to filter the history by date as well as to export all the history or a custom date range.
- Details – lists the room owner, type, content, the last modification date and who made the modification, the creation date, the tags that can be added right away, and the storage / quota information.
 Export room index – to export the index for the Virtual Data Room. The
xlsxfile with a summary report on the file structure of the room will be exported to the Files section.- Change room owner – to change the room owner.
- Create a group – to add the room to a new group of rooms.
- Leave the room – to leave the room. If you are the room owner, you will need to assign another owner first.
- Move to archive – to archive the room. Archived rooms can be restored or deleted.
- Delete room – to permanently delete the room. In the warning window that appears, select the I understand the consequences and want to delete the room checkbox and click the Delete permanently button.
- Share the public room using the Share room button.
- View info about the room using the icon.
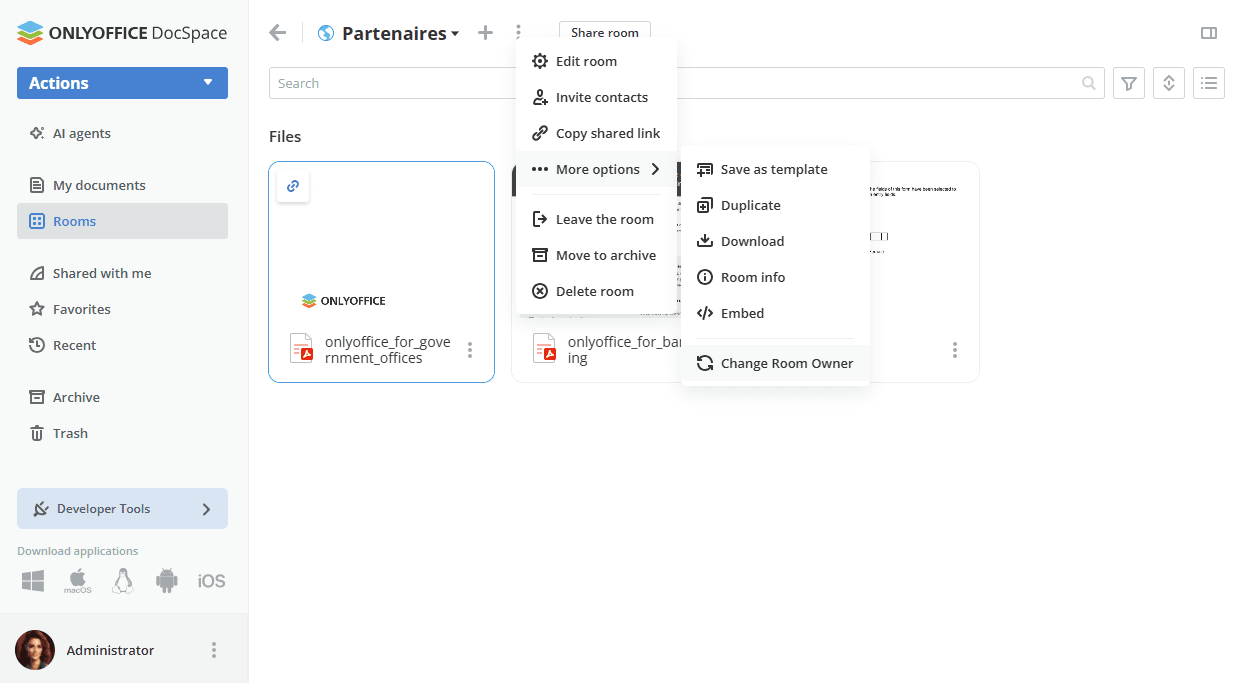
Various operations with rooms
Grouping rooms
Rooms can be organized into groups so that you can switch between them instead of scrolling through the whole list. To use the room grouping feature, first turn on the toggle in Profile -> File management.
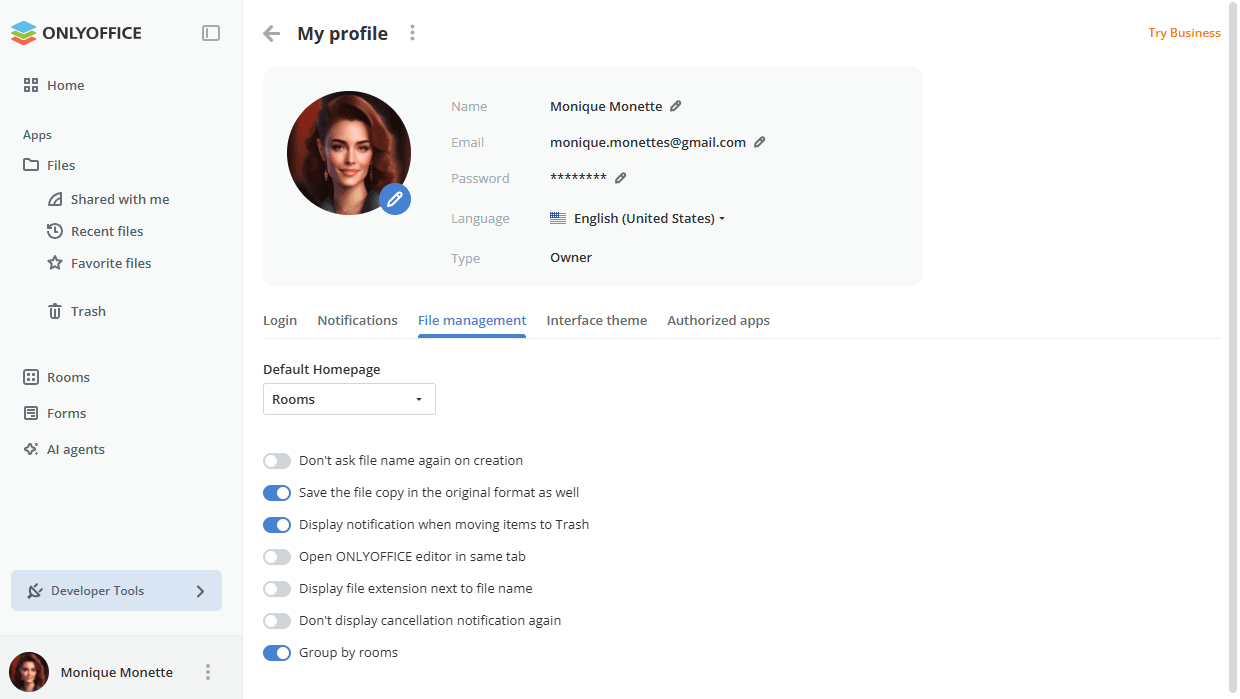
Once enabled, the  and
 items appear above the room list.
-
To create a group, use the Add group item above the room list. You can also select one or several rooms in the list and use the Create a group option on the top panel or in the room context menu. Enter the group name, and choose an icon.

-
Switch between the created groups using the corresponding items above the room list. The All rooms item displays all the rooms regardless of the group.
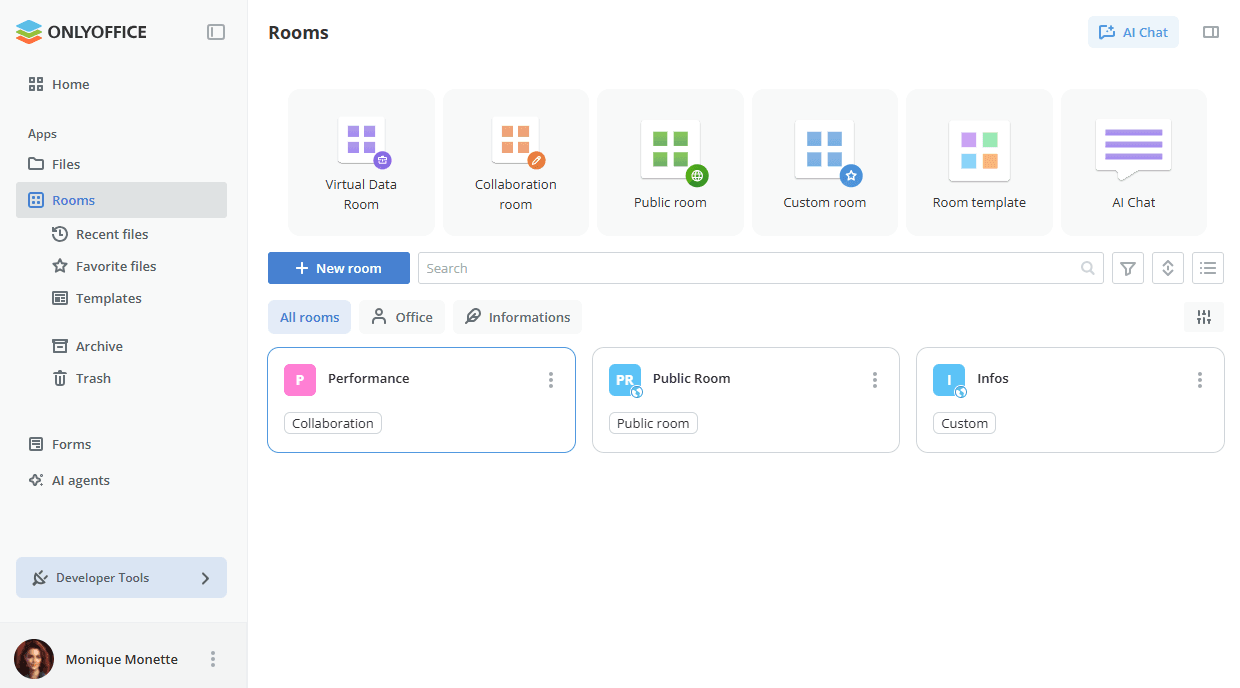
-
To manage the existing groups, use the
 Manage group of rooms icon on the left. On the Edit room groups panel you can Create a new group, edit or delete the existing groups.
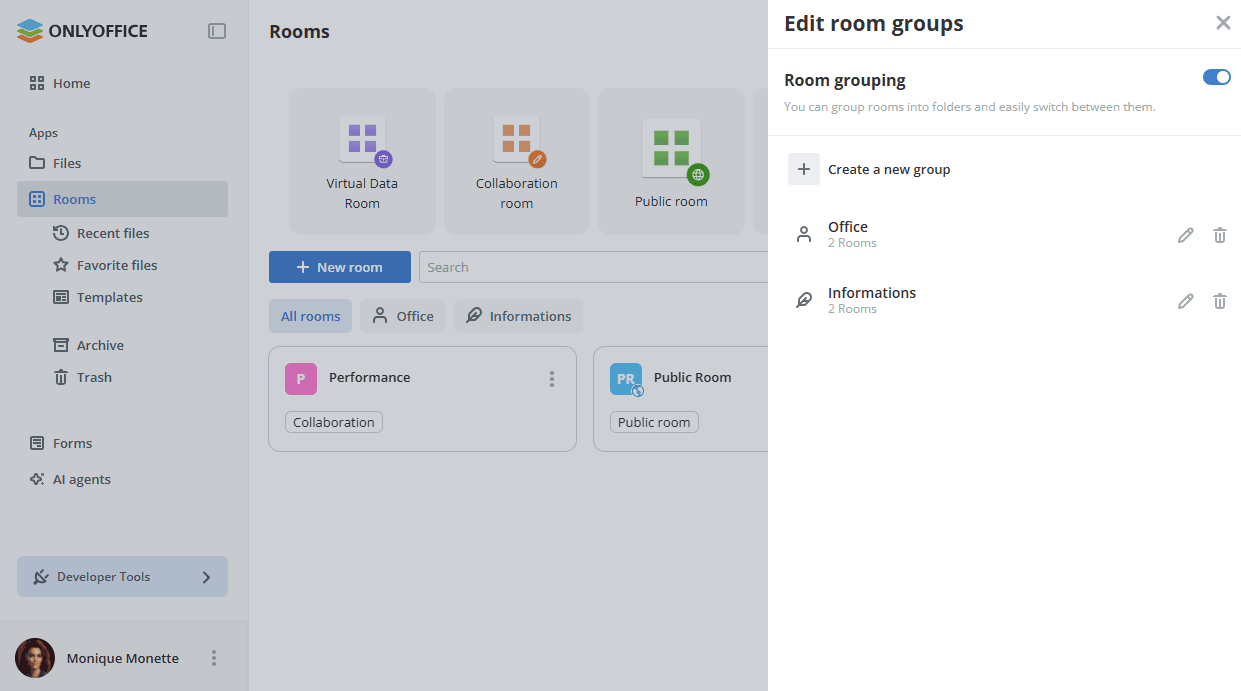
-
Turn the Room grouping toggle off to hide the groups. The created groups are saved and can be displayed again by enabling this option in your profile settings on the File management tab.
Creating room templates
Room templates allow you to quickly create new rooms with similar settings and content. It is possible to use your own templates or the ones shared with you by other administrators.
-
Use the right-click menu or the
icon next to the room name in the room list and select the More options -> Save as template option. You can also open the room and use the More options -> Save as template option in the menu within the selected room. -
Change the Template name if necessary.
-
Add Room tags. Tags will apply to the room that will be created based on this template.
-
To share the template with other administrators, click the Access settings link in the Access to template section.
Turn on the Template available to everyone toggle. In this case, all Full admins and room admins will be able to create rooms using this template.
In the Add Users or Groups section, you can choose certain administrators from the list manually. If you select a group, access will be granted only to administrators who are members of this group.
-
The Open created template option is selected by default.
-
Click the Create template button.
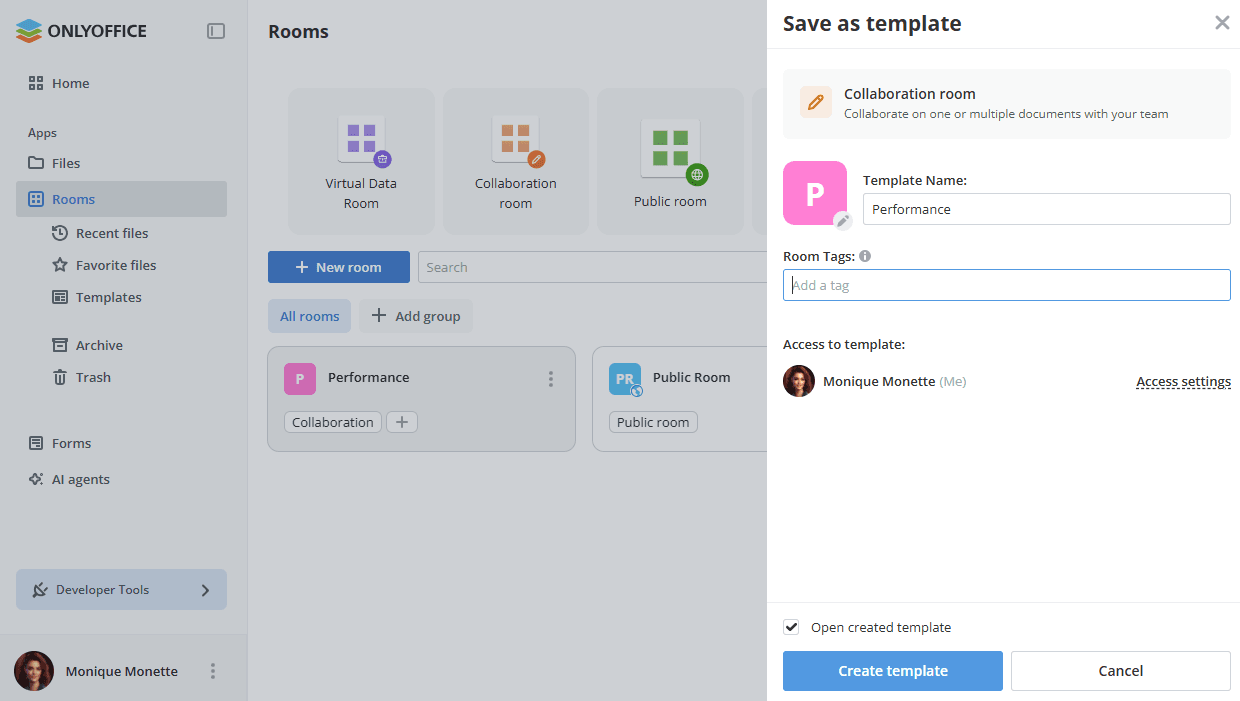
In the created template, you can change the template settings, add new files, and edit existing documents.
The created templates are available in the Rooms -> Templates section. Using the right-click menu or the icon next to the template name, you can perform the following actions:
- Select – to select the template in the list.
- Open – to open the template.
- Copy link – to copy a link to the template.
- Create room – to create a new room based on this template.
- Edit template – to change the template settings.
- Access settings – to share the template with other administrators.
- Download – to download the template.
- Room info – to view the template info.
- Delete template – to delete the template.
Creating external links for rooms
In a public or custom room, you can create several links with different parameters. The contents of the room accessed via these links will be available for viewing without authorization. For public rooms, the shared link is enabled by default. If you want to get a link for a custom room, you should create a shared link first.
To create or edit external links:
-
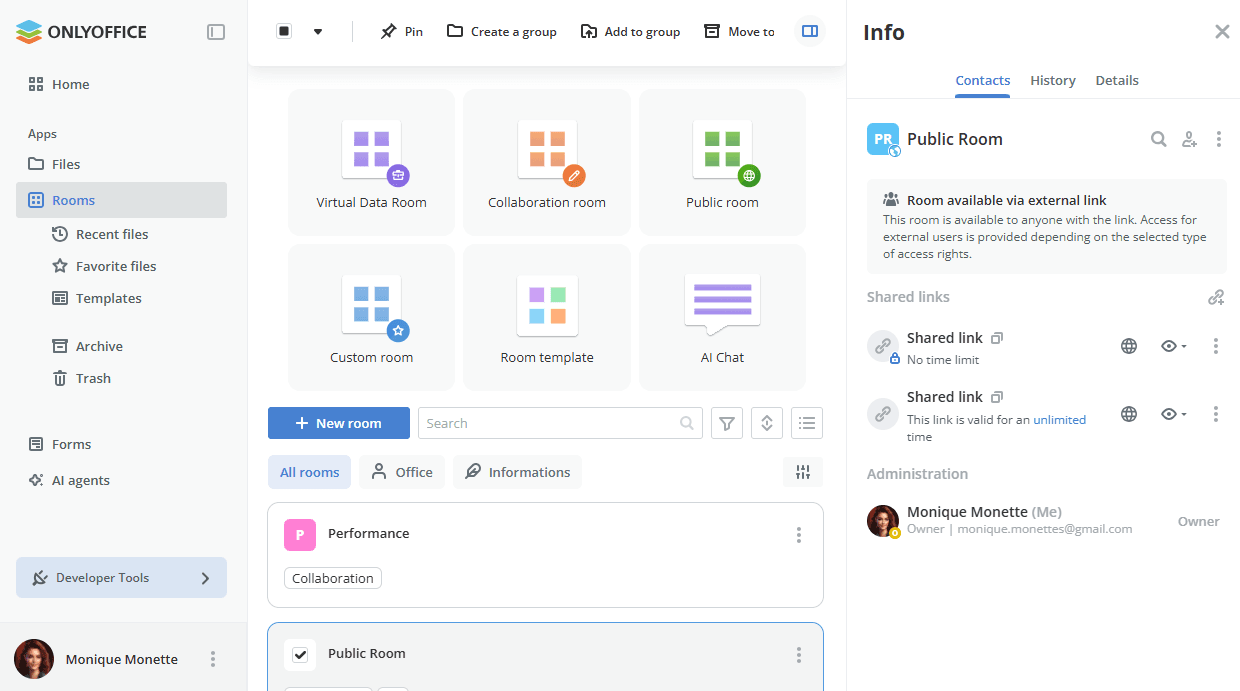
In the room menu, use the
Info item. -
Switch to the Contacts screen.
-
For a public room, proceed to the next step. For a custom room, use the Create new link option in the Shared links section.
-
Click the
icon next to the Shared link. -
Choose the Link settings option.
-
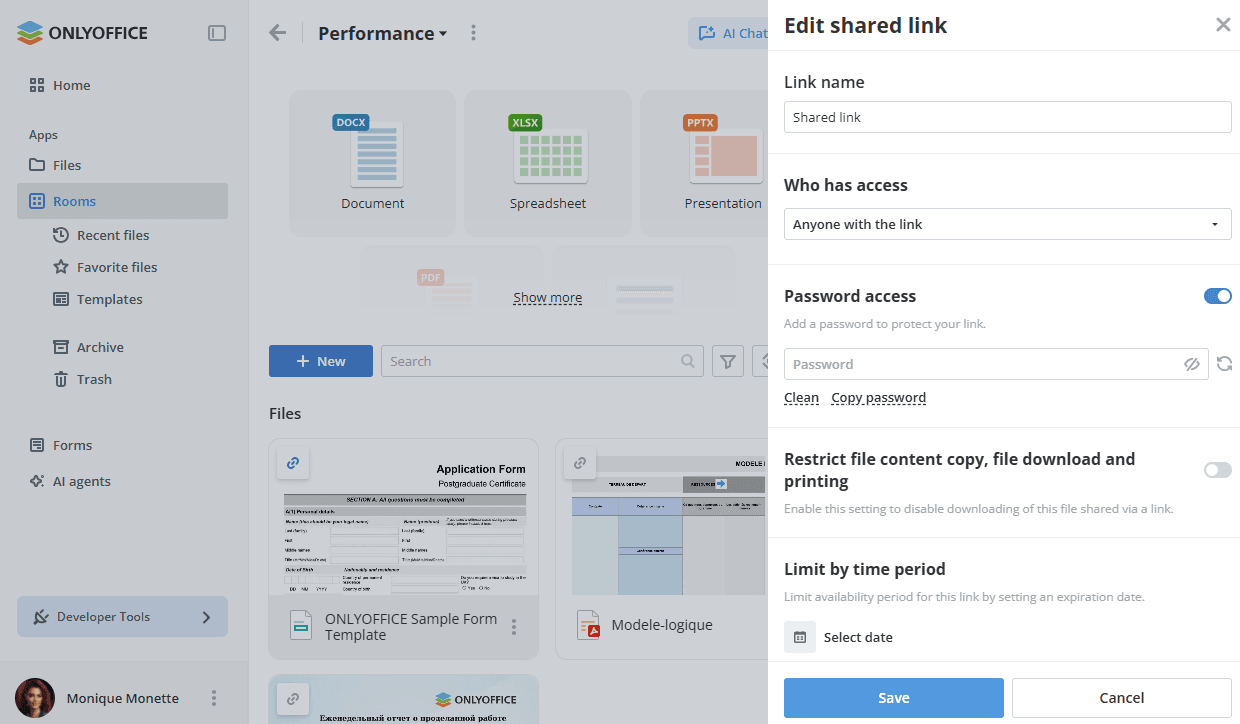
If necessary, change the Role for link in a public or custom room (Viewer, Editor, Reviewer, or Commentator).
-
Change the link name to distinguish various links.
-
In the Who has access list, select Anyone with the link or workspace users only to define who is able to open the room via this link.
-
Set a password to protect the link.
-
Turn on the Password access toggle.
-
Click the
 icon to generate a password or enter it manually into the corresponding field.note
The password must be at least 8 characters long. The following characters are allowed: a-z, A-Z, 0-9, !"#%&'()*+,-./:;<=>?@[]^_`{|}
-
To clean the password field, click the Clean button.
-
To copy the password to your clipboard for future sharing, click the Copy password button.
-
-
Turn on the Restrict file content copy, file download and printing toggle to disable downloads of files and folders from the public or custom room shared via a link.
-
To save the changes made to the shared link parameters, click the Save button.
If you need more than one link for a public or custom room, use the  Add new link icon in the Shared links section. When creating an additional link, you can:
-
Set the link name.
-
Set a password protection as described above.
-
Restrict file content copy, file download and printing.
-
Limit availability period for this link by setting an expiration date. Choose one of the predefined options (in 12 hours, in 1 day, in 7 days, Unlimited) or select Custom and set the date and time using the date picker.
-
Save the link by clicking Create.
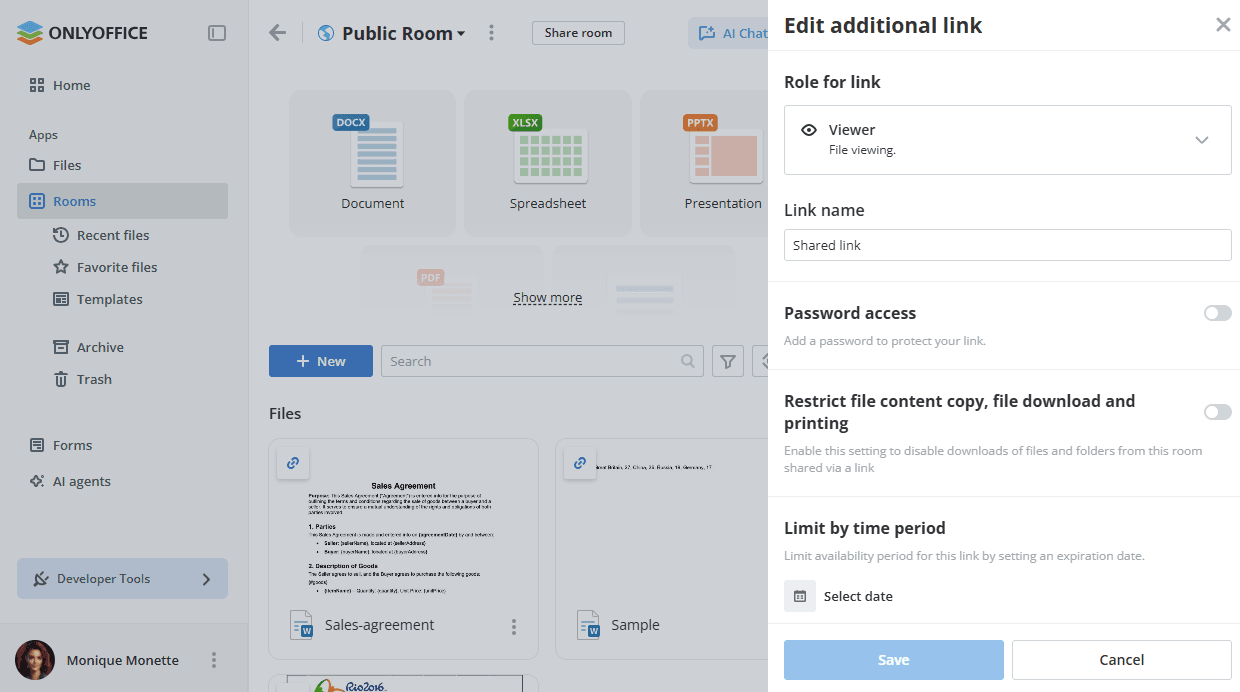
The room will be available to anyone with the link. External users will have View Only permission for all the files in a public or custom room.
In a public or custom room, you can change the default Viewer link by selecting a different permission level: Editor, Reviewer, or Commentator. To do that:
-
In the room menu, use the
Info item. -
Switch to the Contacts screen.
-
Click the
 icon next to the Shared link.
-
Choose the necessary option: Editor, Reviewer, Commentator, Viewer.
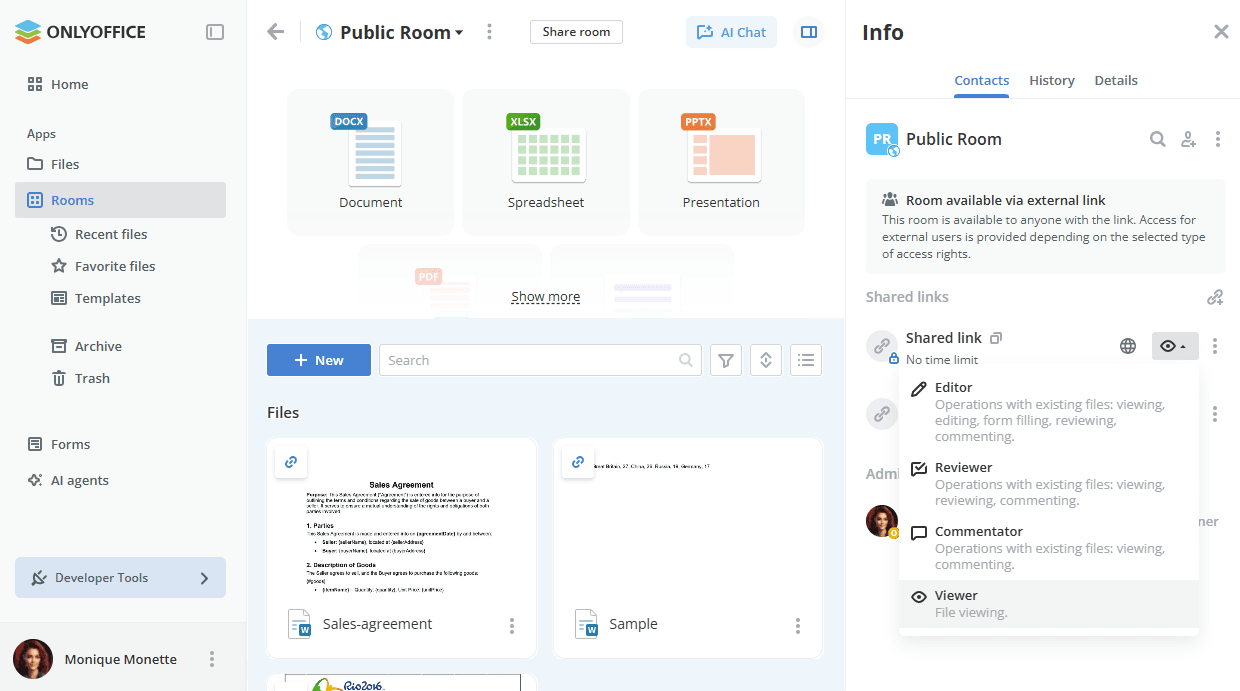
The link for the selected permission level will be copied to the clipboard.
Embedding rooms
You can embed a public or custom room available via a shared link to your website so that the room will be accessible to anyone without authorization.
Read the instructions.
If you want to embed the whole workspace into your application or find more embedding options to customize them manually (for example, select interface elements to display or embed a room of a different type), please use the Developer Tools -> Embed SDK section.
Read the instructions.