Create lists
To create a list in the Document Editor,
- place the cursor to the position where a list will be started (this can be a new line or the already entered text),
- switch to the Home tab of the top toolbar,
-
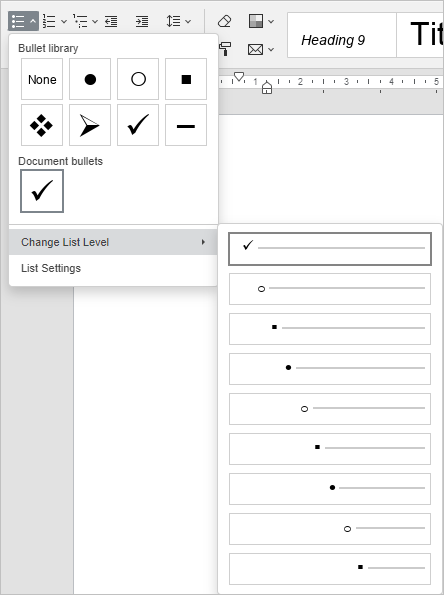
select the list type you would like to start:
- each time you press the Enter key at the end of the line, a new ordered or unordered list item will appear. To stop that, press the Backspace key and keep on typing common text paragraphs.
The program also creates numbered lists automatically when you enter digit 1 with a dot or a bracket and a space after it: 1., 1). Bulleted lists can be created automatically when you enter the -, * characters and a space after them.
You can also change the text indentation in the lists and their nesting by clicking the Multilevel list , Decrease indent , and Increase indent icons on the Home tab of the top toolbar.
To change the list level, click the Numbering , Bullets , or Multilevel list icon and choose the Change List Level option, or place the cursor at the beginning of the line and press the Tab key on a keyboard to move to the next level of the list. Proceed with the list level needed.
The additional indentation and spacing parameters can be changed on the right sidebar and in the advanced settings window. To learn more about it, read the Change paragraph indents and Set paragraph line spacing section.
Combine and separate lists
To combine a list with the previous one:
- click the first item of the second list with the right mouse button,
- use the Join to previous list option from the contextual menu.
The lists will be joined and the numbering will continue in accordance with the first list numbering.
To separate a list:
- click the list item where you want to begin a new list with the right mouse button,
- use the Separate list option from the contextual menu.
The lists will be combined, and the numbering will continue in accordance with the first list numbering.
Change numbering
To continue sequential numbering in the second list according to the previous list numbering:
- click the first item of the second list with the right mouse button,
- use the Continue numbering option from the contextual menu.
The numbering will continue in accordance with the first list numbering.
To set a certain numbering initial value:
- click the list item where you want to apply a new numbering value with the right mouse button,
- use the Set numbering value option from the contextual menu,
- in the new opened window, set the required numeric value and click the OK button.
Change the list settings
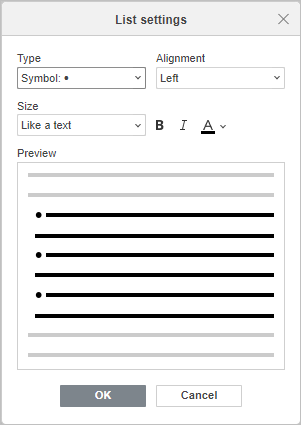
To change the bulleted or numbered list settings, such as a bullet/number type, alignment, size and color:
- click an existing list item or select the text you want to format as a list,
- click the Bullets or Numbering icon on the Home tab of the top toolbar,
- select the List Settings option,
-
the List Settings window will open. The bulleted list settings window looks like this:
The numbered list settings window looks like this:
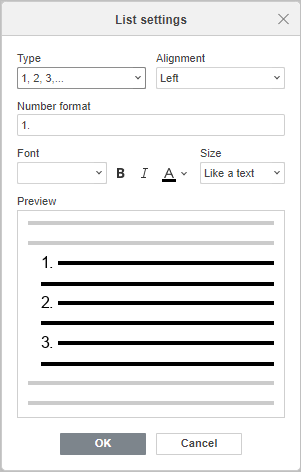
For the bulleted list, you can choose a character used as a bullet, while for the numbered list you can choose the type of numbers and the Font. The Alignment, Size and text emphasis options such as Bold/Italic/Color are the same both for the bulleted and the numbered lists.
- Bullet allows selecting the required character used for the bulleted list. When you click on the Font and Symbol field, the Symbol window will appear, and you will be able to choose one of the available characters. To learn more on how to work with symbols, please refer to this article.
- Type allows selecting the required numbering type used for the numbered list. The following options are available: None, 1, 2, 3,..., a, b, c,..., A, B, C,..., i, ii, iii,..., I, II, III,....
- Alignment allows selecting the required bullet/number alignment type that is used to align bullets/numbers horizontally. The following alignment types are available: Left, Center, Right.
- Size allows selecting the required bullet/number size. The Like a text option is selected by default. When this option is selected, the bullet or number size corresponds to the text size. You can choose one of the predefined sizes ranging from 8 to 96.
- Bold/Italic/Color allows to emphasize and to make the required bullet/number stand out. For Color, the Like a text option is selected by default. When this option is selected, the bullet or number color corresponds to the text color. You can choose the Automatic option to apply the automatic color, or select one of the Theme colors, Standard colors or Recent colors from the palette, or click More colors to select a custom color.
All the changes are displayed in the Preview field.
-
click OK to apply the changes and close the settings window.
Right-click a bulleted list and choose the Adjust list indents option to access List Settings the same as for a multilevel list.
To change the multilevel list settings,
- click a list item,
- click the Multilevel list icon on the Home tab of the top toolbar,
- select the List Settings option,
-
the List Settings window will open. The multilevel list settings window looks like this:
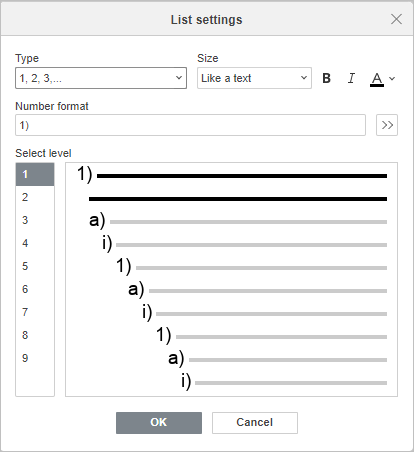
Choose the necessary level of the list in the Level field on the left, then use the buttons on the top to adjust the bullet or number appearance for the selected level:
- Type allows selecting the required numbering type used for the numbered list or the required character used for the bulleted list. The following options are available for the numbered list: None, 1, 2, 3,..., a, b, c,..., A, B, C,..., i, ii, iii,..., I, II, III,.... For the bulleted list, you can choose one of the default symbols or use the New bullet option. When you click this option, the Symbol window will appear, and you will be able to choose one of the available characters. To learn more on how to work with symbols, please refer to this article.
- Alignment allows selecting the required bullet/number alignment type that is used to align bullets/numbers horizontally at the beginning of the paragraph. The following alignment types are available: Left, Center, Right.
- Size allows selecting the required bullet/number size. The Like a text option is selected by default. You can choose one of the predefined sizes ranging from 8 to 96.
- Bold/Italic/Color allows to emphasize and to make the required bullet/number stand out. For Color, the Like a text option is selected by default. When this option is selected, the bullet or number color corresponds to the text color. You can choose the Automatic option to apply the automatic color, or select one of the Theme colors, Standard colors or Recent colors from the palette, or click More colors to select a custom color.
- Number format shows the style of the character used to create the list.
-
Click the double-headed arrow next to the Number format field to access the advanced list settings. You can customize each level of a multilevel list by choosing the level in the Select level section.

- Font allows you to select the font formatting,
- Include level number allows you to indicate the level number of the parent for a subordinate level,
- Start at allows you to select the necessary sequence number a numbered list starts from. Check the Restart list box to restart the list numbering,
- Alignment allows you to set the necessary type of alignment for each list level. Choose the Left, Center or Right option from the drop-down list and set the spacing before the list character,
- Text Indent allows you to set the spacing between the list character and the text,
- Follow number with allows you to indicate what should come after the character you have chosen as the number format. Select Tab character, Space or None from the drop-down list. When you choose to follow with a Tab character, the Add tab stop at option becomes available. Check the Add tab stop at box and specify the length of the indent.
All the changes are displayed in the Preview field.
- click OK to apply the changes and close the settings window.
Return to previous page