Collaborative Presentation Editing
Presentation Editor offers you the possibility to work at a presentation collaboratively with other users. This feature includes:
- simultaneous multi-user access to the edited presentation
- visual indication of objects that are being edited by other users
- real-time changes display or synchronization of changes with one button click
- chat to share ideas concerning particular presentation parts
- comments containing the description of a task or problem that should be solved (it's also possible to work with comments in the offline mode, without connecting to the online version)
Connecting to the online version
In the desktop editor, open the Connect to cloud option of the left-side menu in the main program window. Connect to your cloud office specifying your account login and password.
Co-editing
Presentation Editor allows to select one of the two available co-editing modes:
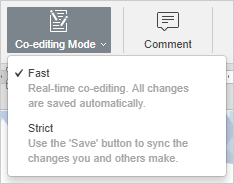
- Fast is used by default and shows the changes made by other users in real time.
- Strict is selected to hide other user changes until you click the Save icon to save your own changes and accept the changes made by others.
The mode can be selected in the Advanced Settings. It's also possible to choose the necessary mode using the Co-editing Mode icon at the Collaboration tab of the top toolbar:
Note: when you co-edit a presentation in the Fast mode, the possibility to Redo the last undone operation is not available.
When a presentation is being edited by several users simultaneously in the Strict mode, the edited objects (autoshapes, text objects, tables, images, charts) are marked with dashed lines of different colors. The object that you are editing is surrounded by the green dashed line. Red dashed lines indicate that objects are being edited by other users. By hovering the mouse cursor over one of the edited passages, the name of the user who is editing it at the moment is displayed. The Fast mode will show the actions and the names of the co-editors once they are editing the text.
The number of users who are working at the current presentation is specified on the right side of the editor header - . If you want to see who exactly are editing the file now, you can click this icon or open the Chat panel with the full list of the users.
When no users are viewing or editing the file, the icon in the editor header will look like allowing you to manage the users who have access to the file right from the document: invite new users giving them permissions to edit, read or comment the presentation, or deny some users access rights to the file. Click this icon to manage the access to the file; this can be done both when there are no other users who view or co-edit the document at the moment and when there are other users and the icon looks like . It's also possible to set access rights using the Sharing icon at the Collaboration tab of the top toolbar.
As soon as one of the users saves his/her changes by clicking the icon, the others will see a note within the status bar stating that they have updates. To save the changes you made, so that other users can view them, and get the updates saved by your co-editors, click the icon in the left upper corner of the top toolbar. The updates will be highlighted for you to check what exactly has been changed.
Chat
You can use this tool to coordinate the co-editing process on-the-fly, for example, to arrange with your collaborators about who is doing what, which paragraph you are going to edit now etc.
The chat messages are stored during one session only. To discuss the document content it is better to use comments which are stored until you decide to delete them.
To access the chat and leave a message for other users,
-
click the icon at the left sidebar, or
switch to the Collaboration tab of the top toolbar and click the Chat button,
- enter your text into the corresponding field below,
- press the Send button.
All the messages left by users will be displayed on the panel on the left. If there are new messages you haven't read yet, the chat icon will look like this - .
To close the panel with chat messages, click the icon at the left sidebar or the Chat button at the top toolbar once again.
Comments
It's possible to work with comments in the offline mode, without connecting to the online version.
To leave a comment to a certain object (text box, shape etc.):
- select an object where you think there is an error or problem,
- switch to the Insert or Collaboration tab of the top toolbar and click the Comment button, or
right-click the selected object and select the Add Сomment option from the menu,
- enter the needed text,
- click the Add Comment/Add button.
The object you commented will be marked with the icon. To view the comment, just click on this icon.
To add a comment to a certain slide, select the slide and use the Comment button at the Insert or Collaboration tab of the top toolbar. The added comment will be displayed in the upper left corner of the slide.
To create a presentation-level comment which is not related to a certain object or slide, click the icon at the left sidebar to open the Comments panel and use the Add Comment to Document link. The presentation-level comments can be viewed at the Comments panel. Comments related to objects and slides are also available here.
Any other user can answer to the added comment asking questions or reporting on the work he/she has done. For this purpose, click the Add Reply link situated under the comment, type in your reply text in the entry field and press the Reply button.
If you are using the Strict co-editing mode, new comments added by other users will become visible only after you click the icon in the left upper corner of the top toolbar.
You can manage the added comments using the icons in the comment balloon or at the Comments panel on the left:
- edit the currently selected by clicking the icon,
- delete the currently selected by clicking the icon,
- close the currently selected discussion by clicking the icon if the task or problem you stated in your comment was solved, after that the discussion you opened with your comment gets the resolved status. To open it again, click the icon.
Adding mentions
When entering comments, you can use the mentions feature that allows to attract somebody's attention to the comment and send a notification to the mentioned user via email and Talk.
To add a mention enter the "+" or "@" sign anywhere in the comment text - a list of the portal users will open. To simplify the search process, you can start typing a name in the comment field - the user list will change as you type. Select the necessary person from the list. If the file has not yet been shared with the mentioned user, the Sharing Settings window will open. Read only access type is selected by default. Change it if necessary and click OK.
The mentioned user will receive an email notification that he/she has been mentioned in a comment. If the file has been shared, the user will also receive a corresponding notification.
To remove comments,
- click the Remove button at the Collaboration tab of the top toolbar,
-
select the necessary option from the menu:
- Remove Current Comments - to remove the currently selected comment. If some replies have beed added to the comment, all its replies will be removed as well.
- Remove My Comments - to remove comments you added without removing comments added by other users. If some replies have beed added to your comment, all its replies will be removed as well.
- Remove All Comments - to remove all the comments in the presentation that you and other users added.
To close the panel with comments, click the icon at the left sidebar once again.
Alla pagina precedente