Open existing files
Tap the necessary file name in the file list. The file will be opened in the editing mode if you have corresponding permissions.
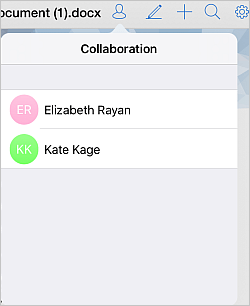
Collaborative editing
Currently, the Fast co-editing mode is only available that allows you to immediately view the changes made by your co-authors. The actions and the names of the co-editors appear in the document once they are editing the text.

When several users are editing the same file simultaneously, you can tap the  icon in the right part of the top toolbar to view the list of users who are editing the file at the moment.
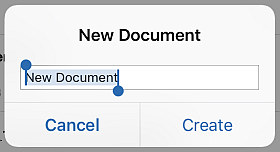
Create new files
Tap the
 icon in the upper right corner, select the Document, Spreadsheet or Presentation option from the menu, enter the file name in the dialog window that appears and press the Create button.
Note: with the 3D Touch support, you can quickly create new documents, spreadsheets and presentations without opening the application. Just press the icon on the main screen and select the necessary option from the quick actions menu that appears.
A new blank .docx document, or .xlsx spreadsheet, or .pptx presentation will be opened. Tap an empty space/cell/text placeholder within it and the keyboard will appear allowing you to start typing.
To save the changes you made in the file, tap the
 icon in the left corner of the top toolbar and tap the Save option in the dialog window that appears.
Create new folders
Tap the
icon in the upper right corner, select the New Folder option from the menu, enter the folder name in the dialog window that appears and press the Create button.
Add image files
Tap the
icon in the upper right corner and select one of the options:
- Load Image - to add an existing image file from your device media library to the Documents app,
- Take a Picture - to take a new photo using your device camera and save it in the Documents app.
Connect third-party storages to your ONLYOFFICE cloud
In addition to adding third-party clouds within the  Clouds application section, you can connect a third-party services within your ONLYOFFICE cloud.
In the  ONLYOFFICE application section, tap the
icon in the upper right corner and select the Connect Storage option from the menu. The Connecting account window will open.
ONLYOFFICE application section, tap the
icon in the upper right corner and select the Connect Storage option from the menu. The Connecting account window will open.
- select the necessary service from the available ones: Google Drive, OneDrive, Dropbox, Box, SharePoint, OneDrive for Business, Yandex.Disk, Nextcloud, ownCloud, or Other account which supports WebDAV protocol.
- sign in to your third-party account using your Login and Password.
When connecting your SharePoint, ownCloud/Nextcloud or Other account which supports WebDAV protocol, you'll also need to specify the Server address. For example, the URL that allows to access your Nextcloud files via WebDAV looks like this: https://yourdomain.com/remote.php/webdav/. This URL address can be found in the following way: sign in to your Nextcloud account, click the Settings icon in the lower left corner and copy the entire URL from the WebDAV field. Then switch to the ONLYOFFICE Documents app and paste the entire copied URL address, including the protocol, into the Server field.
Note: in some cases, you will also need to allow ONLYOFFICE to access your third-party account tapping the corresponding button.
- change the Folder title, if necessary,
- press the Connect button.
The third-party storage folder will be added to your ONLYOFFICE cloud. You can use the folder menu to Rename, Copy, Share or Disconnect third party folder.