Open existing files for viewing
Tap the  icon to the right of the necessary document in the file list and select the Preview menu item.
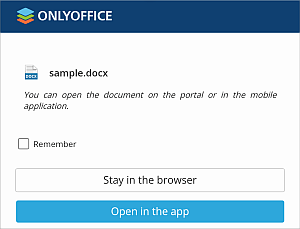
Choose the way you want to open the document: in the mobile web browser or in the mobile app (ONLYOFFICE Documents).
In the viewing mode, you can use the  Settings icon at the top toolbar to open the file settings panel and perform the following actions:
For the DOCX files, you can also switch between the Mobile view that helps you view documents on your mobile device more comfortably and the Standard view. By default, documents open in the Mobile view (if you switch to the Standard view, the next time documents will open in the Standard view). To switch to the Standard view, tap the  icon in the upper right corner. To return to the Mobile view, tap the
  icon in the upper right corner.
To close the file, tap the  Back arrow in the upper left corner.
You can also view media files and images stored on the portal in the most popular formats, including mp4, webm, bmp, jpg, jpeg, png, etc.
Open existing files for editing
To open the file for editing from the file list:
- touch the icon to the right of the necessary document in the file list.
- select the Edit menu item.
- choose the way you want to open the document: in the mobile web browser or in the mobile app (ONLYOFFICE Documents).
- for the text documents, tap the
 icon in the lower right corner of the opened document.
If the file format differs from the DOCX/XLSX/PPTX one, the file will be converted to the Office Open XML format for faster viewing and editing. The converted copy of the file will be opened.
If the file is currently being edited by another user, you'll be able to edit the file collaboratively in real time.
For the DOCX files, you can also switch between the Mobile view that helps you edit documents on your mobile device more comfortably and the Standard view. By default, documents open in the Mobile view (if you switch to the Standard view, the next time documents will open in the Standard view). To switch to the Standard view, tap the icon in the upper right corner. To return to the Mobile view, tap the icon in the upper right corner. In the editing mode, you can also switch between these views using the Mobile View switcher in the document Settings.
Create new files
Tap the Create button in the upper left corner and select one of the options from the menu:
- Document,
- Spreadsheet,
- Presentation,
- Form template to create a new .docxf file which allows editing text and working with form fields. Choose one of the options:
- From blank to create an empty .docxf file.
- From text document to create a .docxf file on the base of an existing .docx document. Select the necessary file stored on your portal and click Create.
Enter the file name in the entry field that appears and tap the  icon on the right:

A new blank .docx document, or .xlsx spreadsheet, or .pptx presentation, or .docxf form template will be opened. Tap an empty space in the document/form template, or a cell within the spreadsheet, or a text placeholder in the presentation and the keyboard will appear allowing you to start typing.
All the changes you made in the file are saved automatically.
Create new folders
Tap the Create button in the upper left corner and select the Folder option from the menu, enter the folder name in the entry field that appears and tap the icon on the right.
Upload files from your device
Tap the  Upload file button in the upper left corner to add an existing file stored on your device into the Documents module.
Connect third-party storages
Tap the
Add account item at the left sidebar. The Connecting account window will open.
- select the necessary service from the available ones: Google Drive, OneDrive, Dropbox, Box, SharePoint, OneDrive for Business, Yandex.Disk, Nextcloud, ownCloud, or Other account which supports WebDAV protocol.
- sign in to your third-party account using your Login and Password.
When connecting your SharePoint, ownCloud/Nextcloud or Other account which supports WebDAV protocol, you'll also need to specify the Server address. For example, the URL that allows to access your Nextcloud files via WebDAV looks like this: https://yourdomain.com/remote.php/webdav/. This URL address can be found in the following way: sign in to your Nextcloud account, click the Settings icon in the lower left corner and copy the entire URL from the WebDAV field. Then switch to the ONLYOFFICE mobile web version and paste the entire copied URL address, including the protocol, into the Server field.
Note: in some cases, you will also need to allow ONLYOFFICE to access your third-party account tapping the corresponding button.
- change the Folder title, if necessary,
- press the Connect button.
The third-party storage folder will be added. You can use the folder menu to Rename, Copy, Share or Disconnect third party folder.